Introduction
Text classification is the task of assigning a label or category to a piece of text based on its content and meaning. We’ve done several tutorials on Python text classification because it’s so helpful. It can be used for a variety of applications, like sentiment analysis, spam detection, topic modeling, and document summarization.
In one of our previous tutorials, we explained how to fine-tune the BERT model for sentiment analysis. You can use that same approach to fine-tune your text classification models. However, with ChatGPT, you don’t really even have to train anything to achieve excellent classification performance.
In this tutorial, we’ll use ChatGPT to classify ham and spam messages, which is a standard text classification problem. We’ll use a dataset of ham and spam messages from Kaggle and we’ll use the OpenAI API to send the messages to ChatGPT and receive the classification labels. If you want to create your own machine learning model for spam detection, we have a tutorial for that, too.
This tutorial is intended for readers who have some basic Python knowledge and are interested in learning how to use ChatGPT for text classification. The article will cover the following topics:
- How to set up the OpenAI API key.
- How to create a Python script to send and receive requests to the OpenAI API.
- How to use ChatGPT to classify ham and spam messages using a simple prompt.
- How to measure the accuracy of ChatGPT on the text classification task.
By the end of this tutorial, you will better understand how to use ChatGPT for text classification and we hope you’ll be able to apply the same technique to other text classification problems. Let’s get started!
Importing and Preprocessing the dataset
For this tutorial, we’ll use a dataset of ham and spam messages from Kaggle. The dataset contains 5,572 messages labeled as either ham or spam. The dataset is in CSV format, and it has five columns: v1, v2, Unnamed: 2, Unnamed: 3, and Unnamed: 4. The v1 column contains the label, and the v2 column contains the message. The other columns are mostly empty and not relevant to this task. If you’re using Google Colab, you can import your kaggle datasets directly using Google Drive.
Before importing the dataset, let’s install the OpenAI library and import the required libraries into our application.
The following script installs the OpenAI library.
pip install openaiThe script below imports the libraries required to execute scripts in this tutorial.
import pandas as pd
import openai
from tqdm import tqdm
from sklearn.metrics import accuracy_score, classification_report
You’ve probably heard of most of these, but if you’re curious, tqdm lets us make a progress bar for our code.
You can use the pd.read_csv function to load the dataset from the CSV file. The following script imports the dataset into a Pandas DataFrame and prints its shape and header.
##Download the dataset here:
##https://www.kaggle.com/datasets/uciml/sms-spam-collection-dataset?select=spam.csv

dataset = pd.read_csv(r"D:\Datasets\spam.csv", encoding = "latin")
print(dataset.shape)
dataset.head()
Output:
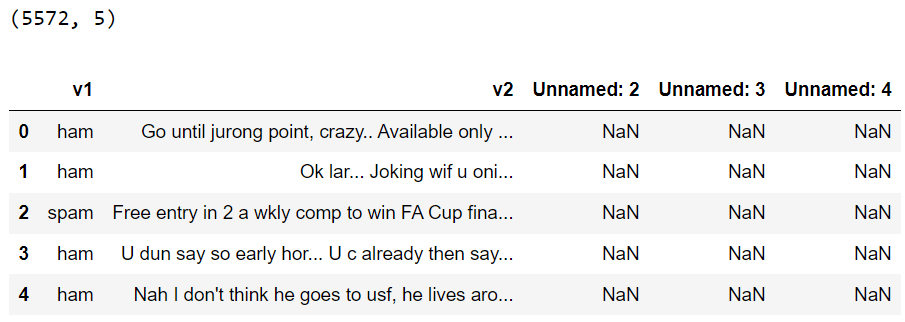
We’re only going to select the v1 and v2 columns to simplify the dataset. We’ll also limit the number of rows to 100, so the processing time is faster. Also, remember it costs to make an API call to the OpenAI API. Classifying a large number of records can be expensive so it’s in our best interest to limit the number of calls we make.
dataset = dataset[["v1","v2"]].head(100)
print(dataset.shape)
dataset.head()
Output:
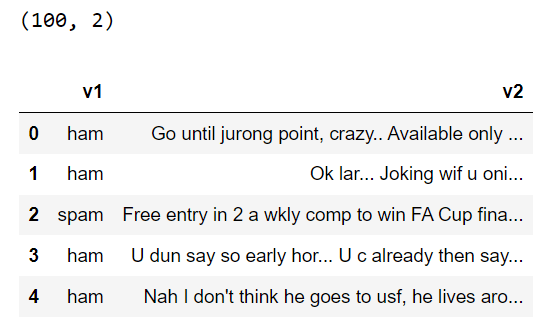
As you can see, the new DataFrame has 100 rows and two columns. You can also see the labels and the messages in the v1 and v2 columns, respectively. We’ll use this dataset to classify ham and spam messages using ChatGPT.
Text Classification Using ChatGPT
Let’s now see how to perform text classification with ChatGPT. We’ll first demonstrate how to classify a single message as ham and spam, then we’ll classify the full dataset.
Setting Up Your OpenAI API Key
To use ChatGPT, you need to have an OpenAI API key, which you can get by signing up for an OpenAI account.
Once you have your API key, you can store it in a variable called openai.api_key in your Python script. This will allow you to call the OpenAI API using the OpenAI API.
openai.api_key = "YOUR_API_KEY_HERE"Making Calls to the OpenAI API
To use ChatGPT for text classification, you need to create a prompt that tells ChatGPT what you want it to do. A prompt is a text input that guides ChatGPT to generate a text output.
For example, if you want ChatGPT to classify a message as ham or spam, you can use a prompt like this:
message  = dataset["v2"].iloc[2]

prompt = f"""Classify the following sms message as ham or spam. Also return the probability of it being spam.
Message: '{message}'.
The output should only contain two words: ham or spam, and the probability with two decimal points.
"""

print(prompt)

response = openai.ChatCompletion.create(
  model="gpt-3.5-turbo",
  temperature = 0.0,
  messages=[
        {"role": "user", "content": prompt}
    ]
)

print("=============================")
print(response)
The prompt in the above script tells ChatGPT to classify the message as ham or spam and to return the probability of it being spam. The message here is the 3rd record in the dataset, which is marked as spam. The prompt also specifies the output format, which should contain the word “ham” or “spam” and a probability. You can customize the prompt according to your needs and preferences.
To send the prompt to ChatGPT and receive the output, you need to use the openai.ChatCompletion.create method, as shown in the previous script. The method takes the following parameters:
-
model: The name of the model you want to use. In this case, we will use gpt-3.5-turbo, previously used as a backend for ChatGPT. You can find the details of all OpenAI models from the official documentation.
-
temperature: The degree of randomness in the output. A lower temperature means more deterministic and consistent output, while a higher temperature means more diverse and creative output. In this case, we will use a temperature of 0.0, which means no randomness.
-
messages: A list of messages that form the conversation between the user and ChatGPT. Each message is a dictionary that contains two keys:
roleandcontent. Therolecan be either user or bot; thecontentis the message’s text. In this case, we will only have one message, which is the prompt from the user.
The response is a JSON object containing various output information, such as the id, object, created, model, choices, and messages.
Output:
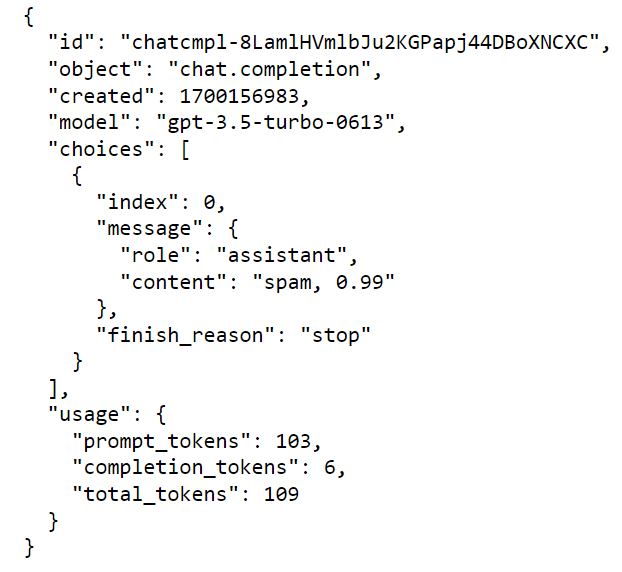
The most important part of the response is the choices list, which contains the user’s and ChatGPT’s messages. The last message in the list is the output from ChatGPT, which you can access by using response["choices"][-1]["message"]["content"].
Here is an example of the output from ChatGPT for the message we used:
print(response["choices"][-1]["message"]["content"])Output:
spam, 0.99As you can see, ChatGPT correctly classified the message as spam and returned the probability of it being spam as 0.99. You can also see that ChatGPT followed the output format we specified in the prompt.
Ham and Spam Classification for a Complete Dataset
Now that you know how to use ChatGPT to classify a single message, you can use it to classify the entire dataset of ham and spam messages.
To do this, you can loop through the dataset and send each message to ChatGPT using the same prompt.
You also need to store the output from ChatGPT in a list to compare it with the actual labels later.
The classify_text() method in the following script implements this functionality.
def classify_text(dataset):

    i = 0
    predictions = []
    while i < dataset.shape[0]:

        try:

            message = dataset["v2"].iloc[i]
            prompt = f"""Classify the following sms message as ham or spam. Also return the probability of it being spam.
            Message: '{message}'.
            The output should only contain two words: ham or spam, and the probability with two decimal points.
            """

            response = openai.ChatCompletion.create(
              model="gpt-3.5-turbo",
              temperature = 0.0,
              messages=[
                    {"role": "user", "content": prompt}
                ]
            )

            response =  response["choices"][0]["message"]["content"].split(",")
            predictions.append(response)

            i = i + 1
            print(f"Total messages processed: {i}")

        except:

            print("error occured, waiting to connect again ...")


    return predictions
Let’s pass our dataset to the classify_text() method to see what predictions we get.
predictions = classify_text(dataset)
predictions
Output:
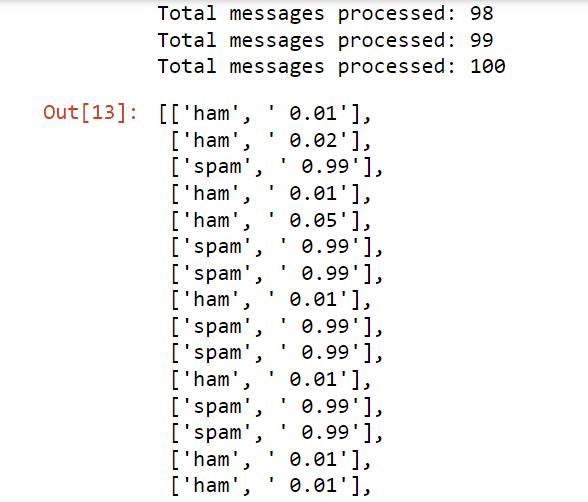
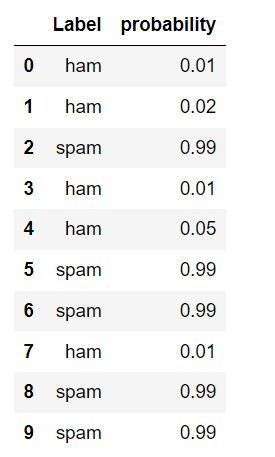
The following script creates a DataFrame containing prediction labels and probabilities of predictions being spam.
pred_df = pd.DataFrame(predictions, columns=['Label', 'probability'])
pred_df.head(10)
Output:
Measuring ChatGPT Classification Performance
To measure the accuracy of ChatGPT on the text classification task, you need to compare the predictions with the actual labels in the dataset.
We will use accuracy_score and classification_report metrics from the sklearn.metrics module. These metrics accept the predictions and target labels in integer format. The following script converts predictions and target labels for our dataset to a binary format with 0s and 1s.
pred_df['Label'] = pred_df['Label'].map({'ham': 0, 'spam': 1})
dataset['v1'] = dataset['v1'].map({'ham': 0, 'spam': 1})
The following script measures the accuracy and prints the classification report for ChatGPT predictions.
print(classification_report(pred_df['Label'].values, dataset['v1'].values))
print(accuracy_score(pred_df['Label'].values, dataset['v1'].values))
Output:
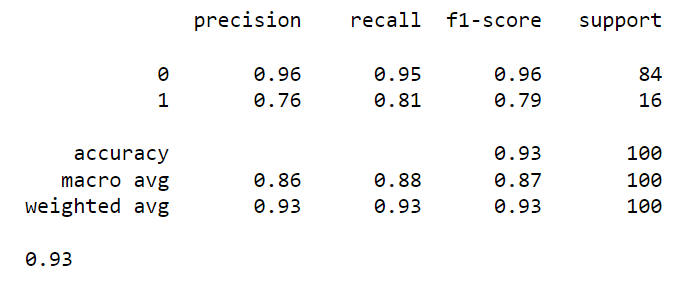
As you can see, ChatGPT achieved an overall accuracy of 93% for ham and spam message classification in our dataset, which is very impressive, given that we did not perform any training or fine-tuning.
Conclusion
In this tutorial, we showed you how to use ChatGPT for text classification, using ham and spam messages as examples. You saw how to set up your OpenAI API key, create a prompt for ChatGPT, send and receive requests to the OpenAI API, and measure the accuracy of ChatGPT on the text classification task.
You can use the same technique to use ChatGPT for other text classification problems, such as sentiment analysis, topic modeling, document summarization, and more. You just need to change the prompt and the dataset according to your needs and preferences and be mindful of the cost.
