BERT (Bidirectional Encoder Representations from Transformers) and its variants have consistently demonstrated outstanding performance across a spectrum of Natural Language Processing (NLP) benchmark tasks, such as text summarization, generation, translation, and classification. In this tutorial, we’ll delve into the intricate process of fine-tuning a pre-trained BERT model, sourced from Hugging Face, using PyTorch. To illustrate this, we’ll walk through the development of a sentiment analysis model, showcasing the step-by-step fine-tuning of a BERT model. If you’re used to TensorFlow instead of PyTorch, we have a separate tutorial about fine-tuning a Hugging Face model in TensorFlow Keras.
By the end of this tutorial, you will have acquired a comprehensive understanding of fine-tuning a BERT model from Hugging Face using PyTorch, enabling you to perform text classification with precision. Here we go!
Installing and Importing Required Libraries
The first step as always is to install and import the required libraries.
The following script installs the Hugging Face transformers library that allows you to import transformer models from Hugging Face. In addition, we’ll install the accelerate library, which is a Python package developed by Hugging Face. It is designed to simplify the process of running training scripts in a distributed environment.
! pip install accelerate -U
! pip install datasets transformers[sentencepiece]
In the next step, we will import the necessary libraries. If you are using Google Colab, like me, there’s no need to install these libraries separately. You can directly import them into your environment.
import pandas as pd
import numpy as np
import torch
import torch.nn as nn
from torch.utils.data import Dataset, DataLoader
from transformers import BertTokenizer, BertModel, AdamW
from sklearn.model_selection import train_test_split
from sklearn.metrics import classification_report, confusion_matrix, accuracy_score
Code More, Distract Less: Support Our Ad-Free Site
You might have noticed we removed ads from our site - we hope this enhances your learning experience. To help sustain this, please take a look at our Python Developer Kit and our comprehensive cheat sheets. Each purchase directly supports this site, ensuring we can continue to offer you quality, distraction-free tutorials.
Importing and Preprocessing the Dataset
We will fine-tune the BERT model for sentiment classification of airline review tweets. You can download the “Tweets.csv” file containing the dataset from Kaggle or follow our Kaggle to Colab tutorial to import it directly from your Colab notebook.
Import the Tweets.csv file into a Pandas DataFrame using the following script.
dataset = pd.read_csv("/content/Tweets.csv")
dataset = dataset.filter(["text", "airline_sentiment"])
print("==============================================")
print(f'The shape of the dataset is: {dataset.shape}')
print("==============================================")
print(f'The number of sentiments in each category is:\n{dataset.airline_sentiment.value_counts()}')
print("==============================================")
dataset.head()
Output:

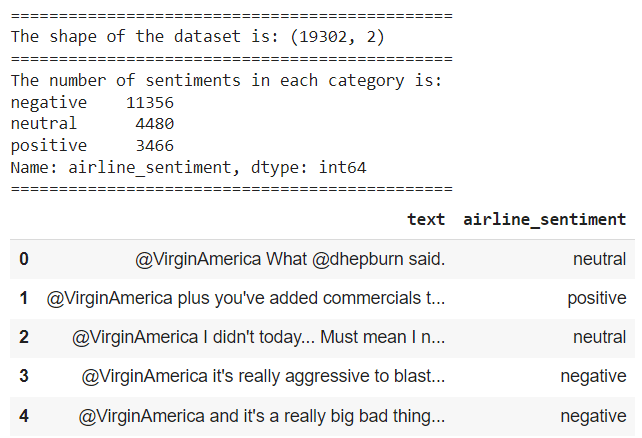
You can see that the dataset consists of 19302 rows and two columns. Datasets on Kaggle do change periodically, so you may so more or fewer rows. The text column contains text tweets featuring airline reviews, and the airline_sentiment column contains the corresponding sentiment labels i.e. positive, negative, or neutral.
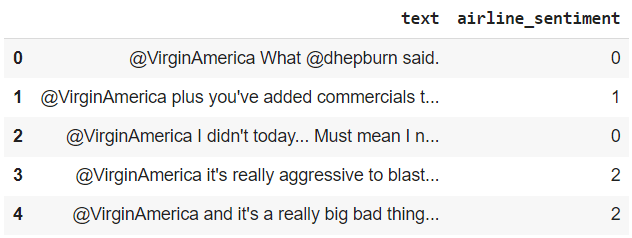
The sentiment labels are currently in string format. To train our sentiment analysis model effectively, we’ll need to convert them into integer values. The following script maps string labels to corresponding integer values.
sentiment_mapping = {
    'positive': 1,
    'neutral': 0,
    'negative': 2
}

dataset['airline_sentiment'] = dataset['airline_sentiment'].replace(sentiment_mapping)
dataset.head()
Output:

The output shows that the sentiment labels are now in integer format.
Next, we will split our dataset into train and test sets. The sentiment classification model will be trained on the train set and its performance will be evaluated on the test set. The data is divided into an 80% training set and a 20% testing set.
dataset = dataset.sample(frac=1, random_state=42)

train_data, test_data = train_test_split(dataset, test_size=0.2, random_state=42)

print("Train set shape:", train_data.shape)
print("Test set shape:", test_data.shape)
Output:
Train set shape: (15441, 2)
Test set shape: (3861, 2)
Create a PyTorch Dataset
While not mandatory, converting your datasets to the PyTorch dataset format is advisable as it enables efficient model training with data batches. The script below introduces the AirlineReviewsDataset class, which inherits from the PyTorch Dataset class. This class fulfills two key tasks:
- Utilizing a BERT tokenizer (defined later in the script), it tokenizes airline reviews in our dataset, returning input IDs and attention masks required by BERT model to generate text representations.
- It returns the corresponding labels for the input airline reviews.
class AirlineReviewsDataset(Dataset):
    def __init__(self, data, tokenizer):
        self.data = data
        self.tokenizer = tokenizer
        self.max_length = 256

    def __len__(self):
        return len(self.data)

    def __getitem__(self, index):
        text = self.data.iloc[index]['text']
        labels = self.data.iloc[index][['airline_sentiment']].values.astype(int)
        encoding = self.tokenizer(text, return_tensors='pt', padding=True, truncation=True, max_length=self.max_length)
        input_ids = encoding['input_ids'][0]
        attention_mask = encoding['attention_mask'][0]
        # resize the tensors to the same size
        input_ids = nn.functional.pad(input_ids, (0, self.max_length - input_ids.shape[0]), value=0)
        attention_mask = nn.functional.pad(attention_mask, (0, self.max_length - attention_mask.shape[0]), value=0)
        return input_ids, attention_mask, torch.tensor(labels)
The script provided below defines the BERT tokenizer and converts our train and test Pandas DataFrames into PyTorch datasets. This tokenizer processes the input data into a format compatible with bert-base-uncased. Feel free to use a different BERT model if you prefer; the fundamental concept remains unchanged.
model_checkpoint = 'bert-base-uncased'
tokenizer = BertTokenizer.from_pretrained(model_checkpoint)
device = torch.device('cuda' if torch.cuda.is_available() else 'cpu')

train_dataset = AirlineReviewsDataset(train_data, tokenizer)
test_dataset = AirlineReviewsDataset(test_data, tokenizer)
Next, we will employ the PyTorch DataLoader class to transform our PyTorch datasets into iterable objects that can be processed in batches. We set the batch size to 32. The batch size can be adjusted based on the available system RAM; you have the flexibility to increase or decrease it as needed.
batch_size = 32
train_loader = DataLoader(train_dataset, batch_size=batch_size, shuffle=True)
test_loader = DataLoader(test_dataset, batch_size=batch_size, shuffle=False)
Code More, Distract Less: Support Our Ad-Free Site
You might have noticed we removed ads from our site - we hope this enhances your learning experience. To help sustain this, please take a look at our Python Developer Kit and our comprehensive cheat sheets. Each purchase directly supports this site, ensuring we can continue to offer you quality, distraction-free tutorials.
Creating a PyTorch Model
We are now ready to construct a PyTorch model for fine-tuning BERT. To achieve this, we create a BertClassifier class that takes the number of output labels as a constructor parameter. Inside the class, we initialize the BERT model using the from_pretrained() method. Subsequently, we define three hidden linear layers with sizes 300, 100, 50, and an output layer with a size of 3. The final layer consists of 3 units, corresponding to the three distinct output labels present in our dataset.
In the forward() method, the input is initially fed into the BERT model. The output from the BERT model is then processed through the hidden layers, resulting in three values in the output.
class BertClassifier(nn.Module):
    def __init__(self, num_labels):
        super(BertClassifier, self).__init__()
        self.bert = BertModel.from_pretrained(model_checkpoint)
        self.classifier = nn.Sequential(
            nn.Linear(self.bert.config.hidden_size, 300),
            nn.ReLU(),
            nn.Linear(300, 100),
            nn.ReLU(),
            nn.Linear(100, 50),
            nn.ReLU(),
            nn.Linear(50, num_labels)

        )

    def forward(self, input_ids, attention_mask):
        outputs = self.bert(input_ids=input_ids, attention_mask=attention_mask)
        x = outputs['last_hidden_state'][:, 0, :]
        x = self.classifier(x)
        return x
Training the model
Now that our model is constructed, it’s time to train it. To accomplish this, we must specify the number of epochs, the loss function, and the criterion. For this multi-class classification task, we utilize the commonly used cross-entropy loss function. Additionally, we employ the
num_labels = 3
model = BertClassifier(num_labels).to(device)
criterion = nn.CrossEntropyLoss()
optimizer = torch.optim.Adam(model.parameters(), lr = 2e-5)

num_epochs = 3
n_total_steps = len(train_loader)
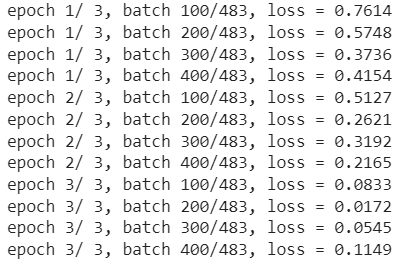
The following script trains the model and prints training loss for every 100th batch.
for epoch in range(num_epochs):

  for i, batch in enumerate (train_loader):

    input_ids, attention_mask, labels = batch
    input_ids = input_ids.to(device)

    attention_mask = attention_mask.to(device)

    labels = labels.view(-1)
    labels = labels.to(device)

    optimizer.zero_grad()

    logits = model(input_ids, attention_mask)

    loss = criterion(logits, labels)
    loss.backward()
    optimizer.step()


    if (i+1) % 100 == 0:
        print(f'epoch {epoch + 1}/ {num_epochs}, batch {i+1}/{n_total_steps}, loss = {loss.item():.4f}')
Output:

Evaluating the Model
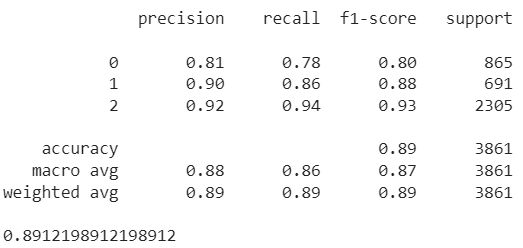
After training the model, it can be tested on the test dataset, as demonstrated in the following script. The model makes predictions on the test set, which are then compared with the target labels. Subsequently, we calculate and print the model’s accuracy and generate a classification report based on the predictions.
all_labels = []
all_preds = []

with torch.no_grad():
  n_correct = 0
  n_samples = 0
  for i, batch in enumerate (test_loader):

    input_ids, attention_mask, labels = batch
    input_ids = input_ids.to(device)

    attention_mask = attention_mask.to(device)

    labels = labels.view(-1)
    labels = labels.to(device)

    outputs = model(input_ids, attention_mask)

    _, predictions = torch.max(outputs, 1)

    all_labels.append(labels.cpu().numpy())
    all_preds.append(predictions.cpu().numpy())

all_labels = np.concatenate(all_labels, axis=0)
all_preds = np.concatenate(all_preds, axis=0)

print(classification_report(all_labels, all_preds))
print(accuracy_score(all_labels, all_preds))
Output:

The output reveals an impressive overall accuracy of 89.12% across the three classes. For further performance improvements, you can experiment with adding more layers and implementing dropout techniques.
I trust this article has been instrumental in your journey to fine-tuning the Hugging Face BERT model from scratch in PyTorch. Happy coding!
Code More, Distract Less: Support Our Ad-Free Site
You might have noticed we removed ads from our site - we hope this enhances your learning experience. To help sustain this, please take a look at our Python Developer Kit and our comprehensive cheat sheets. Each purchase directly supports this site, ensuring we can continue to offer you quality, distraction-free tutorials.
