Introduction | Design Progress Bar | Add Progress Bar Macros | Display Progress Bar | Final Thoughts
Introduction
Make your macros stand out by creating this beautiful VBA Progress Bar to illustrate the progress. This tutorial walks you through how to make the sleek UserForm and how to implement it in your next project!
Inclusion of a VBA progress bar is an incredibly useful feature when you have long macros that take several minutes to complete. Without a periodic status update, your users will wonder if the macro is still running. Follow this step-by-step guide to learn how to incorporate a progress bar into your own spreadsheet.
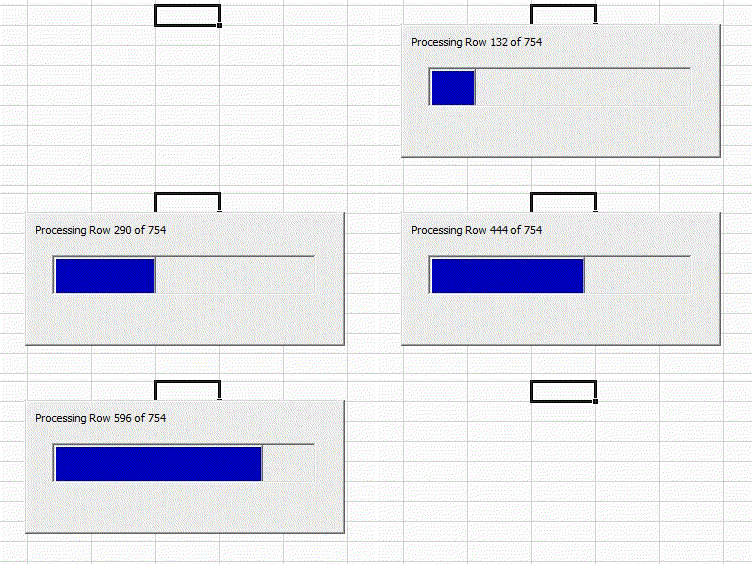
To get you motivated about what’s in store, I’m going to go ahead and show you the final design of my VBA progress bar:
Design Progress Bar
Adding your UserForm
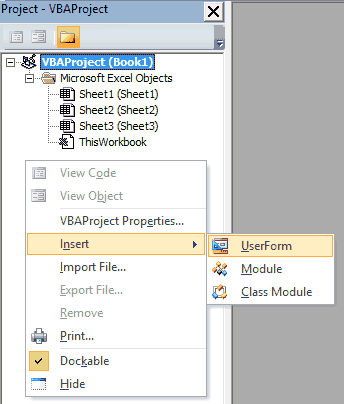
The first thing we want to do is create a UserForm and add the elements necessary to turn it into a progress bar. If you’re new to VBA, follow these steps to add a UserForm:
- Open the VBA Editor (Alt+F11)
- Insert a UserForm
- Right-click the Project Explorer Pane
- Hover over Insert
- Click Userform
Setting the Progress Bar Properties
Once you have an empty UserForm, go ahead and press F4 to bring up the Properties Window.
- Change the (Name) of the UserForm to
ufProgress . - Change the ShowModal property to False. Setting this property to False guarantees other macros will continue to run while the UserForm is open. Check out this tutorial to learn more about the ShowModal property.
- Adjust the size of your UserForm to something visually pleasing for you. I like to set the Height property of my Progress Bars to
110 and the Width property to240 . - If you’d like, you can go ahead and update the Caption property of the UserForm to something like
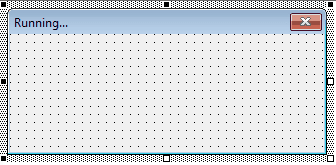
Running... . This step isn’t necessary if you want to hide the title bar altogether. I’ll show you how to do that later in this tutorial!
Here’s what my Progress Bar looks like after completing these steps:
Designing the UserForm
Now that you have the UserForm configured the way we want it, you can begin designing it. There are a few elements we must have for the VBA progress bar to function properly. Follow these steps to make sure each element is included:
Insert Label
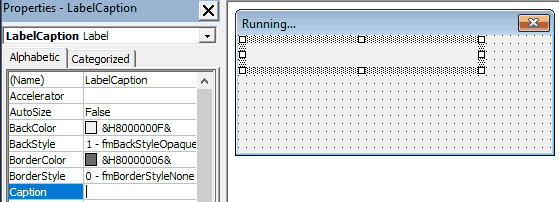
- Insert a label in the upper left of your UserForm. This will be used later to display the text indicating the status of your macro.
- Make sure the label is wide enough for any text you may display later. I set my Width property to
174 , but there’s nothing magical about that number. - Change the (Name) of the label to
LabelCaption . - Change the Caption property to an empty string (no text).
At this point, your Progress Bar should look something like this:
Insert Frame
The next step is to insert a Frame on your UserForm. The frame is the item highlighted in the Toolbox screenshot below:
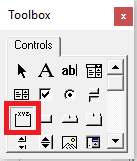
You want to insert the frame so it’s roughly centered on your UserForm, both horizontally and vertically, with a little margin on each side. It should be positioned below the label you previously added. At this point, your UserForm will look something like this:
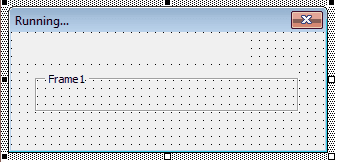
To make the frame begin to resemble a progress bar, you’ll need to change a few properties. Follow these steps to configure the frame properties:
- Select the frame and change the (Name) property to
FrameProgress - Change the Caption property to an empty string (no text)
- Change the SpecialEffect property to
2 - fmSpecialEffectSunken
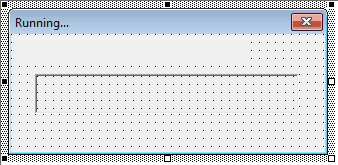
At this point, you can start to see the outline of your progress bar. The progress bar is finally starting to take shape and will look something like this:
Insert Another Label
Next, we want to insert another label, but this label is never going to have any text. This label is going to grow as your macro progresses to fill the frame you just created. Stay with me for a minute to learn what I mean.
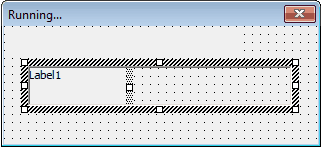
- Insert a label INSIDE the frame you just created, and change the height so it fits nicely right up against the top and bottom of your frame.
- Position the label so the left edge of the label touches the left edge of the frame. The width of the label doesn’t matter at this point. It will look like this:
- Change the (Name) property to
LabelProgress - Change the Caption property to an empty string (no text)
- Change the BackColor property to
blue , or whatever color you prefer. - Change the SpecialEffect property to
1 -fmSpecialEffectRaised .
You are done designing your VBA Progress Bar! The UserForm will look something like this:
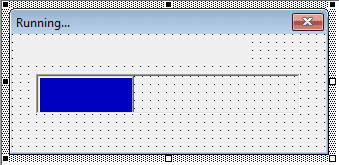
Once you get to this point, you’re ready to add the macros to your Progress Bar so it behaves the way we want it to.
Add Progress Bar Macros
When your progress bar pops up, you don’t want the ugly title bar with the red X to show up, right? I didn’t think so.
Hide Title Bar
To remove the title bar, I’m going to borrow a macro from my Remove Window Border tutorial. If the person using the spreadsheet you’re creating is a Mac user, this macro won’t work, but I’ll show you how to prevent it from crashing on them later.
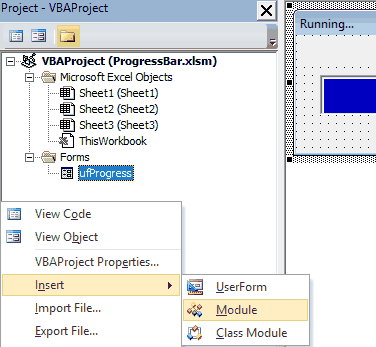
- Insert a Standard Module
- Right-click the Project Explorer Pane
- Hover over Insert
- Click Module
- Change the (Name) property of the Module to
HideTitleBar - Paste the following macro into the new module you just created:
'PLACE IN STANDARD MODULE
Option Explicit
Option Private Module

Public Const GWL_STYLE = -16
Public Const WS_CAPTION = &HC00000
#If VBA7 Then
    Public Declare PtrSafe Function GetWindowLong _
                           Lib "user32" Alias "GetWindowLongA" ( _
                           ByVal hWnd As Long, _
                           ByVal nIndex As Long) As Long
    Public Declare PtrSafe Function SetWindowLong _
                           Lib "user32" Alias "SetWindowLongA" ( _
                           ByVal hWnd As Long, _
                           ByVal nIndex As Long, _
                           ByVal dwNewLong As Long) As Long
    Public Declare PtrSafe Function DrawMenuBar _
                           Lib "user32" ( _
                           ByVal hWnd As Long) As Long
    Public Declare PtrSafe Function FindWindowA _
                           Lib "user32" (ByVal lpClassName As String, _
                           ByVal lpWindowName As String) As Long
#Else
    Public Declare Function GetWindowLong _
                           Lib "user32" Alias "GetWindowLongA" ( _
                           ByVal hWnd As Long, _
                           ByVal nIndex As Long) As Long
    Public Declare Function SetWindowLong _
                           Lib "user32" Alias "SetWindowLongA" ( _
                           ByVal hWnd As Long, _
                           ByVal nIndex As Long, _
                           ByVal dwNewLong As Long) As Long
    Public Declare Function DrawMenuBar _
                           Lib "user32" ( _
                           ByVal hWnd As Long) As Long
    Public Declare Function FindWindowA _
                           Lib "user32" (ByVal lpClassName As String, _
                           ByVal lpWindowName As String) As Long
#End If
Sub HideTitleBar(frm As Object)
    Dim lngWindow As Long
    Dim lFrmHdl As Long
    lFrmHdl = FindWindowA(vbNullString, frm.Caption)
    lngWindow = GetWindowLong(lFrmHdl, GWL_STYLE)
    lngWindow = lngWindow And (Not WS_CAPTION)
    Call SetWindowLong(lFrmHdl, GWL_STYLE, lngWindow)
    Call DrawMenuBar(lFrmHdl)
End Sub
Make powerful macros with our free VBA Developer Kit Tutorials like this can be complicated. That’s why we created our free VBA Developer Kit and our Big Book of Excel VBA Macros to supplement this tutorial. Grab them below and you’ll be writing powerful macros in no time.
Add Macro to UserForm
Once you do this, go back to your ufProgress form and follow these steps:
- Right click anywhere on your ufProgress form and select View Code
- Clear out any macros that may appear on the form
- Paste the following macro:
'PLACE IN YOUR USERFORM CODE
Private Sub UserForm_Initialize()
#If IsMac = False Then
    'hide the title bar if you're working on a windows machine. Otherwise, just display it as you normally would
    Me.Height = Me.Height - 10
    HideTitleBar.HideTitleBar Me
#End If
End Sub
The IsMac check in this routine is what prevents the macro from crashing for users running Excel on a Mac. Instead of the sleek UserForm without a title bar, they’ll see the title bar. In other words, their Progress Bars won’t be as pretty as you Windows users, but that’s okay, right!? ;)
Display Progress Bar
Now that you’re done designing your progress bar and configuring the macros, it’s time to figure out how to incorporate the progress bar into your existing macro.
This is where you may have to adapt the solution I provide into your own application. This might require you to think outside the box a bit, but I’m confident you can do that!
The best way to show you how to include the progress bar in your macro is to give you a demonstration and then walk you through the important pieces.
In this example, I loop through all the rows in my spreadsheet and update my progress bar after each row. Here’s the sample macro (pay attention to the comment cards):
'PLACE IN A STANDARD MODULE
Sub LoopThroughRows()
Dim i As Long, lastrow As Long
Dim pctdone As Single
lastrow = Range("A" & Rows.Count).End(xlUp).Row

'(Step 1) Display your Progress Bar
ufProgress.LabelProgress.Width = 0
ufProgress.Show
For i = 1 To lastrow
'(Step 2) Periodically update progress bar
    pctdone = i / lastrow
    With ufProgress
        .LabelCaption.Caption = "Processing Row " & i & " of " & lastrow
        .LabelProgress.Width = pctdone * (.FrameProgress.Width)
    End With
    DoEvents
        '--------------------------------------
        'the rest of your macro goes below here
        '
        '
        '--------------------------------------
'(Step 3) Close the progress bar when you're done
    If i = lastrow Then Unload ufProgress
Next i
End Sub
This sample has 3 important steps. These 3 steps are common whether or not your macro uses a For loop like the one above.
Step 1 - Display your Progress Bar
At some point in your macro, you want to make your progress bar appear on your screen. Chances are, you want to do this right after your macro starts to run. To do that, you want to make sure the width of your progress bar is set to 0 at the beggining and then show your UserForm. All you have to do is add the following lines to your macro, like I did in the example above:
ufProgress.LabelProgress.Width = 0
ufProgress.Show
Step 2 - Periodically Update Progress Bar
At some point, you want to update the length of your progress bar to indicate how far along your macro is. That’s the point of a progress bar, right? In my example, I used a formula to calculate what percentange of the way through the macro I was, based on which row I was processing. Inside the loop, I included the following code:
pctdone = i / lastrow
    With ufProgress
        .LabelCaption.Caption = "Processing Row " & i & " of " & lastrow
        .LabelProgress.Width = pctdone * (.FrameProgress.Width)
    End With
    DoEvents
Each time I get to a new row, I update the
This is a great way to indicate progress if your macro consists of a loop where you know the starting position and you know the ending position. Examples where a solution like the one above will work are when you’re processing each line of data in a spreadsheet, or looping through files in a folder.
Step 3 - Close the Progress Bar
When your macro is nearing completion, make sure you close your Progress Bar. In my example, I closed the VBA Progress Bar UserForm when I got to the last row. I did that via this line of code:
If i = lastrow Then Unload ufProgressFinal VBA Progress Bar
When you put it all together, you’ll get a beautiful VBA progress bar that looks like this:

What if I don't have a loop?
The approach I demonstrated in the previous section is great for loops, but it’s not very useful if your macro isn’t constructed with a primary loop. What if you don’t have a loop?
The important part is, you need to follow the same 3 steps.
You don’t need a formula to do this. You could manually update the progress bar at various points in your macro. Take a look at this demonstration, where I include the same 3 steps but they’re manually sprinkled into my existing macro.:
'PLACE IN STANDARD MODULE
Sub DemoMacro()
'(Step 1) Display your Progress Bar
ufProgress.LabelProgress.Width = 0
ufProgress.Show
FractionComplete (0) '(Step 2)
    '--------------------------------------
    'A portion of your macro goes here
    '--------------------------------------
FractionComplete (0.25) '(Step 2)
    '--------------------------------------
    'A portion of your macro goes here
    '--------------------------------------
FractionComplete (0.5) '(Step 2)
    '--------------------------------------
    'A portion of your macro goes here
    '--------------------------------------
FractionComplete (0.75) '(Step 2)
    '--------------------------------------
    'A portion of your macro goes here
    '--------------------------------------
FractionComplete (1) '(Step 2)

'(Step 3) Close the progress bar when you're done
    Unload ufProgress

End Sub

Sub FractionComplete(pctdone As Single)
With ufProgress
    .LabelCaption.Caption = pctdone * 100 & "% Complete"
    .LabelProgress.Width = pctdone * (.FrameProgress.Width)
End With
DoEvents
End Sub
In this example, I spaced out my macro so I could provide a status update at approximate 1/4 intervals. How you split your macro isn’t important. As long as you’re periodically updating your
What if my progress bar isn't updating?
If you have a complicated macro that uses a bunch of resources, you may discover that your progress bar won’t update or it’ll show up white. To fix the progress bar, add the following code right below the End With statement in Step 2 of the progress bar.
ufProgress.RepaintThis short piece of code forces VBA to redraw your progress bar so it’s updated each time the UserForm changes.
Final Thoughts
You have successfully created an incredible progress bar using VBA that your users will surely be thankful for! Get creative and change your caption text to specifically match what your macro is doing at any given point if you’d like. When I need to mass produce PDF invoices, I’ve included a progress bar like this one to keep me updated on the status. You can do the same!
That’s all for this tutorial. When you’re ready to take your VBA to the next level, subscribe using the form below.

