Workbook Object | ActiveWorkbook | Add Workbook | Declare Workbook Object
Workbook Object
The Workbook Object is fancy way of referring to your Excel file. The Workbook Object is a part of the Workbooks Collection. Because it’s a part of a collection, you’ll see it written plural in VBA.
Let’s see an example. Open two new workbooks, Book1 and Book2, in Excel and run the following macro.
Sub WorkbookDemo()
Workbooks("Book1").Worksheets("Sheet1").Range("A1") = Workbooks("Book1").Name
Workbooks("Book2").Worksheets("Sheet1").Range("A1") = Workbooks("Book2").Name
End Sub
Result:
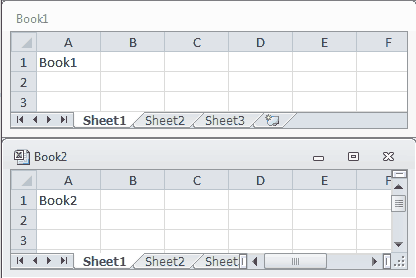
This macro writes the workbook name to “Sheet1” and cell “A1” of each open workbook. The ability to call different workbooks by name allows you to interact with multiple workbooks (Excel files) from a single VBA macro.
ActiveWorkbook Property
Fortunately, you don’t have to define the workbook name each time you write a new line. VBA defaults the file location to the ActiveWorkbook.
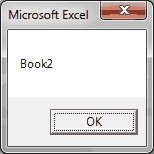
Sub WorkbookDemo()
Workbooks("Book2").Activate
MsgBox (ActiveWorkbook.Name)
End Sub
Result:
Let’s try another example.
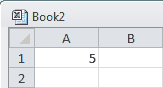
Sub WorkbookDemo()
Workbooks("Book2").Activate
ActiveWorkbook.Sheets("Sheet1").Range("a1") = 5
End Sub
Result:
Because ActiveWorkbook is the default location, you don’t have to mention it if you’re only working with one workbook. This is why we were able to omit it in our Range Object Examples.
Workbooks.Add
The Workbooks.Add Method creates a new workbook and sets it to the ActiveWorkbook.
Sub WorkbookDemo()
Workbooks.Add
End Sub
Because the new Excel File is the ActiveWorkbook, you can manipulate the new file with the ActiveWorkbook Property.
Declare Workbook Object
If you’re working with multiple workbooks, you don’t even have to type the long Workbook string each time. Let’s pretend you have an open workbook called
Workbooks("MyWorkbook.xlsm").For example:
Sub WorkbookNameDemo()
Workbooks("MyWorkbook.xlsm").Sheets("Sheet1").Range("a1") = 5
Workbooks("MyWorkbook.xlsm").Sheets("Sheet1").Range("a2") = 4
Workbooks("MyWorkbook.xlsm").Sheets("Sheet1").Range("a3") = 3
End Sub
There’s an easier way! Instead, you can write shorter macros by declaring your Workbook object at the beginning of your macro, like we do below:
Sub WorkbookNameDemo()
Dim wb1 As Workbook
Set wb1 = Workbooks("MyWorkbook.xlsm")
wb1.Sheets("Sheet1").Range("a1") = 5
wb1.Sheets("Sheet1").Range("a2") = 4
wb1.Sheets("Sheet1").Range("a3") = 3
End Sub
The modification adds 2 more lines, but it’s a much cleaner macro. You’ve replaced the long lines of code with the variable Dim statement is used to declare a workbook object variable.
We’ll talk more about variables and declarations in two lessons, so stay tuned!
Your lines of code are much shorter this way and you’re far less likely to make a mistake. Consider this scenario. Let’s say your workbook is renamed
You now know how to reference workbooks by name, activate new workbooks and add a new workbook. Since you are familiar with the Workbook Object, I hope you’ll join me as I introduce the Worksheet Object. Worksheets are far more exciting than Workbooks.
If you really want to learn VBA, grab a copy of our Ultimate VBA Training Bundle before reading our next tutorial. We specifically created these cheat sheets to help you get the most out of our upcoming lessons. Together, the set has over 200 practical tips covering the 125 most important topics in Excel VBA. We also stuffed it with 140 helpful macro examples.
