Table of Contents
- Introduction
- Available Properties
- Renaming a Checkbox
- Check the Value of a Checkbox
- Checking/Unchecking
- Enabling/Disabling Checkboxes
- Hiding/Unhiding Checkboxes
- Editing Label
- Adding/Deleting Checkboxes
- Selecting a Checkbox
- Linking to a Cell
- Checkbox Font
- Checkbox Color
- Changing Other Properties
- Run Macro when Checkbox is Clicked
- Run Macro when Mouse Hovers over Checkbox
- Other Checkbox Events
- Looping Through All Checkboxes
Introduction
This complete guide shows you how to control Excel ActiveX Checkboxes using VBA. If you want to learn how to control Form Control Checkboxes, instead, head over to my Excel VBA Form Control Checkboxes Guide.
ActiveX checkboxes are one of the two types of checkboxes you can add directly to your worksheet. The ActiveX checkboxes are located under ActiveX Controls on the Developer Tab > Insert menu:

ActiveX Checkboxes
I made a sample product survey form using Excel ActiveX Checkboxes. I’ll point to this survey form throughout this guide as I use VBA macros to show you how to control ActiveX checkboxes.
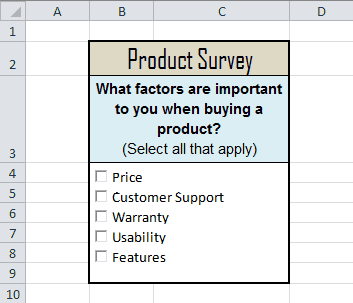
Excel Survey Form
Keep reading to learn how to grab the value, check, uncheck, change properties and loop through all ActiveX checkboxes!
Jump to Table of Contents
Available Properties
Unlike Form Control Checkboxes, you can right-click ActiveX Checkboxes and pull up a list of properties:

ActiveX Checkbox Properties
All these properties can be changed in Excel using VBA - I’ll show you how.
Jump to Table of Contents
Renaming a Checkbox
The checkbox name can be found beside the row labeled (Name) in the Properties Window. A version of the name is found in the upper left of Excel when you have your checkbox selected, but here are two cautions about relying on this version of the name:
- ActiveX controls cannot have spaces in their names. That’s why Method 1, below, works. Even if you put a space in the name in the upper left, the (Name) attribute in the Properties Window will still not have the space.
- You must click Design Mode on the Developer Tab to select your checkbox

CheckBox1
Method 1
Sub CheckboxName_Method1()
    ActiveSheet.CheckBox1.Name="CheckBoxPrice"
End Sub
Method 2
Sub CheckboxName_Method2()
    ActiveSheet.OLEObjects("CheckBox1").Name="CheckBoxPrice"
End Sub
Jump to Table of Contents
Return the Value of your Checkbox
Just like with Form Control Checkboxes, there is more than one way to check the value of an ActiveX checkbox using VBA. I’ll show you two ways. The following macros return the value of a checkbox named “
Method 1
Sub CheckboxValue_Method1()
    Dim cbValue As Variant
    cbValue = ActiveSheet.CheckBox1.Value
End Sub
Method 2
Sub CheckboxValue_Method2()
    Dim cbValue As Variant
    cbValue = ActiveSheet.OLEObjects("CheckBox1").Object.Value
End Sub
Make powerful macros with our free VBA Developer Kit This is actually pretty neat. If you have trouble understanding or remembering it, our free VBA Developer Kit can help. It’s loaded with VBA shortcuts to help you make your own macros like this one - we’ll send a copy, along with our Big Book of Excel VBA Macros, to your email address below.
Notice, the syntax of these macros is slightly different than the macros for Form Control Checkboxes. ActiveX Controls fall into the OLEObjects category, which are a subset of the Shapes collection we used when calling Form Control Checkboxes.
Each method produces the same result, so you can use whichever one you feel the most comfortable with. There are three possible values of a checkbox.
| Value | Example | Description |
|---|---|---|
| True |  |
Checked |
| False |  |
Unchecked |
| Null |  |
Grayed Out |
If you’re trying to read the value of a checkbox using a data type Boolean, you will receive an error if the value is Null. That’s why I chose a Variant data type in the macro examples above.
Jump to Table of Contents
Checking/Unchecking your Checkbox
Checking and unchecking your checkbox is almost identical to returning the value of your checkbox. Again, at least two methods can be used. The following macros first check the box, then uncheck the box and, finally, nullify the checkbox:
Method 1
Sub Check_Method1()
    'Check the checkbox
    ActiveSheet.CheckBox1.Value = True
    'Uncheck the checkbox
    ActiveSheet.CheckBox1.Value = False
    'Gray the checkbox
    ActiveSheet.CheckBox1.Value = Null
End Sub
Method 2
Sub Check_Method2()
    'Check the checkbox
    ActiveSheet.OLEObjects("CheckBox1").Object.Value = True
    'Uncheck the checkbox
    ActiveSheet.OLEObjects("CheckBox1").Object.Value = False
    'Gray the checkbox
    ActiveSheet.OLEObjects("CheckBox1").Object.Value = Null
End Sub
One thing worth noting is that when you programatically change the state of the checkbox to True or False, it calls the Click event for that checkbox. In other words, if you have a macro that runs when you click your checkbox on your spreadsheet, it may run when you change its value using VBA.
Jump to Table of Contents
Enabling/Disabling your Checkbox
ActiveX checkboxes gray out when you disable them, which is excellent. They can either gray out in the Checked or Unchecked state. Disabling a checkbox prevents the user from changing the value of the checkbox by clicking (checking and unchecking). You would still be able to change the value by using VBA. Here are some examples for disabling ActiveX checkboxes:
Method 1
Sub DisableCheckbox()
    ActiveSheet.CheckBox1.Enabled = False
End Sub
Method 2
Sub DisableCheckbox2()
    ActiveSheet.OLEObjects("CheckBox1").Object.Enabled = False
End Sub
Method 3
Sub DisableCheckbox3()
    ActiveSheet.OLEObjects("CheckBox1").Enabled = False
End Sub
I know, I know. It makes no sense that you get the same outcome whether or not you use the .Object keyword. This works for some properties, like .Enabled, but not for other properties, like .Value.

Top 2 Checkboxes are Disabled
Remember when we did this with the Form Control Checkboxes? Recall that disabling the checkboxes did not disable the macro associated with it. ActiveX checkboxes are different. Disabling the checkbox does disable the Click event macro associated with it.
To enable your checkbox again, just set the .Enabled property back to True using whichever method you prefer. Here’s an example:
Sub EnableCheckbox()
    ActiveSheet.CheckBox1.Enabled = True
End Sub
Jump to Table of Contents
Hiding/Unhiding your Checkbox
You can completely hide your ActiveX Checkboxes by changing the .Visible property. Setting it to
Method 1
Sub HideCheckbox()
    ActiveSheet.CheckBox1.Visible = False
End Sub
Method 2
Sub HideCheckbox2()
    ActiveSheet.OLEObjects("CheckBox1").Visible = False
End Sub
Again, I know it makes no sense, but you cannot use the .Object notation to change the visibility, like you could to enable/disable the checkbox. Silly fact.
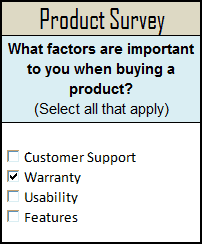
Price checkbox no longer visible
To make your checkbox visible again, change the .Enabled property back to True using whichever method you prefer. Here’s an example:
Sub ShowCheckbox()
    ActiveSheet.CheckBox1.Visible = True
End Sub
Jump to Table of Contents
Editing the Label (Caption) of your Checkbox
You can change the caption of your Checkbox using the .Caption property. The following examples change the label beside
Method 1
Sub ChangeCaption()
    ActiveSheet.CheckBox1.Caption = "Reliability"
End Sub
Method 2
Sub ChangeCaption2()
    ActiveSheet.OLEObjects("CheckBox1").Object.Caption = "Reliability"
End Sub
Here’s the end product:
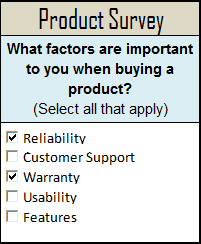
Reliability
If using the OLEObjects method, the .Object method must be used to change the caption. Otherwise, you’ll get a runtime error.
Jump to Table of Contents
Adding/Deleting a Checkbox
To add an ActiveX Checkbox, you need to know where you want to place the checkbox and what size you want it to be.
Add a Checkbox
Sub AddCheckbox()
    With ActiveSheet.OLEObjects.Add(ClassType:="Forms.CheckBox.1", _
        Left:=51.75, Top:=183, Width:=120, Height:=19.5)
        .Name = "NewCheckBox"
        .Object.Caption = "Reliability"
    End With
End Sub
Notice how this macro combines the .Name and .Caption properties we discussed earlier to make a new checkbox with a custom label and custom name.
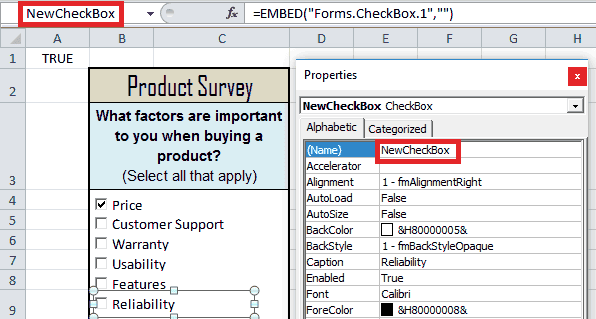
Creating a New Checkbox
To delete the checkbox titled
Delete a Checkbox
Sub DeleteCheckbox()
    ActiveSheet.OLEObjects("NewCheckBox").Delete
End Sub
Jump to Table of Contents
Selecting a Checkbox
To select a checkbox titled
Method 1
Sub SelectCheckbox()
    ActiveSheet.CheckBox5.Select
End Sub
Method 2
Sub SelectCheckbox2()
    ActiveSheet.OLEObjects("CheckBox5").Select
End Sub
You won’t actually see that the checkbox is selected until you enter Design Mode on your Developer Tab.
Jump to Table of Contents
Linking Checkbox to a Cell
To link a checkbox to the value of a cell using VBA, you would try one of the following methods:
Method 1
Sub LinkCheckbox()
    ActiveSheet.CheckBox5.LinkedCell = "Sheet1!$A$1"
End Sub
Method 2
Sub LinkCheckbox2()
    ActiveSheet.OLEObjects("CheckBox5").LinkedCell = "Sheet1!$A$1"
End Sub
Now, cell “A1” in “Sheet1” changes to “TRUE” when
Jump to Table of Contents
Changing the Checkbox Font
The ability to change the font style of an ActiveX checkbox is what sets it apart from Form Control checkboxes. These next macros change the font, font size and other font properties of an ActiveX Checkbox named
Method 1
Sub ChangeFont()
    With ActiveSheet.CheckBox1
        .Font.Name = "Times New Roman"
        .Font.Size = 14
        .Font.Italic = True
        .Font.Bold = True
        .Font.Underline = True
        .Font.Strikethrough = True
    End With
End Sub
Method 2
Sub ChangeFont2()
    With ActiveSheet.OLEObjects("CheckBox1").Object
        .Font.Name = "Times New Roman"
        .Font.Size = 14
        .Font.Italic = True
        .Font.Bold = True
        .Font.Underline = True
        .Font.Strikethrough = True
    End With
End Sub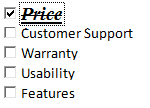
ActiveX Checkbox Font
Play around with the properties in the examples above until you get the look you desire. Using the .Font object, you can change the actual font of the checkbox caption, the size of the font and whether or not the font is italicized, bolded, underlined or struck through. Notice how this only changes the label beside the checkbox - not the actual checkbox.
Although most of the macros in this guide show you how to change properties of your ActiveX Checkboxes using VBA, this is a good time to remind you the macros work both ways. For example, if you’re interested in seeing what value a property is set to, just change the order of the equality:
Sub CheckFont()
    MsgBox ActiveSheet.CheckBox5.Font.Name
End Sub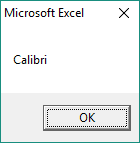
ActiveX Checkbox Font
Jump to Table of Contents
Changing the Color of the Checkbox
In addition to changing the font style, changing the color of an ActiveX checkbox also makes it stand out from Form Control checkboxes. The following macro examples change the font color and background color of the ActiveX Checkbox named
Method 1
Sub ChangeColor()
    With ActiveSheet.CheckBox1
        .ForeColor = RGB(0, 0, 255)
        .BackColor = RGB(200, 200, 200)
    End With
End Sub
Method 2
Sub ChangeColor2()
    With ActiveSheet.OLEObjects("CheckBox1").Object
        .ForeColor = RGB(0, 0, 255)
        .BackColor = RGB(200, 200, 200)
    End With
End Sub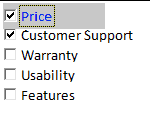
ActiveX Checkbox Colors
The .ForeColor property changes the font color, while the .BackColor property changes the background color of your checkbox. If you find that your checkbox does not appear centered in your background color, adjust the .Height property of your checkbox.
Jump to Table of Contents
Changing Other Checkbox Properties
By now, I’m sure you’re starting to notice a bunch of commonalities between each of these macro examples.
If you want to change other properties listed in the Properties Window, you can follow one of the above examples, but change the property portion of the code to the property you want to change as it appears in the Properties Window. Here is an example to get you started:
Sub ChangeProperties()
    With ActiveSheet.CheckBox1
        .Alignment = 0 'Move checkbox to the right of the caption
        .SpecialEffect = 0 'Flat checkbox
        .BackStyle = 0 'Transparent background
        .TextAlign = 3 'Align text to the right
        .TripleState = True 'Allow checkbox to toggle to Null
    End With
End Sub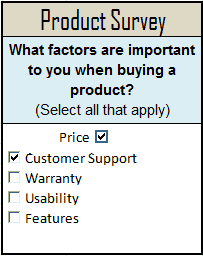
Wacky Checkbox
You can change the size and position of the checkbox in much the same way.
Jump to Table of Contents
Run Macro when Checkbox is Clicked
To run a Macro when your checkbox is clicked, you’ll use the Click event. This template runs when
Private Sub CheckBox1_Click()
    'Your Macro Here
End Sub
It’s important that you paste this template in the Microsoft Excel Object associated with where your checkbox is located! My checkbox is located on Sheet1, so I double-clicked Sheet1 and pasted the macro in there.
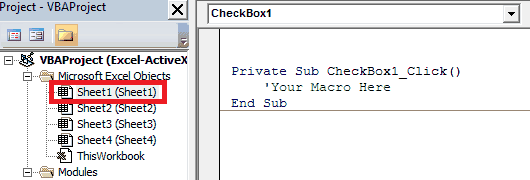
In Sheet1 because my checkbox was on Sheet1
Here’s an example. If your checkbox is named
Private Sub cbSelect_Click()
    'Your Macro Here
End Sub
Notice the name if the Private Sub now says
Jump to Table of Contents
Run Macro when Mouse Hovers over Checkbox
To run a Macro when your mouse hovers over your checkbox, you’ll use the MouseMove event. This template runs when the mouse moves over the
Private Sub CheckBox1_MouseMove(ByVal Button As Integer, ByVal Shift As Integer, ByVal X As Single, ByVal Y As Single)
    'Place Your Macro Here
End Sub
Remember, this template must be pasted in the Microsoft Excel Object that matches the worksheet where your checkbox is located! My checkbox is located on Sheet1, so I double-clicked Sheet1 and pasted the macro in there.
Jump to Table of Contents
Other Checkbox Events
For a complete list of ActiveX Checkbox Events,
- Open your VBA Editor,
- Click your worksheet under Microsoft Excel Objects in the Project Explorer Pane (left)
- Select your Checkbox from the left dropdown box
- Click the down arrow in the Declarations dropdown box on the right.

View All ActiveX Checkbox Events
Play around with these events to create some powerful spreadsheet interfaces.
Jump to Table of Contents
Looping Through All Checkboxes
Use this template to loop through all ActiveX Checkboxes in your active sheet. This macro lets you take different actions depending on whether your checkboxes are checked, unchecked or null. Be sure to read the macro comments to understand how you can modify the VBA macro.
Sub CheckboxLoop()
Dim objX As OLEObject

'Loop through Checkboxes
With ActiveSheet
    For Each objX In .OLEObjects
        If TypeName(objX.Object) = "CheckBox" Then
            If objX.Object.Value = True Then
                'Do something if Checked
            ElseIf objX.Object.Value = False Then
                'Do something if Unchecked
            ElseIf IsNull(objX.Object.Value) Then
                'Do something if null
            End If
        End If
    Next
End With
End Sub
Jump to Table of Contents
I put a lot of effort into this tutorial and I hope you found it helpful. If you did, please subscribe using the form below and I’ll send you more comprehensive VBA tutorials like this one.

