Table of Contents
- Introduction
- Check the Value of a Checkbox
- Checking/Unchecking
- Assigning a Macro
- Determine which Checkbox called a Macro
- Enabling/Disabling Checkboxes
- Editing Label
- Adding/Deleting Checkboxes
- Selecting a Checkbox
- Linking to a Cell
- Looping Through All Checkboxes
Introduction
This VBA Guide will teach you everything you ever wanted to know about handling Excel Form Control Checkboxes using VBA. By “Form Control” checkboxes, I mean this little guy located under “Form Controls” on the Developer Tab > Insert menu:
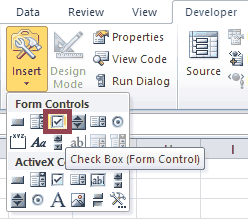
Form Control Checkboxes
I’ve created a simple pizza order form using Excel Form Control Checkboxes. I’ll reference this order form throughout the guide as we learn how to manipulate our checkboxes with VBA macros.

Excel Pizza Order Form
Keep reading to learn how to check, uncheck, assign a macro to and loop through all form control checkboxes!
Note: If you want to learn how to control ActiveX Checkboxes, instead, head over to my Excel VBA ActiveX Checkboxes Guide.
Jump to Table of Contents
Return the Value of your Checkbox
There’s more than one way to check the value of a form control checkbox. I’ll present three ways. The following macros return the value of a checkbox named “
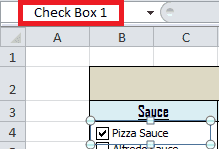
Check Box 1
Method 1
Sub CheckboxValue_Method1()
    Dim cbValue As Long
    cbValue = ActiveSheet.Shapes("Check Box 1").ControlFormat.Value
End Sub
Method 2
Sub CheckboxValue_Method2()
    Dim cbValue As Long
    cbValue = ActiveSheet.Shapes("Check Box 1").OLEFormat.Object.Value
End Sub
Method 3
Sub CheckboxValue_Method3()
    Dim cbValue As Long
    cbValue = ActiveSheet.CheckBoxes("Check Box 1").Value
End Sub
Make powerful macros with our free VBA Developer Kit Tutorials like this can be complicated. That’s why we created our free VBA Developer Kit and our Big Book of Excel VBA Macros to supplement this tutorial. Grab them below and you’ll be writing powerful macros in no time.
All three methods do the same thing, so you can just pick one and go with it. There are three possible values of a checkbox. Yes, three!
| Value | Example | Description |
|---|---|---|
| 1 |  |
Checked (xlOn) |
| -4146 |  |
Unchecked (xlOff) |
| 2 |  |
Mixed (xlMixed) |
Jump to Table of Contents
Checking/Unchecking your Checkbox
Checking and unchecking your checkbox is almost identical to returning the value of your checkbox. Again, at least three methods can be used. The following macros first check the box, then uncheck the box and, finally, mix the checkbox:
Method 1
Sub Check_Method1()
    'Check the checkbox
    ActiveSheet.Shapes("Check Box 1").ControlFormat.Value = 1 'can also set to xlOn
    'Uncheck the checkbox
    ActiveSheet.Shapes("Check Box 1").ControlFormat.Value = -4146 'can also set to 0 or xlOff
    'Gray the checkbox
    ActiveSheet.Shapes("Check Box 1").ControlFormat.Value = 2 'can also set to xlMixed
End Sub
Method 2
Sub Check_Method2()
    'Check the checkbox
    ActiveSheet.Shapes("Check Box 1").OLEFormat.Object.Value = 1 'can also set to xlOn
    'Uncheck the checkbox
    ActiveSheet.Shapes("Check Box 1").OLEFormat.Object.Value = -4146 'can also set to 0 or xlOff
    'Gray the checkbox
    ActiveSheet.Shapes("Check Box 1").OLEFormat.Object.Value = 2 'can also set to xlMixed
End Sub
Method 3
Sub Check_Method3()
    'Check the checkbox
    ActiveSheet.CheckBoxes("Check Box 1").Value= 1 'can also set to xlOn
    'Uncheck the checkbox
    ActiveSheet.CheckBoxes("Check Box 1").Value = -4146 'can also set to 0 or xlOff
    'Gray the checkbox
    ActiveSheet.CheckBoxes("Check Box 1").Value= 2 'can also set to xlMixed
End Sub
Jump to Table of Contents
Assigning a Macro to your Checkbox
The following macro shows you how to assign a macro to a checkbox. When the checkbox is clicked, the macro you assign will execute. This is the same as right clicking your checkbox and clicking Assign Macro. These examples assign the macro .OnAction property:
Method 1
Sub AssignMacro_Method1()
    ActiveSheet.Shapes("Check Box 1").OLEFormat.Object.OnAction = "Module1.DisplayMessage"
End Sub
Method 2
Sub AssignMacro_Method2()
    ActiveSheet.CheckBoxes("Check Box 1").OnAction = "Module1.DisplayMessage"
End Sub
The ControlFormat method we demonstrated earlier will not work to assign a macro.
Jump to Table of Contents
Determine which Checkbox called a Macro
If you have multiple checkboxes linked to the same macro (i.e., more than one checkbox running the same macro), it could be useful to tell which checkbox called the macro. You can do that with Application.Caller.
In the Assigning a Macro example, we set our checkbox to run
Sub DisplayMessage()
    MsgBox Application.Caller
End Sub
When you click the
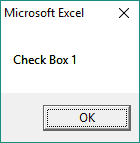
Check Box 1
This is useful if you have one macro that you want to run down different branches depending on which checkbox called it.
In case you were curious, the name that displays via Application.Caller is the .Name property of the checkbox, as demonstrated by the following macro:
Sub DisplayName()
    MsgBox ActiveSheet.CheckBoxes("Check Box 1").Name
End Sub
Jump to Table of Contents
Enabling/Disabling your Checkbox
Unfortunately, Form Control Checkboxes don’t gray out when you disable them. All disabling them does is prevent you from changing the value by clicking (checking and unchecking). To give the illusion of graying out a Form Control checkbox, I recommend setting its value to 2 (xlMixed) prior to disabling it. The following macros demonstrate this:
Method 1
Sub DisableCheckbox()
    ActiveSheet.Shapes("Check Box 1").ControlFormat.Value = 2 'This line is optional
    ActiveSheet.Shapes("Check Box 1").ControlFormat.Enabled = False
End Sub
Method 2
Sub DisableCheckbox2()
    ActiveSheet.Shapes("Check Box 1").OLEFormat.Object.Value = 2 'This line is optional
    ActiveSheet.Shapes("Check Box 1").OLEFormat.Object.Enabled = False
End Sub
Method 3
Sub DisableCheckbox3()
    ActiveSheet.CheckBoxes("Check Box 1").Value = 2 'This line is optional
    ActiveSheet.CheckBoxes("Check Box 1").Enabled = False
End Sub
It’s important to note that this does not disable the macro associated with the checkbox if you’ve set it to one. All it does is prevent the user from checking and unchecking the checkbox. Your macro will still run when the checkbox is clicked.
To enable your checkbox again, just set the .Enabled property back to True using whichever method you prefer. Here’s an example:
Sub EnableCheckbox()
    ActiveSheet.CheckBoxes("Check Box 1").Enabled = True
End Sub
Jump to Table of Contents
Editing the Label (Caption) of your Checkbox
You can change the caption of your Checkbox using the .Caption property. The following examples change the label beside
Method 1
Sub ChangeCaption()
    ActiveSheet.Shapes("Check Box 1").OLEFormat.Object.Caption = "Tomato Sauce"
End Sub
Method 2
Sub ChangeCaption2()
    ActiveSheet.CheckBoxes("Check Box 1").Caption = "Tomato Sauce"
End Sub
Here’s the end product:
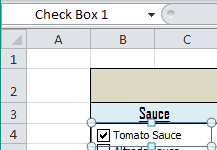
Tomato Sauce
Just like when we were Assigning a Macro, the ControlFormat method will not work to change the caption.
Jump to Table of Contents
Adding/Deleting a Checkbox
To add a Form Control Checkbox, you need to know where you want to place the checkbox and what size you want it to be. The following example adds a new checkbox to the cell you currently have selected. It also adjusts the checkbox’s size to match the dimensions of the selected cell.
Add a Checkbox
Sub AddCheckbox()
    With ActiveSheet.CheckBoxes.Add(Selection.Left, Selection.Top, Selection.Width, Selection.Height)
        .Name = "NewCheckBox"
        .Caption = "Green Peppers"
    End With
End Sub
Notice how this macro combines the .Name and .Caption properties we discussed earlier to make a new checkbox with a custom label and custom name.

Creating a New Checkbox
To delete the checkbox titled “NewCheckBox”, run this VBA macro:
Delete a Checkbox
Sub DeleteCheckbox()
    ActiveSheet.CheckBoxes("NewCheckBox").Delete
End Sub
Jump to Table of Contents
Selecting a Checkbox
To select a checkbox titled
Sub SelectCheckbox()
    ActiveSheet.CheckBoxes("Check Box 5").Select
End Sub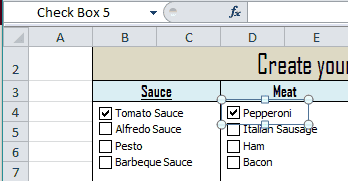
Select "Check Box 5"
Jump to Table of Contents
Linking Checkbox to a Cell
To link a checkbox to the value of a cell using VBA, you would try one of the following methods:
Method 1
Sub LinkCheckbox()
    ActiveSheet.Shapes("Check Box 5").ControlFormat.LinkedCell = "Sheet1!$A$1"
End Sub
Method 2
Sub LinkCheckbox2()
    ActiveSheet.Shapes("Check Box 5").OLEFormat.Object.LinkedCell = "Sheet1!$A$1"
End Sub
Method 3
Sub LinkCheckbox3()
    ActiveSheet.CheckBoxes("Check Box 5").LinkedCell = "Sheet1!$A$1"
End Sub
Now, cell “A1” in “Sheet1” changes to “TRUE” when
Jump to Table of Contents
Looping Through All Checkboxes
This example was adapted from a macro created by my good friend, Chris, over at The Spreadsheet Guru. It loops through all the Form Control Checkboxes in your active sheet and serves as a nice template for you if you want to take action on checkboxes meeting different conditions. Be sure to read the comments to understand how you can use the VBA macro.
Sub CheckboxLoop()
'PURPOSE: Loop through each Form Control Checkbox on the ActiveSheet
'SOURCE: www.TheSpreadsheetGuru.com/the-code-vault

Dim cb As Shape

'Loop through Checkboxes
  For Each cb In ActiveSheet.Shapes
    If cb.Type = msoFormControl Then
      If cb.FormControlType = xlCheckBox Then
        If cb.ControlFormat.Value = 1 Then
          'Do something if checked...
        ElseIf cb.ControlFormat.Value = -4146 Then
          'Do something if not checked...
        ElseIf cb.ControlFormat.Value = 2 Then
          'Do something if mixed...
        End If
      End If
    End If
  Next cb

End Sub
Jump to Table of Contents
Please share this article with your friends on Twitter and Facebook if you found it useful, and subscribe using the form below for more VBA tutorials.

