Introduction | Example | Tutorial | Applications
Introduction - Offset VBA
This tutorial shows you how the Offset VBA property is used to navigate Excel. In VBA, offset allows you to access cells relative to your target cell. For example, you can select a cell and change or grab the value of a cell that’s a couple rows or columns away from the cell you have selected.
The Offset property in VBA is similar to the =OFFSET() function in Excel, except the VBA property is more powerful! I say that because, unlike the OFFSET() function, the offset VBA property doesn’t limit you to just grabbing the value of a nearby cell. You can also change the contents of that nearby cell! I’ll demonstrate why I think this is so important later in this tutorial.
For more information on changing ranges and cells in Excel, check out the Select and Selection chapter of my VBA Basics tutorial.
Example - Offset VBA
Sub OffsetDemo()
Range("A1").Select
Selection = "This is cell " & Selection.Address
Selection.Offset(1, 0).Select
Selection = "This is cell " & Selection.Address
End Sub
Make powerful macros with our free VBA Developer Kit Tutorials like this can be complicated. That’s why we created our free VBA Developer Kit and our Big Book of Excel VBA Macros to supplement this tutorial. Grab them below and you’ll be writing powerful macros in no time.
Tutorial - Offset VBA
This is a basic example. All it does is select cell

Kind of boring, eh? Let’s dive deeper into the Offset property to add a little excitement.
Arguments
The Offset VBA property is often referred to as the Range.Offset Property. It accepts 2 arguments:
.Offset(RowOffset, ColumnOffset)RowOffset is the number of rows you want to move up or down. It can be a positive integer (down), negative integer (up), or 0.
ColumnOffset is the number of columns you want to move left or right. It can also be a positive integer (right), negative integer (left), or 0.
Good Practices
Before we go any further, I want to point out a good practice to make your macros run quicker.
If you’re using the offset property to change the cell/range you have selected in Excel, like we did in our example, get in the habit of placing Application.ScreenUpdating = False at the top of your macro. If you don’t use this command, each time the selected cell changes, your screen will update. Eventually, your screen may freeze on you, but even if it doesn’t freeze, your macro run-time will be much longer than if you added the command to the top of your macro.
Bottom line, add the command to the top of your macros to increase speed.
Offset in a Loop
My favorite thing to do with the Offset VBA property is to stick it in a For Loop.
Sub OffsetDemoLoop()
Application.ScreenUpdating = False
Range("A1").Select
For i = 0 To 5
    Selection = "Row " & Selection.Row
    Selection.Offset(2, 1).Select
Next i
Application.ScreenUpdating = True
End Sub
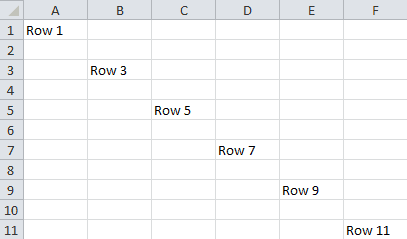
Each time the macro iterates through the loop, the selected cell is moved two cells down and one cell to the right.

Offset Active Cell
You don’t have to use offset to select the cell. The same macro works if you just want to refer to the active cell. This may make your macros run faster.
Sub OffsetDemoLoop2()
Application.ScreenUpdating = False
Range("A1").Activate
For i = 0 To 5
    ActiveCell = "Row " & ActiveCell.Row
    ActiveCell.Offset(2, 1).Activate
Next i
Application.ScreenUpdating = True
End Sub
Offset a Range
So far we’ve only used the Offset in VBA to move a single cell. This example shows you how to use Offset for an entire range:
Sub OffsetRange()
Range("A1:B2").Select
Selection.Offset(2, 2).Select
End Sub
In this example, the values in range

Read Contents of Offset Cell
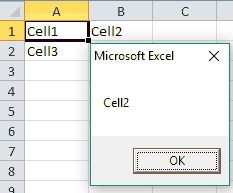
In all the examples above, we used Offset to navigate the Excel spreadsheet. This example will by slightly different because we’ll never actually change the selected cell.
Sub OffsetRangeValue()
Range("A1").Select
str1 = Selection.Offset(0, 1)
MsgBox str1
End Sub
See? Cell

Change Contents of Offset Cell
This time, we’ll change the value of an offset cell without selecting that cell.
Sub OffsetVBAmap()
Range("A1").Select
Selection.Offset(2, 1) = "Hey!"
End Sub
Like magic, cell

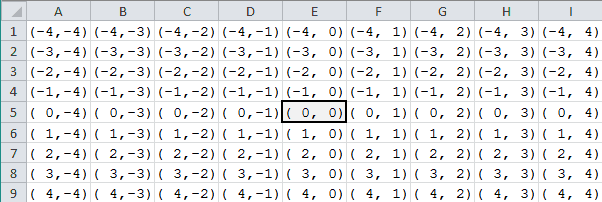
VBA Offset Map
If you’re wondering how I made the VBA offset map in my header image, here’s a bonus macro for you:
Sub OffsetVBAmapBonus()
Range("A1").Select
For i = 0 To 8
    For j = 0 To 8
    If Len(CStr(Selection.Row - 5)) = 1 Then
        str1 = " " & CStr(Selection.Row - 5)
    Else
        str1 = CStr(Selection.Row - 5)
    End If
    If Len(CStr(Selection.Column - 5)) = 1 Then
        str2 = " " & CStr(Selection.Column - 5)
    Else
        str2 = CStr(Selection.Column - 5)
    End If
    Selection = "(" & str1 & "," & str2 & ")"
    Selection.Offset(1, 0).Select
    Next j
    Selection.Offset(-9, 1).Select
Next i
End Sub
The resulting map tells you what arguments to enter into the offset command to access cells relative to cell

Offset VBA Map
Application Ideas
The power of the Offset VBA command doesn’t come when you select a cell in your macro, like I did in these examples. The power comes when you search through your data for a number or string, then offset relative to that cell once you find it.
I primarily use the Offset VBA property to write scripts in other programming languages. For example, I’m not a Bash or Awk expert. It would take me a while to write a functional Bash or Awk script that loops through a bunch of files.
Instead of wasting time trying to write a short, clean script in these languages, I’ll use VBA to write hundreds of simple Bash or Awk command lines and copy and paste the commands from Excel into Unix or Linux. It’s certainly not practical, but it gets the job done!
Most people try to deter VBA programmers from using the offset command, because it’s slow, clunky, and often unnecessary. As I’ve been saying since my first post over one year ago, I’m not “most people.” Form follows function. As long as your code is functional and meets your intended purpose, who am I to deter you? Most VBA projects just aren’t resource-intensive enough to warrant optimizing. Do what you’ve gotta do!
That’s all for this tutorial. When you’re ready to take your VBA to the next level, subscribe using the form below.

