Introduction
Create your UserForm ListBox
Create your Class Module
Launching your UserForm
Closing Thoughts
Introduction
By default, you can only align the text in UserForm ListBoxes as a group. In other words, all the text in each column must be aligned the exact same way - either left, right or center. That’s the all-or-nothing behavior you have to deal with when you set the TextAlign property of your UserForm Listbox.
Fortunately, there’s a better way.
With the class module I’m going to show you in this tutorial, you will be able to align each column in your listbox however you want! That means you can have a listbox with one column left-justified, one column centered and one column right-justified. You can align your UserForm ListBox columns however you want!
Create your UserForm ListBox
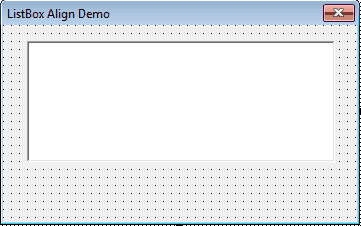
If you made it to this page, I’m going to assume you already have a UserForm with a ListBox on it. For this demonstration, I’m just going to make a basic design, like this:

Because I’m feeling lazy today, I’m going to keep the name of my UserForm
Create your Class Module
The Class Module I present in this section is the backbone of this tutorial. Without it, it’s not possible to gracefully align your columns differently within the same ListBox.
Create a new Class Module by clicking Insert in your VBA editor and selecting Class Module.
In your properties window (press F4 if you don’t see a properties window), change the name of the Class to
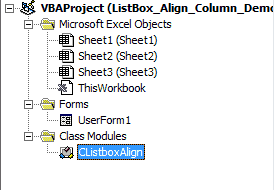
Your Project Explorer Pane (Ctrl-R) should look something like this

Once you do that, copy and paste the following code into your newly-created Class Module.
'PLACE IN A CLASS MODULE
Option Explicit
'----------------------------------------------------------------------------------------------
'---Developer: Ryan Wells (wellsr.com)---------------------------------------------------------
'---Date:      05/2017-------------------------------------------------------------------------
'---Class:     CListboxAlign-------------------------------------------------------------------
'---Purpose:   Align the text in different columns in a UserForm ListBox differently-----------
'---           This has been adapted from a few sources I stumbled across many moons ago but---
'---           I don't recall the sources.-----------------------------------------------------
'----------------------------------------------------------------------------------------------

Public Sub Center(LBox As MSForms.ListBox, Optional WhichColumn As Integer = 0)
'
' PURPOSE: Center align the text in a listbox column
' HOW TO USE:
'    - First argument is the listbox you want to adjust, the second optional argument is which
'      column in the listbox you want to align.
'    - To use this procedure, you would place a statement like the following in your UserForm_Initialize routine:
'          MyListBoxClass.Center Me.ListBox1, 1
'
    Dim labSizer As MSForms.Label
    Dim lngIndex As Long
    Dim intColumn As Integer
    Dim lngTopIndex As Long
    Dim vntColWidths As Variant

    ' get label control to help size text
    Set labSizer = m_GetSizer(LBox.Parent)
    If labSizer Is Nothing Then Exit Sub

    ReDim sngWidth(LBox.ColumnCount) As Single
    If Len(LBox.ColumnWidths) > 0 Then
        ' decode column widths
        vntColWidths = Split(LBox.ColumnWidths, ";")
        ' fudge for gap between cols
        For intColumn = 1 To LBox.ColumnCount
            sngWidth(intColumn) = Val(vntColWidths(intColumn - 1)) - 5
        Next
    Else
        ' assume default sizes
        For intColumn = 1 To LBox.ColumnCount
            sngWidth(intColumn) = (LBox.Width - (15 * LBox.ColumnCount)) / LBox.ColumnCount
        Next intColumn
    End If

    ' generic font attributes
    With labSizer
        With .Font
            .Name = LBox.Font.Name
            .Size = LBox.Font.Size
            .Bold = LBox.Font.Bold
        .Italic = LBox.Font.Italic
        End With
        .WordWrap = False
    End With

    ' begin processing column width to center align
    lngTopIndex = LBox.TopIndex
    For intColumn = 1 To LBox.ColumnCount
        If intColumn = WhichColumn Or WhichColumn = -1 Then
            ' if you say to center align this column or center align all columns
            For lngIndex = 0 To LBox.ListCount - 1
                LBox.TopIndex = lngIndex
                labSizer.Width = LBox.Width
                labSizer.Caption = Trim(LBox.List(lngIndex, intColumn - 1))
                labSizer.AutoSize = True
                Do While labSizer.Width < sngWidth(intColumn)
                    labSizer.Caption = " " & labSizer.Caption & " "
                Loop
                LBox.List(lngIndex, intColumn - 1) = labSizer.Caption
            Next lngIndex
        End If
    Next intColumn
    LBox.TopIndex = lngTopIndex

    LBox.Parent.Controls.Remove labSizer.Name
    Set labSizer = Nothing

End Sub

Public Sub Left(LBox As MSForms.ListBox, Optional WhichColumn As Integer = 0)
'
' PURPOSE: Left align the text in a listbox column
' HOW TO USE:
'    - First argument is the listbox you want to adjust, the second optional argument is which
'      column in the listbox you want to align.
'    - To use this procedure, you would place a statement like the following in your UserForm_Initialize routine:
'          MyListBoxClass.Left Me.ListBox1, 1
'
    Dim lngIndex As Long
    Dim intColumn As Integer
    Dim lngTopIndex As Long
    Dim vntColWidths As Variant
    ReDim sngWidth(LBox.ColumnCount) As Single

    If Len(LBox.ColumnWidths) > 0 Then
        ' decode column widths
        vntColWidths = Split(LBox.ColumnWidths, ";")
        ' fudge for gap between cols
        For intColumn = 1 To LBox.ColumnCount
            sngWidth(intColumn) = Val(vntColWidths(1)) - 5
        Next
    Else
        ' assume default sizes
        For intColumn = 1 To LBox.ColumnCount
            sngWidth(intColumn) = (LBox.Width - (15 * LBox.ColumnCount)) / LBox.ColumnCount
        Next intColumn
    End If

    lngTopIndex = LBox.TopIndex
    For intColumn = 1 To LBox.ColumnCount
        If intColumn = WhichColumn Or WhichColumn = -1 Then
            ' if you say to left align this column or left align all columns
            For lngIndex = 0 To LBox.ListCount - 1
                LBox.TopIndex = lngIndex
                LBox.List(lngIndex, intColumn - 1) = Trim(LBox.List(lngIndex, intColumn - 1))
            Next lngIndex
        End If
    Next intColumn
    LBox.TopIndex = lngTopIndex

End Sub

Public Sub Right(LBox As MSForms.ListBox, Optional WhichColumn As Integer = 1)
'
' PURPOSE: Right align the text in a listbox column
' HOW TO USE:
'    - First argument is the listbox you want to adjust, the second optional argument is which
'      column in the listbox you want to align.
'    - To use this procedure, you would place a statement like the following in your UserForm_Initialize routine:
'          MyListBoxClass.Right Me.ListBox1, 1
'
    Dim labSizer As MSForms.Label
    Dim lngIndex As Long
    Dim intColumn As Integer
    Dim lngTopIndex As Long
    Dim vntColWidths As Variant
    ' get label control to help size text
    Set labSizer = m_GetSizer(LBox.Parent)
    If labSizer Is Nothing Then Exit Sub

    ReDim sngWidth(LBox.ColumnCount) As Single
    If Len(LBox.ColumnWidths) > 0 Then
        ' decode column widths
        vntColWidths = Split(LBox.ColumnWidths, ";")
        ' fudge for gap between cols
        For intColumn = 1 To LBox.ColumnCount
            sngWidth(intColumn) = Val(vntColWidths(1)) - 5
        Next
    Else
        ' assume default sizes
        For intColumn = 1 To LBox.ColumnCount
            sngWidth(intColumn) = (LBox.Width - (15 * LBox.ColumnCount)) / LBox.ColumnCount
        Next intColumn
    End If

    With labSizer
        With .Font
            .Name = LBox.Font.Name
            .Size = LBox.Font.Size
            .Bold = LBox.Font.Bold
        .Italic = LBox.Font.Italic
        End With
        .WordWrap = False
    End With

    lngTopIndex = LBox.TopIndex
    For intColumn = 1 To LBox.ColumnCount
        If intColumn = WhichColumn Or WhichColumn = -1 Then
            'if you say to right align this column, or right align all columns
            For lngIndex = 0 To LBox.ListCount - 1
                LBox.TopIndex = lngIndex
                labSizer.Width = LBox.Width
                labSizer.Caption = Trim(LBox.List(lngIndex, intColumn - 1))
                labSizer.AutoSize = True
                Do While labSizer.Width < sngWidth(intColumn)
                    labSizer.Caption = " " & labSizer.Caption
                Loop
                LBox.List(lngIndex, intColumn - 1) = labSizer.Caption
            Next lngIndex
        End If
    Next intColumn
    LBox.TopIndex = lngTopIndex
    LBox.Parent.Controls.Remove labSizer.Name
    Set labSizer = Nothing

End Sub

Private Property Get m_GetSizer(Base As MSForms.UserForm) As MSForms.Label
    Set m_GetSizer = Base.Controls.Add("Forms.Label.1", "labSizer", True)
End Property
Make powerful macros with our free VBA Developer Kit This is actually pretty neat. If you have trouble understanding or remembering it, our free VBA Developer Kit can help. It’s loaded with VBA shortcuts to help you make your own macros like this one - we’ll send a copy, along with our Big Book of Excel VBA Macros, to your email address below.
This class module contains 3 subroutines: one for centering, one for left-aligning, and one for right-aligning.
Launching your UserForm
This is where you finally get to witness the result of all your hard work - something like that.
View the code portion of your UserForm by right-clicking your UserForm in the VBA editor and selecting View Code.
When you initialize your UserForm, you’ll want to declare an object as your new class, then tell the compiler how you want each column aligned. When your UserForm is closed, it’s a good idea to clear your class declaration. You’ll see that in my macro.
I’m going to show you my entire UserForm code first, then I’ll walk you through the important parts so you can adapt it to your own application.
'PLACE IN YOUR USERFORM CODE
Option Explicit

Private MyListBoxClass As CListboxAlign

Private Sub UserForm_Initialize()
    Dim lngRow As Long
    Dim lngIndex As Long
    Set MyListBoxClass = New CListboxAlign 'declare the class

    'This is just a sample where I add data to a listbox.
    'You'll want to use your own data.
    '-----------------------------------------------------------------------
    ListBox1.ColumnCount = 3
    With Me.ListBox1
        .AddItem
        .AddItem
        .AddItem
        .List(0, 0) = "First Product"
        .List(1, 0) = "Second Product"
        .List(2, 0) = "Third Product"
        .List(0, 1) = "Basic"
        .List(1, 1) = "Standard"
        .List(2, 1) = "Ultimate"
        .List(0, 2) = "$45.00"
        .List(1, 2) = "$79.00"
        .List(2, 2) = "$100.00"
    End With
    '-----------------------------------------------------------------------

    'This is how you left, center and right align a ListBox.
    MyListBoxClass.Left Me.ListBox1, 1
    MyListBoxClass.Center Me.ListBox1, 2
    MyListBoxClass.Right Me.ListBox1, 3
End Sub

Private Sub UserForm_Terminate()
    'clear the class declaration
    Set MyListBoxClass = Nothing
End Sub
Declaring your Class Variable
You’ll notice at the top of my UserForm code, I declared a variable
In my UserForm_Initialize procedure, I then set this variable as a new class with the line:
Set MyListBoxClass = New CListboxAlignPopulating your ListBox
Everything between the “—–” lines is just a demonstration of me adding values to my ListBox. In this section, I set my listbox to have 3 columns by using the .ColumnCount property of my ListBox. After I populate my listbox, I’m ready to tell my UserForm how to align each column.
Aligning Each Column
There are 3 procedures of
- MyListBoxClass.Left
- MyListBoxClass.Center
- MyListBoxClass.Right
You’ve probably already figured out that this is how I align different columns. I align each column by passing the procedures the name of my ListBox and the column number of the column I want to align.
For example, if I want to right align the 2nd column in my ListBox (which is named
MyListBoxClass.Right Me.ListBox1, 2If instead I’d rather center justify the 2nd column, I would enter this command:
MyListBoxClass.Center Me.ListBox1, 2The first argument is the name of my ListBox and the 2nd argument is the column I want to align. Don’t worry if you forget the syntax. I put detailed comment cards in my class module to refresh your memory.
Displaying your UserForm
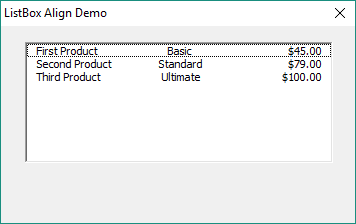
When you finally launch your UserForm, you’ll see that each column has a different justification. Each one is aligned differently!

VBA UserForm ListBox with Each Column Aligned Differently
The first column is left-justified, the second column is centered and the last column is right-justified. This is something you simply cannot do by using the .TextAlign property of your ListBox.
It’s worth mentioning here that special ListBox column alignment like this won’t work if you’re populating your ListBox via the .RowSource property. You’ll be greeted with a Run-Time Error 70 message. Interestingly, this is the same error message you’d get if you tried to add an item using .AddItem on a ListBox linked to a RowSource. If you have your .RowSource property set to something, remove it, add your items to your listbox manually using a loop, then the column alignment should work.
Closing Thoughts
Congratulations! You just made something that most people can’t do in Excel. I’m serious here - you really ought to feel good about this.
That’s all for this tutorial. When you’re ready to take your VBA to the next level, subscribe using the form below.

