The ComboBox is a Control for VBA userforms that allows the user to choose from a list of options. It is also known as a drop-down menu, but to serve its purpose as a dropdown menu, you’ll first need to populate the combobox for the user so they can actually make a choice. There are two ways to populate a ComboBox with VBA:
- With the .AddItem method
- With the .List property
The rest of this tutorial will teach you how to add entries to, or populate, your own VBA userform comboboxes, and we’ll have a little fun teaching it!
Create the UserForm
Before we write any code to populate our combobox, we need to create the box itself and the userform on which it lives.
I’m sure you already have your own design, but in this tutorial, our userform will carry the name
Here is what the layout looks like:
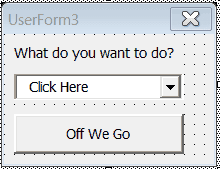
Userform with three elements: a combobox, a label, and a button
As you can see, we put default text “Click Here” into the combobox. This is not one of the dropdown options; it’s simply a filler before the user clicks the menu. You can edit it directly by clicking into the combobox in the preview window, just like for the Label and CommandButton controls, but what you really want to do is populate your combobox using VBA code, like we’ll demonstrate in the next section.
Populate the VBA Combobox
In this section, we will show you how to populate a combobox in the UserForm_Initialize VBA Event by either adding items sequentially or reading the values directly from an array.
Accessing the Initialization Event
VBA hands control off to the UserForm_Initialize Event only after the userform has been called. If you want a more in-depth discussion about the logic of showing a userform, check out our Userform Show article. In short, here’s the code for showing our particular userform:
Sub CBUFShow()
Combobox_Userform.Show
End Sub
Make sure you place this in a regular Module, not the userform’s dedicated private code.
Populate ComboBox with .List
Now we’re going to begin actually populating the values in our ComboBox. One way to add multiple values to your ComboBox is to use the ComboBox List property, or .List.
To use the ComboBox .List property, you simply need to put your dropdown menu options into an array and separate each dropdown item by a comma. You can use the Array function to create the array needed for the .List property. Don’t forget each option needs quotes since your entries are strings!
Here’s a sample code that goes into the userform’s private code, not a regular module, and adds two items to your dropdown list once the userform is initialized:
Private Sub UserForm_Initialize()
ComboBox_Demo1.List = Array("Choose a Single File", "Choose Multiple Files")
End Sub
Make powerful macros with our free VBA Developer Kit Tutorials like this can be complicated. That’s why we created our free VBA Developer Kit and our Big Book of Excel VBA Macros to supplement this tutorial. Grab them below and you’ll be writing powerful macros in no time.
When you run this code, you’ll get this beauty:
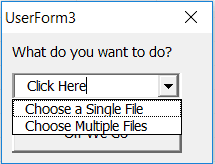
The userform with populated combobox open
Notice the userform’s caption is “UserForm3”, but the userform name is
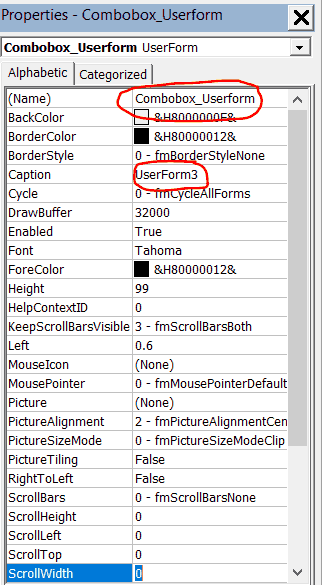
The Properties Window for
Populate ComboBox with a Range
You can also use the .List property to populate a userform combobox with a range of cells in your spreadsheet. Take this macro, for example:
Private Sub UserForm_Initialize()
'add column of data from spreadsheet to your userform ComboBox
ComboBox_Demo1.List = Sheets("Sheet1").Range("A1:A10").Value
End Sub
This macro will quickly add all the values in range
Populating Multi-Column ComboBox
Speaking of columns of data, the .List property also has an optional second argument, pvargColumn, to let you populate specific columns of a multicolumn ComboBox.
If you want to use the optional arguments in the .List property to create multi-columned comboboxes, there are some extra steps to take.
First you need to change the number of columns in your combobox, much like you would in my tutorial on aligning columns differently in a UserForm ListBox. You can do this under the Properties window mentioned earlier, or you can do it at runtime by using the .ColumnCount property of the combobox object, like this:
ComboBox_Demo1.ColumnCount = 2Then, you can create a dummy array that matches the dimensions you want for the list of options. Remember the .List array is zero-based. Let’s say you want a 3-row, 2-column list with any kind of data, like numbers or dates, so you dimensionalize an array, like this:
Dim initial_array(2, 1) As VariantFrom here, you have two choices. You can either (1) populate your array and then populate your ComboBox with your full array, or (2) populate your ComboBox with an empty array and then fill each array element individually.
Either way, we’ll use the .List property, just like before, to add items to your ComboBox. The second option accesses each “cell” in the list to fill out the final dropdown menu.
Option 1: Pass Full Array to ComboBox
Private Sub UserForm_Initialize()
ComboBox_Demo1.ColumnCount = 2
Dim initial_array(2, 1) As Variant
'populate array
initial_array(0, 0) = "Option1"
initial_array(0, 1) = "Great Idea"
initial_array(1, 0) = "Option2"
initial_array(1, 1) = "Mediocre Idea"
initial_array(2, 0) = "Option3"
initial_array(2, 1) = "Terrible Idea"

'then populate combobox with full array
ComboBox_Demo1.List = initial_array
End Sub
Option 2: Pass Empty Array to ComboBox
Private Sub UserForm_Initialize()
ComboBox_Demo1.ColumnCount = 2
Dim initial_array(2, 1) As Variant

'populate list with empty array
ComboBox_Demo1.List = initial_array

'then populate combobox
ComboBox_Demo1.List(0, 0) = "Option1"
ComboBox_Demo1.List(0, 1) = "Great Idea"
ComboBox_Demo1.List(1, 0) = "Option2"
ComboBox_Demo1.List(1, 1) = "Mediocre Idea"
ComboBox_Demo1.List(2, 0) = "Option3"
ComboBox_Demo1.List(2, 1) = "Terrible Idea"
End Sub
Whichever option you choose, you’ll be left with a nice two-column, three-row VBA ComboBox that’s fully populated, like this one:
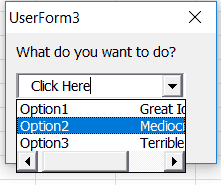
A Populated Multi-Column ComboBox
Populate ComboBox with .AddItem
If instead you want to add items with methods (as opposed to properties), you can use the ComboBox .AddItem method during initialization. Each time you call the AddItems method, a new item will appear in your ComboBox.
More interestingly, you can use .AddItems to add items dynamically after the userform has already been created.
In code, populating your UserForm ComboBox dynamically would look something like this:
Private Sub UserForm_Click()
ComboBox_Demo1.AddItem "You Clicked Me!"
End Sub
We used the Event UserForm_Click, so when the user clicks on the userform area, an item is added to the bottom of our dropdown list. The initial userform has the default values we added with the .List property, but now we let the user add items by clicking on the userform, as well.
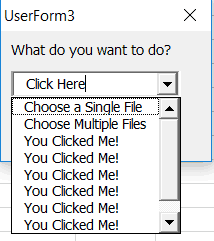
The dropdown menu after clicking on the userform several times
I know this is a silly example, but it demonstrates how you can dynamically alter your combobox when certain conditions are met; in this case, when the user clicks the form.
You could also populate the list with .AddItem in the initialization stage if you wanted, like this:
Private Sub UserForm_Initialize()
ComboBox_Demo1.AddItem "abc"
ComboBox_Demo1.AddItem "123"
ComboBox_Demo1.AddItem "def"
ComboBox_Demo1.AddItem "456"
End Sub
The VBA ComboBox AddItem method is the most popular way to add items to a userform, although I’ve found both options to be equally flexible.
Imagine you had a lot of rows in a text file or something that you wanted to add to your combobox. You could nest the .AddItem method inside a For Loop to programatically add each item. Placing the AddItem ComboBox method inside a loop is a common practice for populating a UserForm ComboBoxes.
Add Item to Different Positions in ComboBox
The AddItem method of userform comboboxes also accepts an optional second argument: pvargIndex. When included, the pvargIndex tells your combobox where you want to add your new entry.
The items in your combobox range from 0 (at the top) to .ListCount (at the bottom). For example, if you fed the argument a 0, it would add a new entry to the top of your userform. Omitting the argument is the same as passing the AddItem method an argument of .ListCount.
Let’s look at a couple examples. In the following code, the “You Clicked Me!” item is added in the first position instead of the default last position.
Use
ComboBox_Demo1.AddItem "You Clicked Me!", 0instead of
ComboBox_Demo1.AddItem "You Clicked Me!"to place the code at the top of your ComboBox (Position 0).
Let’s take a look at one more example.
Private Sub UserForm_Click()
With ComboBox_Demo1
    .AddItem "I'm at the top!", 0 'add item to top of combobox
    .AddItem "I'm at the bottom!", .ListIndex 'add item to bottom of combobox
    .AddItem "I'm at position 3!", 2 'add item to third spot in userform
End With
End Sub
In this example, we dynamically populated our combobox by adding an item to the top, bottom and at the 3rd entry in the dropdown menu by specifying a pvargIndex position. Notice how a pvargIndex of 2 added an item to the 3rd slot. Remember, ComboBox indexing begins at position 0!.
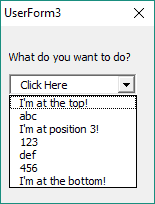
pvargIndex to add items to ComboBox
Conclusion
Creative developers can use both .List and .AddItem to make interactive userform dropdown lists. By using ComboBoxes (or dropdowns), developers are able to guide user interactions with the program while still allowing a degree of freedom to the end users.
We hope you enjoyed this tutorial. To take your VBA skills to the next level, check out more of our free VBA tutorials. Test your skills by trying to link concepts. For example, can you combine [VBA GetOpenFilename] feature with a ComboBox for an interactive dropdown. When you’re ready to take your VBA to the next level, subscribe using the form below.

