In this tutorial, I will demonstrate how to send emails from Excel using VBA. This tutorial works in conjunction with Outlook, but all the macros are actually entered in Excel. You’ll be able to use the skills you learn in this tutorial to send emails from Excel to multiple users with a custom subject and body. We’ll even introduce how to send emails with attachments using VBA.
Connecting directly to the email servers can become somewhat complicated, especially if you want to implement security features. Connecting directly can be done with VBA (what can’t?), but let’s explore sending emails from on-system email clients. For us, that will be Outlook, since MS Office products play nicely with VBA, which was developed specifically for Microsoft products.
- Sending Emails Without VBA
- Sending Emails from Excel With VBA
- Common Properties
- Attachments
- Displaying and Sending
- Late Binding
Sending Emails Without VBA
You don’t actually need VBA at all to send an email in Excel. There is a Quick Menu option just for that.
If you enable the Quick Menu option E-mail, you can send the current workbook as an attachment from the default email client on your computer. The current workbook is automatically attached, and you can simply send it. However, there is no customization and no VBA, which isn’t very useful for a VBA tutorial. ;)
To enable and use the Quick Menu option, take a look at this picture.
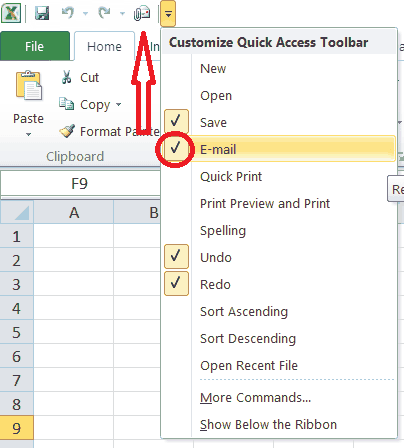
The red circle indicates how to enable Email, and the red arrow shows the Email button.
Sending Emails from Excel With VBA
Let’s say you want to do some customization. For example, you may have a list of recipients in Column A and the filepath of an associated file in Column B. You need to send one email to each person and attach the right file. This level of customization and automation (and admitted coolness) is simply not possible with the Quick Menu method.
But before we start anything, we need to set our references.
Set Your References
To set the references for Outlook, go to Tools > References… like so:
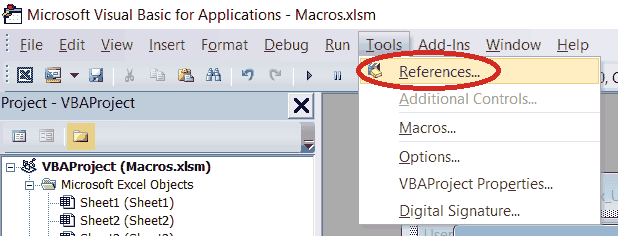
Click the References... option
Then you will need to find both the
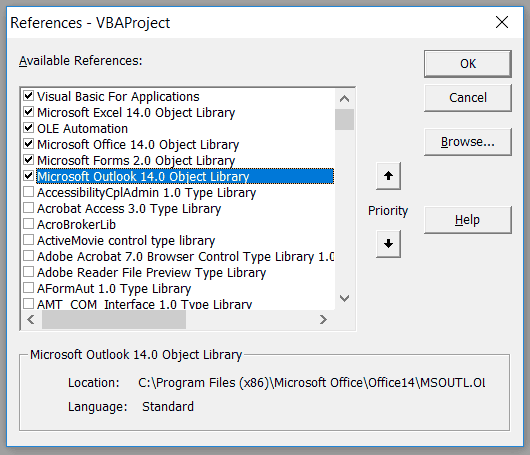
The References... Window With the Necessary References
If you have multiple versions of MS Office installed, you can either use the one you use as the default or use late binding, which we will get to later.
The OLE Automation library may already be selected by default.
What are References?
As a short side note, References are simply collections of code already written for you by others (here, written by Microsoft). They’re also known as libraries, and they let you access lots of methods and properties so you don’t have to write all of them manually.
For us, the OLE Automation reference lets MS Office applications talk to each other, and the MS Outlook reference gives us all the objects, methods and properties available to Outlook. If you were to write code directly in Outlook’s VBE, these would be “natively” available, but Excel generally doesn’t need Outlook’s VBA objects or methods or properties, so the programmer must manually include them. If you look at the massively long list of references, you can understand why all these references aren’t automatically included for every project.
Set Your Variables
Not setting the references gives you two problems: first, your code won’t run because Excel cannot find the pre-written code; second, you won’t get the handy automatic help from Intellisense (which I find very useful when learning or just when I forget what exactly goes into a function). Now that we’ve set the references, we can create our variables.
You can DIM your variables like usual, and the types are Outlook as an Application and a blank email as an Outlook MailItem.
Dim outlookApp As Outlook.Application
Dim myMail As Outlook.MailItem

Set outlookApp = New Outlook.Application
Set myMail = outlookApp.CreateItem(olMailItem)
Make powerful macros with our free VBA Developer Kit It’s easy to copy and paste a macro like this, but it’s harder make one on your own. To help you make macros like this, we built a free VBA Developer Kit and wrote the Big Book of Excel VBA Macros full of hundreds of pre-built macros to help you master file I/O, arrays, strings and more - grab your free copy below.
When you do this, you will create an Instance of Outlook with which Excel can interact. You can think of this step like Excel opening a special window of Outlook just for itself. The .CreateItem method creates a MailItem, which is nothing but a blank email.
When you type into the VBE, Intellisense will display the other options for .CreateItem. You can create contacts, tasks, and other Outlook objects. I will leave this as “an exercise for the reader,” as my math textbooks always said - i.e., it’s outside the scope of this tutorial but related, so you can probably play with it if you want (use Intellisense to help!).
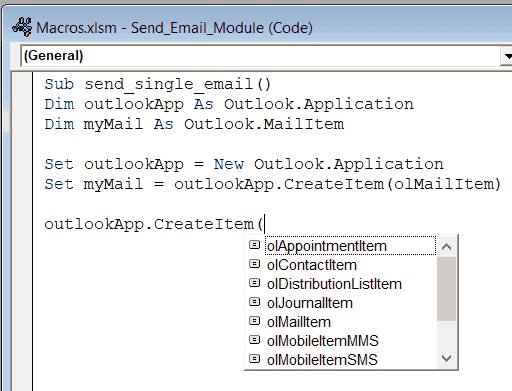
The Intellisense List of Options for Outlook's .CreateItem method
Common Properties
Now that you have your Outlook Application instance and your MailItem object, you can modify the latter to your liking.
There are several properties for MailItem, but we will only look at the To, CC, BCC, and Subject fields, for now.
Each one acts just like a string which you can manipulate. When it is on the left side of the equal sign, it is written to (it “receives” the information). When on the right side, it is read from (it “provides” information).
So, when you write to the .To property, it is just like writing to a regular string. For each of the recipient properties, you should delimit the list with semicolons (;).
For example, if you had email addresses in Column A, you could concatenate them into a long string then modify .To. Let’s do it for To and CC:

Emails in two lists, one for the To field and one for the CC field
You might have some code to grab the email addresses and concatenate them like this:
For i = 2 To 4
    to_emails = to_emails & Cells(i, 1) & ";"
    cc_emails = cc_emails & Cells(i, 2) & ";"
Next i
Then you can simply send .To property and .CC property like this:
myMail.To = to_emails
myMail.CC = cc_emails
The BCC field is exactly the same. And the subject field is just as simple, but there’s no need to use semicolons for anything. A subject line is a subject line. You can include semicolons if you want, but there is only one subject line. This contrasts with recipients, of whom there may be multiple.
Editing the Email Body with VBA
If you want to fill in the email body programatically, you can use the .Body method. Using the .Body method will only let you add unformatted text, which is great for quick emails, but not so nice if you want quick and pretty emails.
If you know a little HTML and CSS, you can make formatted email bodies using the .HTMLBody method, instead of the plain Body method. Here’s an example to get you started:
myMail.HTMLBody = "<b>This is bold</b><br> and this isn't"
Email with Formatted Body using HTMLBody
Attachments
Now let’s look at the attachments. We’re just going to introduce the concept today, because we have an entire post dedicated to sending attachments with VBA!
Sending attachments requires the use of the .Attachments.Add method. The argument is the attachment’s filepath as a string:
myMail.Attachments.Add "c:\users\cory\docs\My Cool Attachment.docx"Here, I added
You might even want to let the user choose a file, like we showed you in our GetOpenFilename VBA tutorial.
A snippet of code to implement that could be:
file_to_send = Application.GetOpenFilename
myMail.Attachments.Add file_to_send
The
Displaying and Sending
If you want to send your message without looking at it - useful for situations when you will send 100 emails via a for-loop - you don’t need to display it. Just use the method .Send.
However, if you want to display the email, perhaps to edit the body text manually or to make sure everything looks right, you can use the .Display method. The only optional argument for .Display is whether the display should be opened in Modal mode.
If you set the Modal argument to TRUE, Excel will not continue the macro until you finish editing the email (by sending, saving, or otherwise closing it). If you set the Modal argument to FALSE or omit the argument, the rest of the code will run in the background or you can edit the spreadsheet with the email still open. You might want to do this if you will take a long time editing the email but need to run another macro or use Excel in some way.
Finished Example
Now, let’s put all these skills together. Here is a full code sample that sends one email to one recipient with one chosen attachment and displays the email before sending it.
Sub send_single_email_with_chosen_attachment()
'Must add references (Tools > References) to
' 1) OLE Automation
' 2) Microsoft Outlook xx.0 Object Library
Dim outlookApp As Outlook.Application
Dim myMail As Outlook.MailItem
Dim Source_File As String

Set outlookApp = New Outlook.Application
Set myMail = outlookApp.CreateItem(olMailItem)

myMail.To = "ryan.wellsr@gmail.com"
myMail.Subject = "Check Out my File!"
'myMail.HTMLBody = "<b>This is bold</b><br> and this isn't" 'uncomment this if you want a formatted body

Source_File = Application.GetOpenFilename
myMail.Attachments.Add Source_File

myMail.Display True 'comment this out if you don't want to display email
myMail.send 'comment this out if you don't want to send yet

End Sub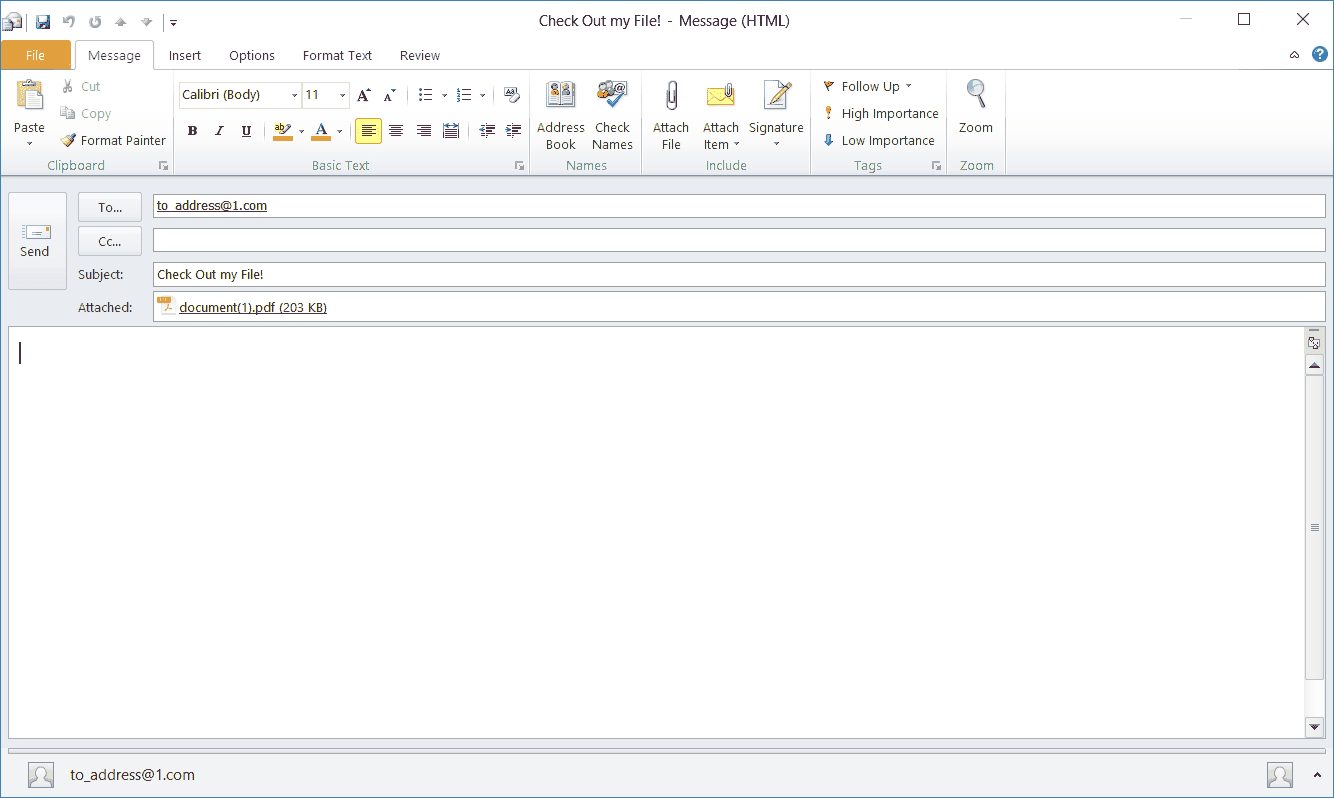
Email with Attachment, To address, and Subject filled in
Word of Caution When Using .Display and .Send
When you display the email, if you send it via Outlook’s GUI (by pressing the Send button in the above picture), the email will be moved to Outlook’s Outbox folder and Excel won’t be able to see it anymore. That means when the VBA tries to execute myMail.Send, you will receive an error - and lots of frustration from your users. So, if you are going to display the message then send it via code, make sure to check whether it is sent or not before executing the .Send method.
Conversely, if you execute .Send then try to display the message, it will have similary been moved and Excel won’t be able to find the email to display it. Excel will again give you an error in the process.
Using Late Binding
In the beginning of this tutorial, I mentioned late binding. In the above examples, we used early binding. For our purposes, the main difference is how you find the right references and the presence of Intellisense. If for some reason you cannot find the correct references, you can always use late binding which lets the operating system pick the version of Outlook and its references to use.
When we work only within Excel, this is usually unimportant since all Excel objects are already available from within Excel. But when we interface with other applications, it is important.
If you do this, however, you will not get any Intellisense help, and compile errors will pop up at runtime rather than at compile time. That means if you have errors, like misspelled method names, it won’t be caught until the code is run, possibly by the user.
To use late binding, you should replace
Dim outlookApp As Outlook.Application
Dim myMail As Outlook.MailItem

Set outlookApp = New Outlook.Application
Set myMail = outlookApp.CreateItem(olMailItem)
with
Dim outlookApp as Object
Dim myMail as Object

Set outlookApp = CreateObject("Outlook.Application")
Set myMail = outlookApp.CreateItem(0)
So that was our tutorial on sending emails through Outlook from Excel. Using for loops, you can automate sending large numbers of files to large numbers of people. Using the .Subject and .Body properties you can automate the rather menial task of sending different files to different people with custom messages for each one, too.
You also learned about the broader concepts of Early and Late Binding as well as OLE Automation and a bit about References/Libraries. These are very powerful tools you can use across many real-world applications. I hope this was helpful, and happy coding! Remember,when you’re ready to take your VBA to the next level, subscribe using the form below.

