Introduction | Example | Tutorial | Applications
Introduction - VBA Gmail
Sending an email through Gmail with VBA is easy once you know the correct Gmail SMTP server and port information. After configuring your message using the Microsoft CDO library, your macro will be ready to send. If you have 2-step verification (2-factor authentication) enabled on your Gmail account, there’s an extra step you’ll need to take. I’ll walk you through the whole process in this tutorial.
Example - VBA Gmail
Send Email through Gmail with VBA
'For Early Binding, enable Tools > References > Microsoft CDO for Windows 2000 Library
Sub SendEmailUsingGmail()
    Dim NewMail As Object
    Dim mailConfig As Object
    Dim fields As Variant
    Dim msConfigURL As String
    On Error GoTo Err:

    'late binding
    Set NewMail = CreateObject("CDO.Message")
    Set mailConfig = CreateObject("CDO.Configuration")

    ' load all default configurations
    mailConfig.Load -1

    Set fields = mailConfig.fields

    'Set All Email Properties
    With NewMail
        .From = "youremail@gmail.com"
        .To = "recipient@domain.com"
        .CC = ""
        .BCC = ""
        .Subject = "Demo Spreadsheet Attached"
        .Textbody = "Let me know if you have questions about the attached spreadsheet!"
        .Addattachment "c:\data\testmail.xlsx"
    End With

    msConfigURL = "http://schemas.microsoft.com/cdo/configuration"

    With fields
        .Item(msConfigURL & "/smtpusessl") = True             'Enable SSL Authentication
        .Item(msConfigURL & "/smtpauthenticate") = 1          'SMTP authentication Enabled
        .Item(msConfigURL & "/smtpserver") = "smtp.gmail.com" 'Set the SMTP server details
        .Item(msConfigURL & "/smtpserverport") = 465          'Set the SMTP port Details
        .Item(msConfigURL & "/sendusing") = 2                 'Send using default setting
        .Item(msConfigURL & "/sendusername") = "youremail@gmail.com" 'Your gmail address
        .Item(msConfigURL & "/sendpassword") = "yourpassword" 'Your password or App Password
        .Update                                               'Update the configuration fields
    End With
    NewMail.Configuration = mailConfig
    NewMail.Send

    MsgBox "Your email has been sent", vbInformation

Exit_Err:
    'Release object memory
    Set NewMail = Nothing
    Set mailConfig = Nothing
    End

Err:
    Select Case Err.Number
    Case -2147220973  'Could be because of Internet Connection
        MsgBox "Check your internet connection." & vbNewLine & Err.Number & ": " & Err.Description
    Case -2147220975  'Incorrect credentials User ID or password
        MsgBox "Check your login credentials and try again." & vbNewLine & Err.Number & ": " & Err.Description
    Case Else   'Report other errors
        MsgBox "Error encountered while sending email." & vbNewLine & Err.Number & ": " & Err.Description
    End Select

    Resume Exit_Err

End Sub
Make powerful macros with our free VBA Developer Kit This is actually pretty neat. If you have trouble understanding or remembering it, our free VBA Developer Kit can help. It’s loaded with VBA shortcuts to help you make your own macros like this one - we’ll send a copy, along with our Big Book of Excel VBA Macros, to your email address below.
Tutorial - VBA Gmail
Late Bindings vs Early Binding
I set this macro up with late binding, which means you don’t have to enable any external libraries. All you have to do is copy and paste the macro, and it will be ready to use. The downside is you won’t get auto-complete (IntelliSense) when you’re typing.
To enable auto-complete, you need to transform the macro to Early Binding. Go to Tools > References in your VBA editor and check the box beside Microsoft CDO for Windows 2000 Library. Then, when initializing your variables, replace everything above the “load all default configurations” comment with the following block of code:
Dim NewMail As CDO.Message
    Dim mailConfig As CDO.Configuration
    Dim fields As Variant
    Dim msConfigURL As String
    On Error GoTo Err:

    'early binding
    Set NewMail = New CDO.Message
    Set mailConfig = New CDO.Configuration
Configuring your Gmail
Before you can programmatically send an email through your Gmail account using VBA, or any other programming language, there are a few steps you need to take. The steps you take depend on whether or not you have 2-step verification set up on your Gmail account. We’ll walk you through both options here.
Configuring Gmail without 2-step verification
If you don’t have 2-step verification set up on your account, you may need to enable “less secure apps” in your Gmail mailbox settings in order to get your macro to work.
To enable less secure apps, follow these steps:
- Navigate to your Google Security Settings in your Google Account Settings
- On the bottom of the page, in the Less secure app access panel, click Turn on access.
If you have 2-step verification enabled, you’ll see a message like This setting is not available for accounts with 2-Step Verification enabled. Such accounts require an application-specific password for less secure apps access.
If you got this message, we’ll walk you through how to configure your application-specific password in the next section.
Configuring Gmail with 2-step verification
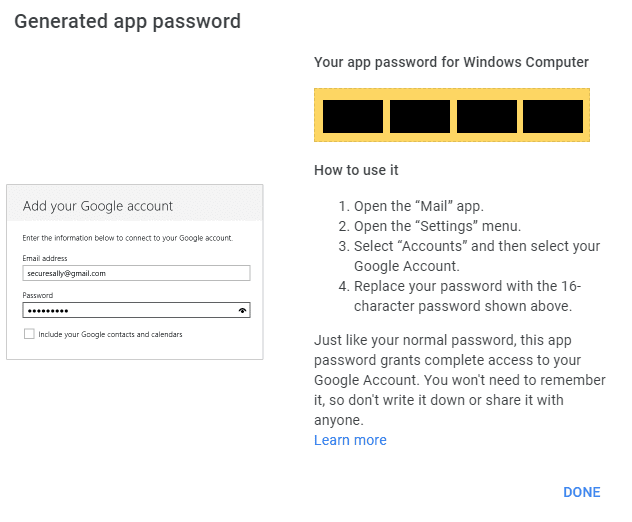
2-step verification is just a second step you take when logging into your Google account, like entering a code or security key. If this is how you log into your account, you’ll need to create a unique app password specifically for sending emails with VBA. Here’s how you do that:
- Navigate to your App Passwords page in your Google Account Settings. If this page doesn’t work for you, most likely 2-Step Verification isn’t set up for your account or Advanced Protections is enabled.
- Once on the App Password page, scroll to the bottom.
- Under Select app, choose Mail.
- Under Select Device, choose Windows Computer.
- Click Generate.

This should lead you to a screen with a 16-character App Password. Remember this password! This 16-character code is what we’ll put for our account password in your VBA macro in the next section.

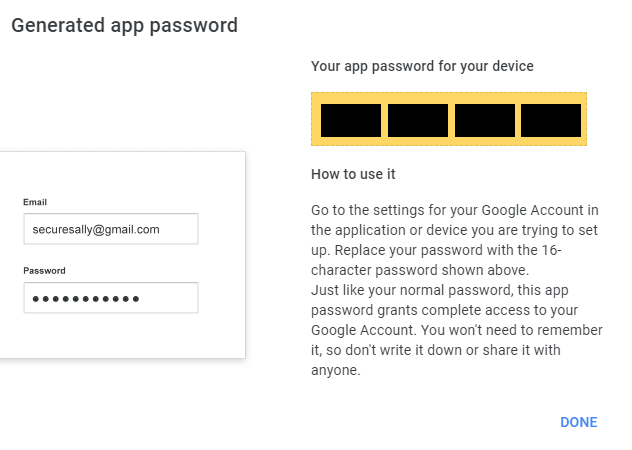
Note: You may be able to select “Other (Custom Name)” in the Select app dropdown in Step 3, above. From there, you could give your app password a more meaningful description, like “VBA SMTP.” This is my preferred choice but Google has restrictions on how many “Other” passwords you can have activated, so that’s why I defaulted to the “Mail > Windows Computer” option. They both work the same way. If you choose Other, your App Password screen will look like this:

Configuring your Macro
Customizing your Gmail Message
Once you have your Google Account set up, you’re ready to configure your macro. There are a couple fields you need to change to get the macro to work for your account. The With NewMail code block has parameters you can change to control your message.
With NewMail
        .From = "youremail@gmail.com"
        .To = "recipient@domain.com"
        .CC = ""
        .BCC = ""
        .Subject = "Demo Spreadsheet Attached"
        .TextBody= "Let me know if you have questions about the attached spreadsheet!"
        .AddAttachment "c:\data\testmail.xlsx"
    End With
The
.Sender = "youremail@gmail.com"
.From = "Your Name"
To send emails to more than one email address, comma-delimit the
.To = "recipient1@domain1.com, recipient2@domain2.com"To attach more than one attachment to your email, just add multiple
.AddAttachment "c:\data\spreadsheet.xlsx"
.AddAttachment "c:\data\rawdata.pdf"
Updating your Configuration Fields
The With fields section is where you need to adjust the SMTP settings specific to your Gmail account.
With fields
        .Item(msConfigURL & "/smtpusessl") = True             'Enable SSL Authentication
        .Item(msConfigURL & "/smtpauthenticate") = 1          'SMTP authentication Enabled
        .Item(msConfigURL & "/smtpserver") = "smtp.gmail.com" 'Set the SMTP server details
        .Item(msConfigURL & "/smtpserverport") = 465          'Set the SMTP port Details
        .Item(msConfigURL & "/sendusing") = 2                 'Send using default setting
        .Item(msConfigURL & "/sendusername") = "youremail@gmail.com" 'Your gmail address
        .Item(msConfigURL & "/sendpassword") = "yourpassword" 'Your password or App Password
        .Update                                               'Update the configuration fields
    End With
Here’s some information you need to know about this section. First, the smtpserver field is smtpserverport field is
Second, the sendusername field should be the full email address associated with your Gmail account. It’s the same username you use to login.
Finally, let’s talk about the sendpassword field. If you don’t have 2-step verification enabled, you simply put your account password here and you’ll be ready to run your macro. It’s worth noting Google has been cracking down on exposing your password like this, so I highly recommend enabling 2-step verification and using an App Password, instead.
Speaking of App Passwords, remember that 16-digit code you generated earlier (if you had 2-step verification enabled)? That 16-digit code is what you need to paste into the sendpassword field if you’re using 2-step verification on your Google account.
Once you update these fields, you’re ready to run your macro.
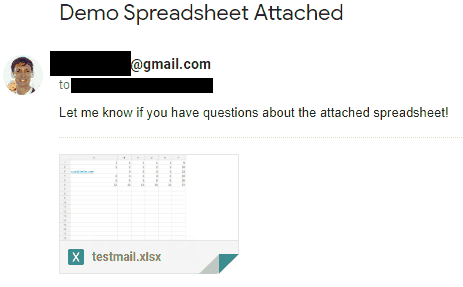
VBA Email successfully sent through Gmail
That’s all there is to it! Once you have your Gmail set up to support sending emails from external codes and have your macro set up to properly link to your account, you’re ready to run the

Application Ideas
You can use a macro like this to make a custom mail merge application to mass send emails to a list of email addresses. You’ll be able to quickly loop through a list of email addresses in your spreadsheet and send to multiple recipients, though I recommend disabling the msgbox warnings if you’re sending in a loop!
One thing to keep in mind is Google places limits on the number of emails you can send per day. For example, there’s a G Suite limit of 2000 messages per day. Keep this in mind and review your bulk sending practices to avoid being blocked or sent to spam.
I have a free VBA developer’s kit I want to send you as part of my Write Better Macros in 7 Days challenge. To see how this dev kit can take your VBA to the next level, please subscribe using the form below:

