Inserting a row in a spreadsheet seems like a straightforward task. If you don’t overthink it, you could probably guess right now how to .Insert a Row into the Rows collection without looking up anything else. However, one of my favorite Bertrand Russell quotes applies here: everything is vague to a degree you do not realize until you have tried to make it precise.
In that spirit, what exactly is meant by row? Is it the row of a table? The row of the entire sheet? Can a single cell be a row if we constrain ourselves to a single column? Let’s take a look at the different ways to insert rows.
The Guessable Method
I’m going to call this method the guessable method, because, well, even non-programmers could probably guess how it do it. Let’s say you want a new Row 2. Perhaps you need to load some data into it because you’re using a worksheet as a reverse chronological database for sales - against all advice, might I add. Tip: don’t use Excel as a database. VBA works in Access, too.
To add a new Row 2, it really is as simple as
Rows(2).InsertTo be more precise, this accesses the Rows collection and uses the .Insert method for the second entry. .Insert pertains to many objects, but VBA interpolates you would like to insert a row when accessing the Rows collection.
If you’d like to inject several rows, you need to put the range into quotes:
Rows("2:4").Insert 'this inserts THREE rows (2, 3, and 4)This method inserts entire rows, from Column A all the way to Column XFD or whatever your rightmost column is. While this is the guessable method because it’s simple, simplicity is not the only method or even the preferred method for all use cases.
The Table Row
In spreadsheet terminology, “row” can be, believe it or not, a somewhat nebulous term. While Rows(1).Insert does indeed insert a row, this type of row spans the entire worksheet. This method isn’t all that useful if you only want to change part of a table or if you have two tables side-by-side and you only want to target one of them.
Let’s say you use a UserForm to gather data about orders, then have two subroutines that run: one injects new orders into the left table, while the other changes the inventory table on the right. Rows.Insert will not produce the desired result here because you don’t want to shift rows in the inventory table on the right while updating the order table on the left.
To target a row within a table, you can target the top row of the table using the range in two ways. One way is specify the columns and rows in your statement:
Sub InsertRow()
Range("A2:E2").Rows.Insert      'target the row directly
End Sub
In fact, you could even drop the .Rows part from this and get the same result, because Excel understands this range is indeed a single row.
Alternatively, if you prefer to use relative locations:
Sub InsertRow2()
Range("A1:E2").Rows(2).Insert   'target the second row in the range A1:E2
End Sub
The second method is useful if you already have a named range for the table or have a looping process. This version does indeed require the .Rows part to specify which part of the range to change. Otherwise, Excel wouldn’t know whether you wanted to insert rows or columns.
With all the macro examples in this section, we’re not inserting an entire row across your whole spreadsheet, like we did in our first example. We’re simply inserting cells in a row within a defined range.
Make powerful macros with our free VBA Developer Kit It’s easy to copy and paste a macro like this, but it’s harder make one on your own. To help you make macros like this, we built a free VBA Developer Kit and wrote the Big Book of Excel VBA Macros full of hundreds of pre-built macros to help you master file I/O, arrays, strings and more - grab your free copy below.
The Shift
The .Insert method takes two optional inputs: Shift and CopyOrigin. Since they’re optional you don’t need to use them, but they can be useful in some instances.
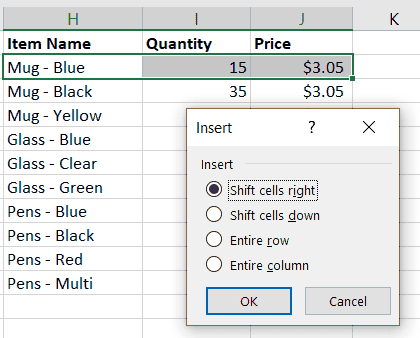
If you’re targeting a range, such as the first row of the Inventory table, normally you would shift the cells down. However, you can also shift the targeted cells to the right. This is precisely why Excel asks this question:
Excel GUI Prompt for How to Shift after Insert Cells
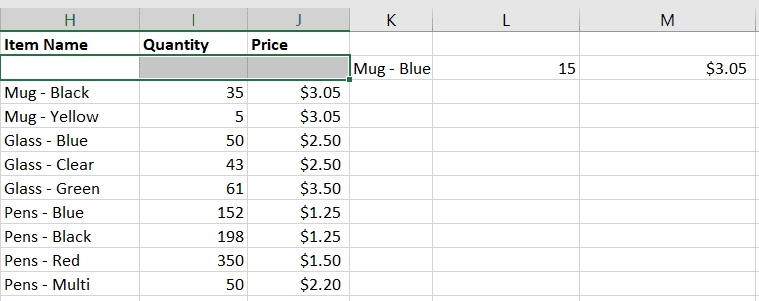
In most cases, you’ll probably be using xlShiftDown, which is the default for .Insert when referring to rows. However, sometimes you might want to copy to the right, say for a visual check after the subroutine runs:
Range("H2:J2").Insert xlShiftToRightThis will produce the following result, where the range
Cells Shifted to Right
The other optional parameter chooses where to copy the format of the inserted cells from. The default is xlFormatFromLeftOrAbove. In our table example, if we insert at CopyOrigin parameter:
Range("A2:E2").Insert CopyOrigin:=xlFormatFromRightOrBelowThis ensures that the inserted cells use the format of the cells below the range before the insertion instead of what’s above (the header format).
The Entire Row Property
The Excel GUI prompt above also allows you to insert an Entire Row. From our example earlier, this would affect the order table on the left and all other cells on the sheet, including the inventory table on the right. It’s equivalent to the Guessable Method, except the initial reference is a range of cells rather than the Rows collection directly.
To replicate the GUI’s Insert Entire Row from this example, you’ll add the the EntireRow property of the Range object:
Range("H2:J2").EntireRow.InsertThis is most useful if you only have a cell location (especially a relative location, so you don’t know the true location) and you want to insert a full row.
Conclusion
Now you can insert rows across the entire sheet or only for specific ranges using VBA. In the latter case, you can now also choose whether to shift the cells down or to the right of the newly-inserted cells. And finally, you can choose the format of the new cells from the surrounding, existing cells.
You also learned a little about the EntireRow property, which can be useful in same instances, especially when programming complex macros where you don’t know the exact cell reference.


