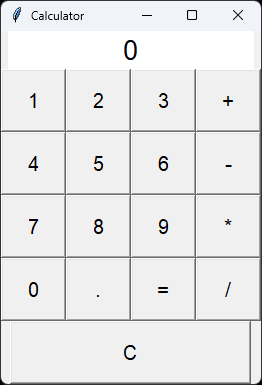
In this article, we’ll show you how to build a functional calculator GUI using Python and Tkinter. Tkinter is a standard library module that provides a simple way to create graphical user interfaces (GUIs) with Python. A calculator GUI is a useful example to demonstrate how to use Tkinter widgets, such as buttons, labels, and entry fields, to create an interactive application.
The steps to create a Python calculator GUI are:
- Import the Tkinter module and create a root window.
- Create a frame to hold the calculator display and buttons.
- Create a label to show the calculator expression and result.
- Create a string variable to store the calculator expression and result.
- Create a function to update the label with the string variable.
- Create a function to clear the string variable and reset the label.
- Create a function to append a character to the string variable and update the label.
- Create a function to evaluate the string variable as a mathematical expression and update the label with the result or an error message.
- Create buttons for digits, operators, decimal point, equal sign, and clear sign, and bind them to the corresponding functions.
- Arrange the buttons in a grid layout inside the frame.
- Format the buttons so they look nice.
- Bind keyboard keys to the calculator buttons.
- Run the main loop of the root window.
As a demonstration of what Tkinter is capable of, we’ve created a calculator GUI that accomplishes each of the steps above, including binding keyboard keys to the Tkinter calculator buttons. The code for the calculator GUI is:
# Import Tkinter module
import tkinter as tk

# Create root window
root = tk.Tk()
root.title("Calculator")

# Create frame
frame = tk.Frame(root)
frame.pack()

# Create label
label = tk.Label(frame, text="0", font=("Arial", 20), bg="white", width=15)
label.grid(row=0, column=0, columnspan=4)

# Create string variable
string_var = tk.StringVar()
string_var.set("0")

# Create update function
def update_label():
    label.config(text=string_var.get())

# Create clear function
def clear():
    string_var.set("0")
    update_label()

# Create append function
def append(char):
    if string_var.get() == "0":
        string_var.set(char)
    else:
        string_var.set(string_var.get() + char)
    update_label()

# Create evaluate function
def evaluate():
    try:
        result = eval(string_var.get())
        string_var.set(str(result))
    except:
        string_var.set("Error")
    update_label()

# Create buttons
button_1 = tk.Button(frame, text="1", font=("Arial", 15), command=lambda: append("1"))
button_2 = tk.Button(frame, text="2", font=("Arial", 15), command=lambda: append("2"))
button_3 = tk.Button(frame, text="3", font=("Arial", 15), command=lambda: append("3"))
button_4 = tk.Button(frame, text="4", font=("Arial", 15), command=lambda: append("4"))
button_5 = tk.Button(frame, text="5", font=("Arial", 15), command=lambda: append("5"))
button_6 = tk.Button(frame, text="6", font=("Arial", 15), command=lambda: append("6"))
button_7 = tk.Button(frame, text="7", font=("Arial", 15), command=lambda: append("7"))
button_8 = tk.Button(frame, text="8", font=("Arial", 15), command=lambda: append("8"))
button_9 = tk.Button(frame, text="9", font=("Arial", 15), command=lambda: append("9"))
button_0 = tk.Button(frame, text="0", font=("Arial", 15), command=lambda: append("0"))
button_plus = tk.Button(frame, text="+", font=("Arial", 15), command=lambda: append("+"))
button_minus = tk.Button(frame, text="-", font=("Arial", 15), command=lambda: append("-"))
button_multiply = tk.Button(frame, text="*", font=("Arial", 15), command=lambda: append("*"))
button_divide = tk.Button(frame, text="/", font=("Arial", 15), command=lambda: append("/"))
button_point = tk.Button(frame, text=".", font=("Arial", 15), command=lambda: append("."))
button_equal = tk.Button(frame, text="=", font=("Arial", 15), command=evaluate)
button_clear = tk.Button(frame, text="C", font=("Arial", 15), command=clear)

# Arrange buttons in grid layout
button_1.grid(row=1, column=0)
button_2.grid(row=1, column=1)
button_3.grid(row=1, column=2)
button_plus.grid(row=1, column=3)
button_4.grid(row=2, column=0)
button_5.grid(row=2, column=1)
button_6.grid(row=2, column=2)
button_minus.grid(row=2, column=3)
button_7.grid(row=3, column=0)
button_8.grid(row=3, column=1)
button_9.grid(row=3, column=2)
button_multiply.grid(row=3, column=3)
button_0.grid(row=4, column=0)
button_point.grid(row=4, column=1)
button_equal.grid(row=4, column=2)
button_divide.grid(row=4, column=3)
button_clear.grid(row=5, column=0, columnspan=4)

#format buttons
button_1.config(width=5, height=2)
button_2.config(width=5, height=2)
button_3.config(width=5, height=2)
button_4.config(width=5, height=2)
button_5.config(width=5, height=2)
button_6.config(width=5, height=2)
button_7.config(width=5, height=2)
button_8.config(width=5, height=2)
button_9.config(width=5, height=2)
button_0.config(width=5, height=2)
button_plus.config(width=5, height=2)
button_minus.config(width=5, height=2)
button_multiply.config(width=5, height=2)
button_divide.config(width=5, height=2)
button_point.config(width=5, height=2)
button_equal.config(width=5, height=2)
button_clear.config(width=21, height=2)

#add keyboard shortcuts to calculator buttons
root.bind("<Return>", lambda event: evaluate())
root.bind("<KP_Enter>", lambda event: evaluate())
root.bind("<BackSpace>", lambda event: clear())
root.bind("1", lambda event: append("1"))
root.bind("2", lambda event: append("2"))
root.bind("3", lambda event: append("3"))
root.bind("4", lambda event: append("4"))
root.bind("5", lambda event: append("5"))
root.bind("6", lambda event: append("6"))
root.bind("7", lambda event: append("7"))
root.bind("8", lambda event: append("8"))
root.bind("9", lambda event: append("9"))
root.bind("0", lambda event: append("0"))
root.bind("+", lambda event: append("+"))
root.bind("-", lambda event: append("-"))
root.bind("*", lambda event: append("*"))
root.bind("/", lambda event: append("/"))
root.bind(".", lambda event: append("."))
root.bind("<Escape>", lambda event: root.destroy())


# Start main loop
root.mainloop()
When you run this program, you’ll get a simple, but beautiful, Python calculator like this one:

I encourage you to take a look through the code and see if there are ideas you can use to add to your next Tkinter project. I hope you have learned something useful from this Tkinter code example. Feel free to subscribe below for more helpful Python tutorials.
