LangGraph is an agentic AI workflow built on LangChain. LangGraph allows you to create chatbots that dynamically route queries to specialized agents for tasks like searching the web, fetching data from Wikidata, or handling general questions.
This approach provides a more flexible, modular chatbot design that can tap into different data sources based on the nature of the user’s question.
In this tutorial, you will learn how to set up LangGraph and create a multi-agent chatbot using ReAct agents. We will walk through the entire process, from installing the necessary libraries to configuring agents that can interact with external tools.
By the end of this tutorial, you’ll have a functional multi-agent chatbot that can intelligently classify and respond to different types of user requests.
Installing and Importing Required Libraries
The following script installs the Python libraries to run scripts in this article.
!pip install langchain-core
!pip install -U langgraph
!pip install langchain-community
!pip install -qU langchain-openai
!pip install google-search-results
!pip install --upgrade --quiet "wikibase-rest-api-client<0.2" mediawikiapi
The script below imports the required libraries into your Python application. Notice the placeholders for API keys, which you’ll need to fill in with your own keys.
from langchain_core.tools import tool
from langchain_community.tools.wikidata.tool import WikidataAPIWrapper, WikidataQueryRun
from langchain_community.utilities import SerpAPIWrapper
from pydantic import BaseModel, Field
from typing import Optional, TypedDict, Annotated
from langchain_core.messages import AnyMessage, SystemMessage, HumanMessage
from langchain_openai import ChatOpenAI
from langgraph.graph import StateGraph, END
from IPython.display import Image, display
from langgraph.prebuilt import create_react_agent
import sqlite3
import math
import re
from google.colab import userdata
serp_api_key = userdata.get('SERP_API_KEY')
openai_api_key = userdata.get('OPENAI_API_KEY')
Defining Tools
You can create LangGraph agents without tools, as well. However, tools are what makes agents powerful. Tools allow LLM agents to access external information and provide responses based on that information.
For example, using an LLM, you can use tools to access YouTube, the Internet, and Wikipedia. By default, LLMs do not have access to these sources of information.
To define a tool, you must define a method it will call. In the following script, we define the get_wikidata_data() method, which uses LangChain’s Wikidata wrapper to search the Wikidata database against the search query.
def get_wikidata_data(search_query):
    wikidata = WikidataQueryRun(api_wrapper=WikidataAPIWrapper())
    wikidata_response = wikidata.run(search_query)
    return wikidata_response

print(get_wikidata_data("Eifel Tower"))
Output:

Once you define a tool method, you can create a tool by defining a method with the @tool annotator.
The following script defines the search_wikidata tool that accepts WikidataTopic type data, which is a simple topic string in the script below. The tool then passes the topic string to the get_wikidata_data() method to retrieve a final response.
A tool’s description is fundamental. Agents look at tool descriptions to decide which tool to call. In the script below, we define that the tool Returns information from Wikidata about the searched topic.
class WikidataTopic(BaseModel):
  topic: str = Field(description="The topic to be searched on Wikidata")

@tool(args_schema = WikidataTopic)
def search_wikidata(topic: str) -> str:
  """Returns information from Wikidata about the searched topic"  ""
  return get_wikidata_data(topic)
Similarly, let’s define another tool that uses LangChain’s Serp API wrapper to fetch search engine results for a given query.
The following script defines the get_websearch_results() method we will use in our tool.
def get_websearch_results(query):
  search = SerpAPIWrapper(serpapi_api_key = serp_api_key)
  return search.run(query)

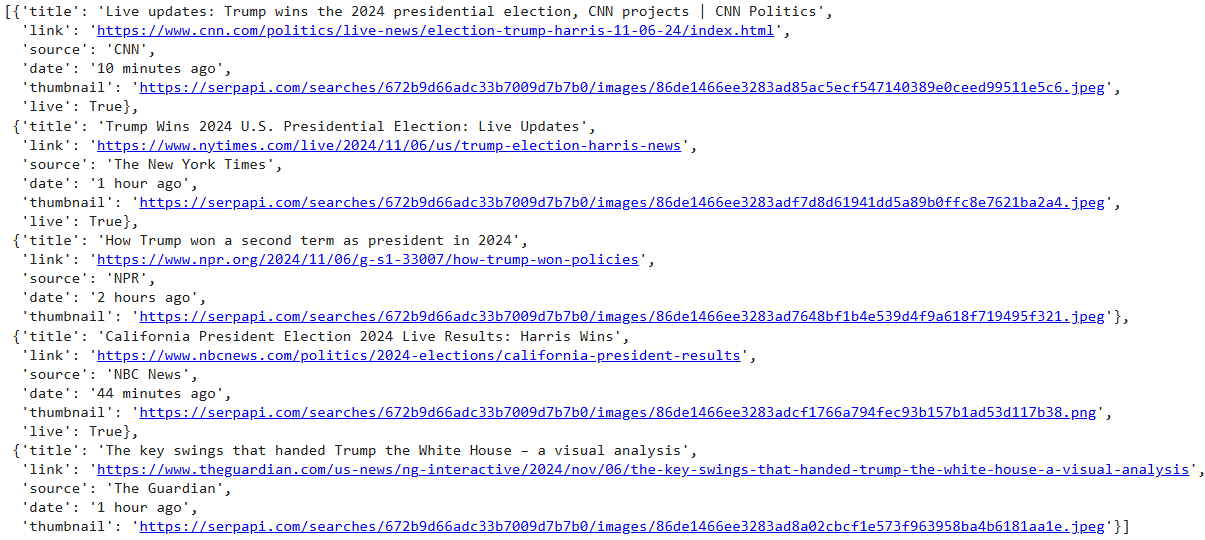
get_websearch_results("Who is winning the US presidential election in 2024?")
Output:

The script below defines the search_web tool, which, given a query, calls the get_websearch_results() method to search the Internet.
class WebSearchTopic(BaseModel):
  topic: str = Field(description="The topic to be searched on the internet")

@tool(args_schema = WebSearchTopic)
def search_web(topic: str) -> str:
  """Returns information from the internet about the searched topic"  ""
  return get_websearch_results(topic)
We have defined our tools. Next, we will create our LangGraph multi-agent system.
Creating a Multi-agent LangGraph
We will first create a router node in our graph that, given a user query, directs the query to the most suitable node of our graph.
Next, we will define graph nodes and the tools that these nodes can access. Finally, we will add the graph nodes to our multi-agent graph.
Creating a Router for Query Classification
LangGraph agents use LLM. The following script defines the get_llm() method that returns the OpenAI GPT-4o LLM.
The script also defines the MultiAgentState typed dictionary, which stores the state of our graph. A graph’s state contains information shared between all nodes in a graph. In our state, we will add the user query, the query_type that decides which node to select based on the user query, and the model response.
def get_llm():

  llm = ChatOpenAI(api_key = openai_api_key,
                 temperature = 0,
                model_name = "gpt-4o")
  return llm
class MultiAgentState(TypedDict):
query: str
query_type: str
response: strNext, we will define the router and the router node prompt. The prompt tells the LLM to select one of the three categories: WIKIDATA, WEB, or GENERAL based on the user input.
We define the router_node() that accepts the graph’s state and passes the router prompt and the user query from the state to our LLM model. The model response is stored in the query_type attribute of the graph state.
query_category_prompt = """
You are an expert in assigning correct categories to user queries.
Depending on your answer, the question will be routed to one of the agents.
There are 3 possible question types:
- WIKIDATA- questions related to an entity, place, object or a famous person or question about facts
- WEB - questions asking to search something on the internet
- GENERAL - general questions
Return in the output only one word (WIKIDATA, WEB or GENERAL).
"""

def router_node(state: MultiAgentState):
  messages = [
    SystemMessage(content = query_category_prompt ),
    HumanMessage(content=state['query'])
  ]
  llm = get_llm()
  response = llm.invoke(messages)
  return {"query_type": response.content}
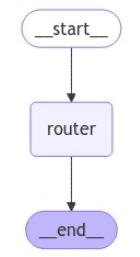
Let’s test our router first. We will create a LangGraph graph using the StateGraph class and pass the graph’s state to the StateGraph constructor.
Next, we add the router_node to our graph using the add_node method. Note that we can assign a node ID (router in this case) to our node.
We set the router node as the entry point of our graph and add the edge from the router node to the END. In this case, the graph simply takes user input and returns the corresponding node category, e.g., WIKIDATA, WEB, or GENERAL.
Finally, we compile our graph and display it.
builder = StateGraph(MultiAgentState)
builder.add_node("router", router_node)

builder.set_entry_point("router")
builder.add_edge('router', END)

graph = builder.compile()

display(Image(graph.get_graph().draw_mermaid_png()))
Output:

Let’s test our graph. We will pass a dictionary containing the query key and the corresponding user input.
graph_input = {'query': "Give me some latest news about microsoft"}
output = graph.invoke(graph_input)
print(output)
Output:
{'query': 'Give me some latest news about microsoft', 'query_type': 'WEB'}In the above output, you can see the graph state at this point. The model thinks that given the input query, the query_type should be WEB.
Let ask a different question.
graph_input= {'query': "Take two to the power of 5"}
output = graph.invoke(graph_input)
print(output)
Output:
{'query': 'Take two to the power of 5', 'query_type': 'GENERAL'}In this case the query_type is GENERAL.
Next, we will define the nodes that will be selected based on the query type.
Creating Nodes to add in LangGraph
First, we will define the wikidata_search_node node. This node is called when the query type is WIKIDATA.
The node uses a built-in LangGraph’s ReAct agent to call the search_wikidata tool we created earlier and return a response from Wikidata.
wikidata_search_prompt ='''
You have access to Wikidata.
Your job is to search Wikidata for the latest relevant information based on a given query and return only the information retrieved from Wikidata.
You don't add anything yourself and only provide the exact information found.
'''

def wikidata_search_node(state: MultiAgentState):
    llm = get_llm()
    wikidata_agent = create_react_agent(llm,
                                        [search_wikidata],
                                         state_modifier = wikidata_search_prompt)

    messages = [HumanMessage(content=state['query'])]
    result = wikidata_agent.invoke({"messages": messages})
    print(result)
    return {'response': result['messages'][-1].content}
Similarly, the following script defines the web_search_node, which is called when the query type is WEB. This node uses the ReAct agent to call the search_web tool.
web_search_prompt = '''
You can search the internet, particularly Google.
Your job is to search the internet for the latest relevant information based on a given query and return only the information retrieved from the internet.
You don't add anything yourself and only provide information from other sources.
'''

def web_search_node(state: MultiAgentState):
    llm = get_llm()
    web_agent = create_react_agent(llm,
                                        [search_web],
                                         state_modifier = web_search_prompt)

    messages = [HumanMessage(content=state['query'])]
    result = web_agent.invoke({"messages": messages})
    return {'response': result['messages'][-1].content}
Finally, we define the general_assistant_node which simply uses an LLM to return the model response.
general_prompt = '''
You're a friendly assistant and your goal is to answer general questions.
Please don't provide any unchecked information; just say that you don't know if you don't have enough information.
'''

def general_assistant_node(state: MultiAgentState):
    messages = [
        SystemMessage(content=general_prompt),
        HumanMessage(content=state['query'])
    ]
    llm = get_llm()
    response = llm.invoke(messages)
    return {"response": response.content}
We will also define the route_query method, which returns the value of the graph’s state’s query_type attribute at any given moment.
def route_query(state: MultiAgentState):
    return state['query_type']
Adding Nodes and Compiling the Graph
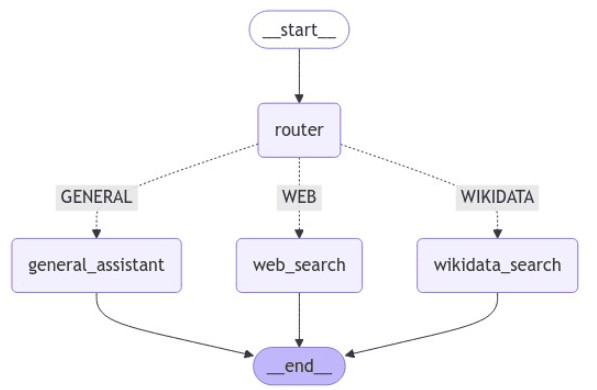
Let’s define our multi-agent graph now. We will add the router_node,, the wikidata_search_node, web_search_node, and the general_assistant_node to our graph. We name the last three nodes wikidata_search, web_search, and general_assistant, respectively.
We will also add a conditional edge that starts from the router_node, calls the route_query, and goes to one of the last three nodes, based on its output.
We set the router_node as the entry node and add edges from the wikidata_search, web_search, and general_assistant nodes to the END node.
Finally, we compile the model and display its graph.
builder = StateGraph(MultiAgentState)
builder.add_node("router", router_node)
builder.add_node('wikidata_search', wikidata_search_node)
builder.add_node('web_search',  web_search_node)
builder.add_node('general_assistant', general_assistant_node)
builder.add_conditional_edges(
    "router",
    route_query,
    {'WIKIDATA': 'wikidata_search',
     'GENERAL': 'general_assistant',
     'WEB': 'web_search'}
)


builder.set_entry_point("router")
builder.add_edge('wikidata_search', END)
builder.add_edge('web_search', END)
builder.add_edge('general_assistant', END)
graph = builder.compile()

display(Image(graph.get_graph().draw_mermaid_png()))
Output:

Let’s test our multi-agent LangGraph.
The following script asks for facts about Empire state building. We stream the graph response.
graph_input = {'query': "Give me some facts about Empire state building"}
results = []
for s in graph.stream(graph_input):
  print(s)
  results.append(s)
Output:

The above output shows that the graph assigns the WIKIDATA query type to the user query and then calls the wikidata_search node to retrieve a model response.
Let’s ask another question. This time, we asked the graph to answer a query related to the current situation.
The output shows that the graph assigned the WEB type to the user query and moved to the web_search node to retrieve the final response.
graph_input = {'query': "Who is winning the US Presidential elections right now?"}
results = []
for s in graph.stream(graph_input):
  print(s)
  results.append(s)
Output:

If you are only interested in the graph’s final response, you can retrieve the response key from the graph’s output.
output =  graph.invoke(graph_input)
print(output['response'])
Output:

Finally, let’s create the chatbot() function that executes a while loop to receive user input. The method then calls the graph we created to return the model response. The while loop continues unless the user enters quit, in which case the loop terminates.
def chatbot(graph):
    results = []

    while True:

        query = input("\033[1m User >>:\033[0m")

        if query.lower() == "quit":
            print("Chatbot: Goodbye!")
            break

        input_data = {'query': query}

        # Retrieve and process response from graph
        output = graph.invoke(input_data)  # Use input_data instead of input
        print("Chatbot:", output['response'])
        results.append(output['response'])

chatbot(graph)
Output:

The above output shows our chatbot in action.
Conclusion
In this tutorial, you saw how to implement a multi-agent LangGraph agent in Python.
LangGraph is a state-of-the-art agentic AI workflow built on top of LangChain. Compared to default LangChain agents, LangGraph offers high flexibility and can implement complex agentic workflows more efficiently. I encourage you to use LangGraph to implement all your future LLM applications.
