In a previous tutorial, we explained how to develop a retrieval augmented generation system in the LangGraph framework. In that tutorial, we developed a single-agent workflow.
LangGraph framework allows you to develop far more complex graphs with multiagent workflows. That’s exactly what we’re going to do today.
We will use a distilled version of the DeepSeek R1 reasoning LLM from Hugging Face to develop a multiagent workflow in LangGraph. The workflow will allow us to perform RAG on a PDF document and retrieve information from a tabular dataset depending on the input query.
Let’s get started!
Installing and Importing Required Libraries
The following script installs the libraries to run scripts in this article.
!pip install langchain
!pip install langchain-core
!pip install huggingface_hub
!pip install langchain-text-splitters
!pip install langchain-community
!pip install langgraph
!pip install transformers
!pip install pypdf
!pip install chromadb
!pip install langchain-experimental
!pip install langchain_huggingface
!pip install tabulate
The script below imports the required libraries. Notice the placeholder for your Hugging Face API token. In this example, we stored this in the user data of Google Colab, but you can alter this line to hard code the token (for testing), grab it from your local environment variables or from a secure key vault, like Azure. Whatever you prefer for your normal workflow.
import os
import pandas as pd
from huggingface_hub import InferenceClient
from langchain_community.embeddings import HuggingFaceInferenceAPIEmbeddings
from langchain_community.document_loaders import PyPDFLoader
from langchain_text_splitters import RecursiveCharacterTextSplitter
from langchain_core.documents import Document
from langchain_community.vectorstores import Chroma
from langchain_core.documents import Document
from langchain_core.prompts import ChatPromptTemplate
from langchain_core.output_parsers import StrOutputParser
from langchain_huggingface import HuggingFaceEndpoint, ChatHuggingFace
from langgraph.graph import START, END, StateGraph
from langgraph.checkpoint.memory import MemorySaver
from langchain_experimental.agents import create_pandas_dataframe_agent
from langchain import hub
from typing_extensions import List, TypedDict
from pydantic import BaseModel, Field
from IPython.display import Image, display
from pydantic import BaseModel, Field
from google.colab import userdata
hf_token = userdata.get('HF_API_TOKEN')
Next, we will ingest data into a vector database for RAG operation.
Data Ingestion into Vector Database For RAG
As in the previous tutorial, we will use Alphabet’s Q3 2024 earnings call to perform RAG.
The following script imports the PDF document and splits it into chunks.
data_url = "https://abc.xyz/assets/71/a5/78197a7540c987f13d247728a371/2024q3-alphabet-earnings-release.pdf"

loader = PyPDFLoader(data_url)
docs = loader.load()

text_splitter = RecursiveCharacterTextSplitter(
    chunk_size=1000,  # chunk size (characters)
    chunk_overlap=200,  # chunk overlap (characters)
    add_start_index=True,  # track index in original document
)
all_splits = text_splitter.split_documents(docs)

print(f"Document split into {len(all_splits)} sub-documents.")
Output:
Document split into 33 sub-documents.Next, we will use a free embedding model from HuggingFace to generate embeddings for the PDF document chunks and store them in the Chroma vector database.
embeddings = HuggingFaceInferenceAPIEmbeddings(
    api_key=hf_token,  # Replace with your Hugging Face API Key
    model_name="sentence-transformers/all-MiniLM-L6-v2"  # Specify the embedding model
)

vector_store= Chroma.from_documents(
    documents=all_splits,
    embedding=embeddings
)
Now, we are ready to create a multiagent workflow in RAG.
Creating a Multiagent Workflow in RAG
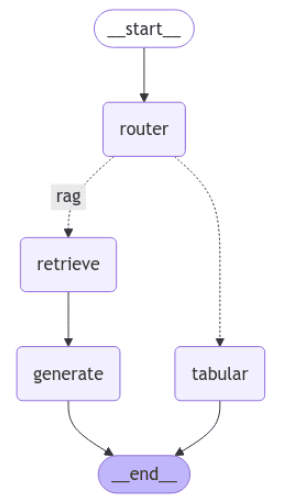
Our workflow will contain two main paths: the RAG and tabular data paths. We will create a router that accepts the user query and routes it to the concerned path.
Let’s first define the model state and the router node.
Defining State and Router Node
The model state will consist of a category attribute that stores the query category returned by the router. The question, context, and answer attributes will store the user input, the document retrieved from the vector database, and the multiagent workflow response, respectively.
class State(TypedDict):
    category:bool
    question: str
    context: List[Document]
    answer: str
In the router, we will use a distilled DeepSeek R1 LLM to assign a category to the user question. The following script creates an llm object that calls the DeepSeek model on Hugging Face.
repo_id = "deepseek-ai/DeepSeek-R1-Distill-Qwen-32B"

llm = HuggingFaceEndpoint(
    repo_id=repo_id,
    temperature=0,
    huggingfacehub_api_token=hf_token,
    max_new_tokens=4000
)

llm = ChatHuggingFace(llm=llm)
Next, we will define the router node that extracts the question from the graph’s state and uses the llm we just defined to assign one of the rag or tabular categories to the state’s category attribute.
You can see the prompt used to assign categories to user questions. You can modify the prompt and see if you get different results.
def route(state: State):

  output_parser = StrOutputParser()
  question = state["question"]

  template = f"""Here is a question from the user.
  \nQuestion: {question}
  \nYour job is to assign a category to this question
  The question can be about RAG system and earnings report for Alhabet.
  For `rag` category look for keywords like YouTube, Google, Alphabet, Revenue, etc.
  For `tabular` category look for keywords like table, data, column, row, etc.
  Assign the category 'rag' or 'tabular' based on the question.
  The response must contain a single word containing the category: which can be `rag` or `tabular`
  """

  prompt = ChatPromptTemplate.from_template(template)

  llm_chain = prompt | llm | output_parser
  output = llm_chain.invoke({"question": question})
  response = output.strip().split("</think>")[-1].strip()

  return {"category": response}
Let’s test the route node by asking it a question about Google Cloud’s revenue.
route({"question":"What is Google Cloud revenue in Q3 2023 and 2024?"})Output:
{'category': 'rag'}The above output shows that the route node correctly predicts the category for the question as defined in the router’s prompt.
We will also define a function that returns the category attribute’s value. We will use this function to define the conditional logic in the graph.
def select_route(state:State):
  return state["category"]
Next, we will define the nodes for RAG and tabular workflows.
Defining RAG Nodes
The following script defines the function for the retrieve node. The function uses the retriever’s similarity_search() method to retrieve the most similar documents for the RAG context.
def retrieve(state: State):
    retrieved_docs = vector_store.similarity_search(state["question"])
    return {"context": retrieved_docs}
For our RAG workflow, we will use a built-in RAG prompt from the Langchain hub. The following script shows the prompt.
prompt = hub.pull("rlm/rag-prompt")

example_messages = prompt.invoke(
    {"context": "(context goes here)", "question": "(question goes here)"}
).to_messages()

assert len(example_messages) == 1
print(example_messages[0].content)
Output:
You are an assistant for question-answering tasks. Use the following pieces of retrieved context to answer the question. If you don't know the answer, just say that you don't know. Use three sentences maximum and keep the answer concise.
Question: (question goes here)
Context: (context goes here)
Answer:
Finally, we will define the generate function, which extracts the question and context from the graph’s state and generates a response for the RAG workflow.
def generate(state: State):
    docs_content = "\n\n".join(doc.page_content for doc in state["context"])
    messages = prompt.invoke({"question": state["question"], "context": docs_content})
    output = llm.invoke(messages).content
    response = output.strip().split("</think>")[-1].strip()
    return {"answer": response}
Defining Tabular Data Node
For the tabular data workflow, we will use the sample Titanic dataset from Kaggle. You can try any other dataset in Pandas format, if you’d like. This tutorial explains how simple it is to import from Kaggle directly into Google Colab.
We will define a create_pandas_dataframe_agent() agent that we will use inside the tabular_response function to generate a response for the tabular workflow.
df = pd.read_csv('/content/Titanic-Dataset.csv')
agent = create_pandas_dataframe_agent(llm, df,
                                      verbose=True,
                                      allow_dangerous_code=True)

def tabular_response(state: State):
    response = agent.invoke(state['question'])
    return {"answer": response["output"]}
Now, we have everything we need to create our multiagent LangGraph workflow.
Putting it All Together
We can use the StateGraph class to create a graph in LangGraph.
We will add the router, retrieve, generate, and tabular nodes to our LangGraph.
The graph will start from the router node, which returns the category for the question.
Next, we add a conditional edge using the add_conditional_edges method. Here, we define the source node, which is router, and the function that we use to select the route, select_route. Based on the response from the select_route function, we either move to the retrieve or tabular nodes.
The retrieve node starts the RAG workflow, whereas the tabular node initiates the tabular.
The output of the script below shows our multiagent workflow.
graph_builder = StateGraph(State)

#Add custom-named RAG nodes
graph_builder.add_node("retrieve", retrieve)
graph_builder.add_node("generate", generate)

#Add TABULAR node (
graph_builder.add_node("tabular", tabular_response)

#Add router node with LLM-based decision-making
graph_builder.add_node("router", route)  # Custom name for the router node

#Define edges for routing logic
graph_builder.add_edge(START, "router")  # Start with the router

graph_builder.add_conditional_edges(
    "router",
     select_route,
      {"rag": "retrieve",
       "tabular": "tabular"}
)

graph_builder.add_edge("retrieve", "generate")  # Connect retrieve to generate in RAG flow
graph_builder.add_edge("generate", END)  # End after generate
graph_builder.add_edge("tabular", END)  # End after generate
#Compile the graph
graph = graph_builder.compile()

display(Image(graph.get_graph().draw_mermaid_png()))
Output:

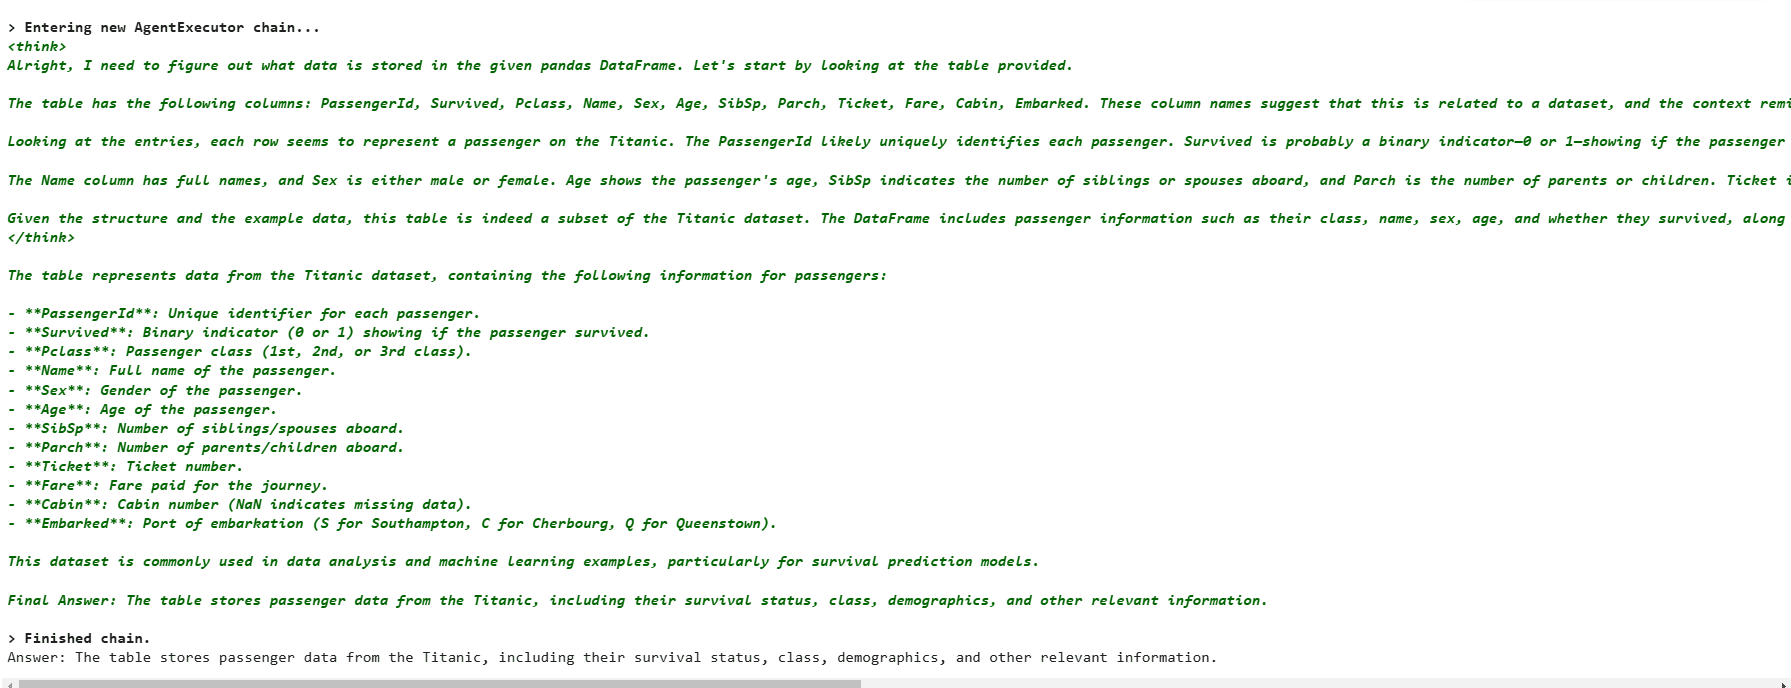
Let’s test the graph. First, we will ask what data is stored in the table.
input = {"question":"What is stored in this table"}
result = graph.invoke(input)
print(f'Answer: {result["answer"]}')
Output:

The above output shows that the tabular workflow is triggered, which calls the pandas dataframe agent to generate a response.
Let’s ask a question about Google Cloud’s revenue.
input = {"question":"What is Google Cloud revenue in Q3 2023 and 2024?"}
result = graph.invoke(input)
print(f'Answer: {result["answer"]}')
Output:
Answer: Google Cloud's revenue for Q3 2023 was $8.411 billion and for Q3 2024 it was $11.353 billion, reflecting a 35% increase.The router again selects the correct category and triggers the RAG workflow.
Conclusion
LangGraph multiagent workflows allow the creation of complex LLM applications involving multiple agents and paths. In this tutorial, we showed you how to create a multiagent workflow in LangGraph using the distilled DeepSeek R1 model to create RAG and tabular data retrieval workflows. We confirmed it routed properly, based on the prompt. I encourage you to try multiagent LangGraph workflows and see what LLM applications you can create!
