We’re going to show you how to send emails using Python, including how to send them with attachments. To send an email, you need to use a simple mail protocol server (SMTP). There are two options to access an SMTP server:
- You can set up your own server, which can be very costly and inefficient and may require quite a bit of coding and security layers.
- Or, you can use exisiting SMTP servers from email providers like Gmail, Hotmail, Yahoo, and Outlook. In this tutorial, we’ll give you step-by-step instructions to let you send an email from a Python application using Gmail.
Step 1: Connect to Gmail’s SMTP Server
The first step is to connect to Gmail’s SMTP server. To do this, you need to create an object of the SMTP class using the smtplib module. In the constructor of the SMTP class object, pass the address of Gmail’s SMTP server and the port you’ll be using to connect to the server. In this tutorial, we’ll be using port 587 since it’s the default port used for SMTP submission. Next, you need to call the ehlo() method from the SMTP class object, as shown in the following script:
import smtplib
smtp_obj = smtplib.SMTP("smtp.gmail.com", 587)
smtp_obj.ehlo()
Running the script above may or may not produce an output. If you receive the following output as a result of running the above script, you’re able to successfully establish connection with the Gmail’s SMTP server.
(250,
 b'smtp.gmail.com at your service, [46.193.65.140]\nSIZE 35882577\n8BITMIME\nSTARTTLS\nENHANCEDSTATUSCODES\nPIPELINING\nCHUNKING\nSMTPUTF8')
It may also work if no output is printed.
While establishing connection with the Gmail’s SMTP server, you mentioned 587 as the port number. The port 587 uses TLS encryption to send and receive data in a secure way. Therefore, you need to specify with your SMTP object that the data you are going to send or receive should be TLS encrypted. To do so, you need to call the starttls() method from the SMTP class object. If you are using a port other than port 587, you don’t need to include the following script:
smtp_obj.starttls()The following output confirms you are ready to communicate with the SMTP server via TLS encryption.
(220, b'2.0.0 Ready to start TLS')Again, you may not receive this output.
Step 2: Generate Gmail Password for Python App
You will be sending emails via your Gmail account. To access your Gmail account via a Python application, you need to set up application password in your Gmail account. This password is different from your regular password that you use to directly login into your Gmail account via a web browser or an android application. Rather, this password allows you to access your Gmail account using a Python script.
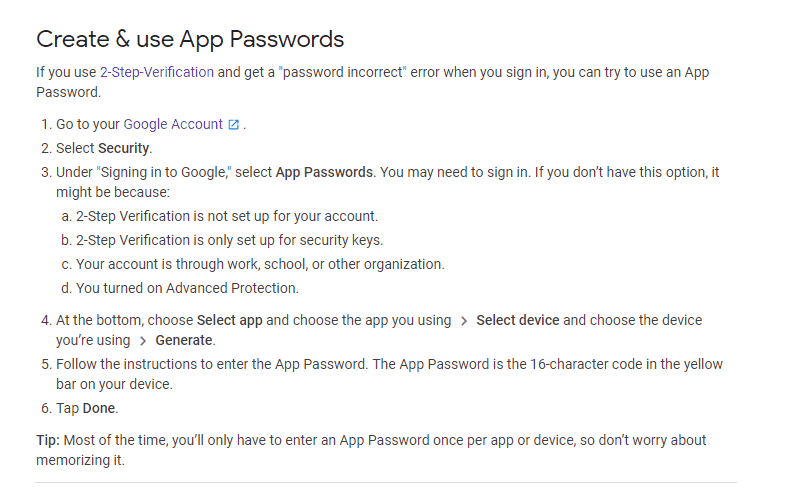
The process to create an application password is explained at this link. Once there, you’ll see the following instructions:
Here, you’ll notice that before you can generate an application password, you need to enable 2-step verification for your Gmail account. Our VBA Gmail tutorial explains how to do this without 2-step verification, but it requires turning on access to Less secure apps in your Google Security Settings page.
Turning on Two-step verification
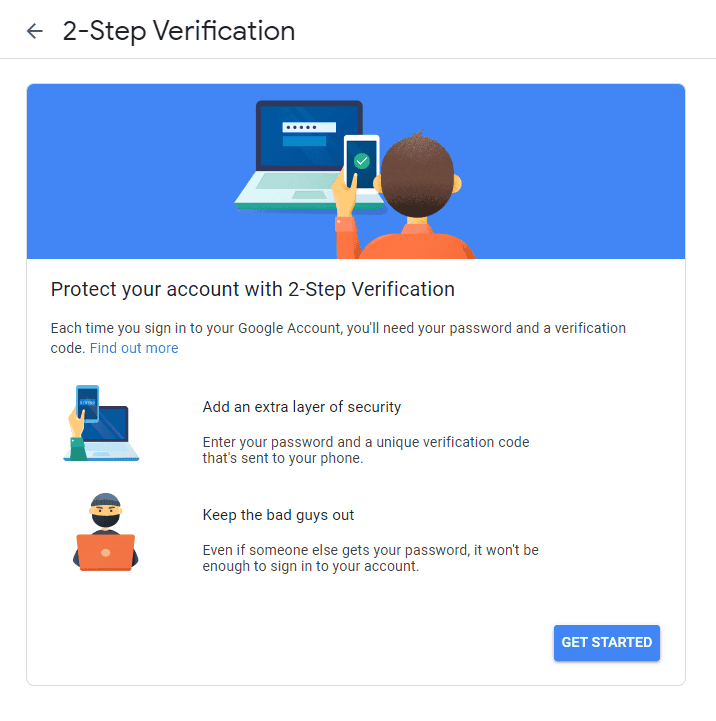
To enable two step verification, click this link. Once logged-in, you should see a page like this:
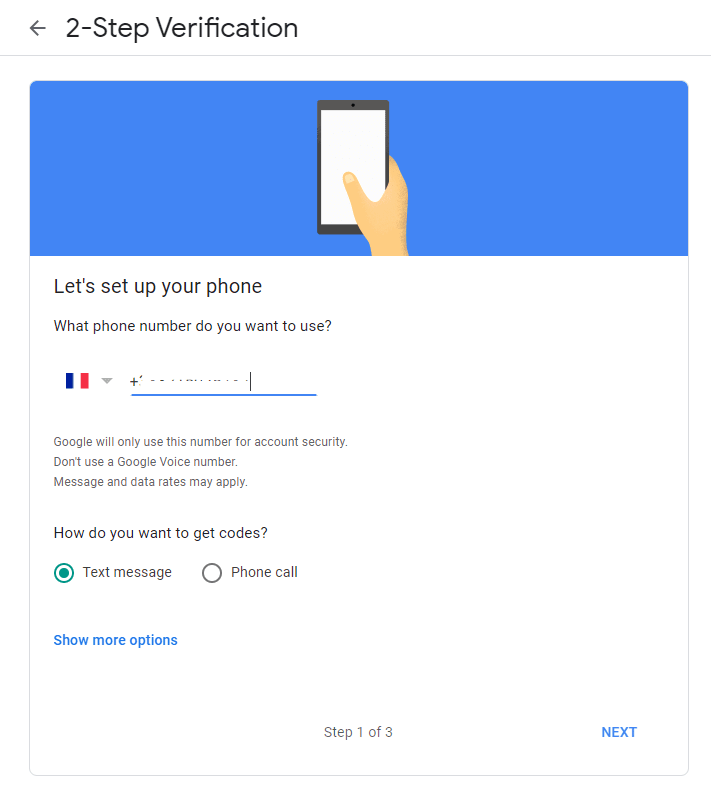
Click “GET STARTED” button on the page, then enter your cell number or opt for verification using the Google Authenticator app.
If you entered a phone number, you’ll receive a text message containing an authentication code from Google. If you use the Google Authenticator app, you’ll see a code when you open the app. Either way, enter the code in the “Enter the code” field and click “NEXT.”
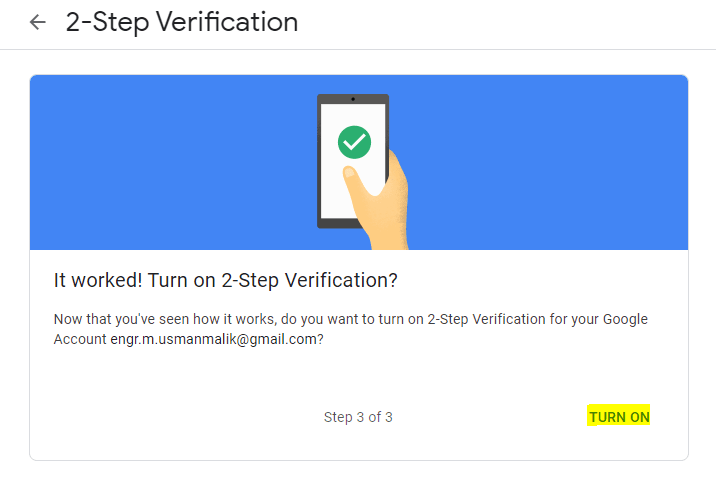
Finally, click the “TURN ON” link on the screen that appears as shown below:
Now that you’ve successfully enabled two-step verification for your Google account, you can generate application passwords.
Creating App Password
The steps for creating application password are explained at this link and are shown in the following screenshot.
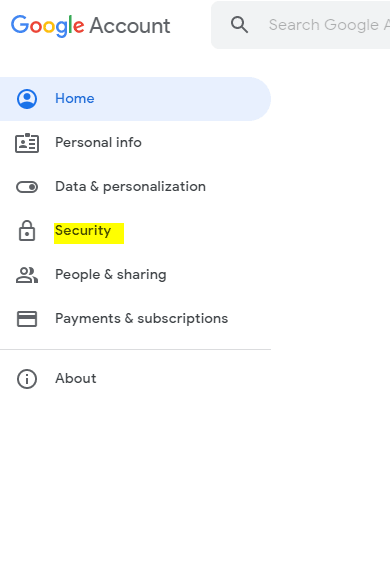
After enabling 2-step verification, go to your Google account and click “Security.”
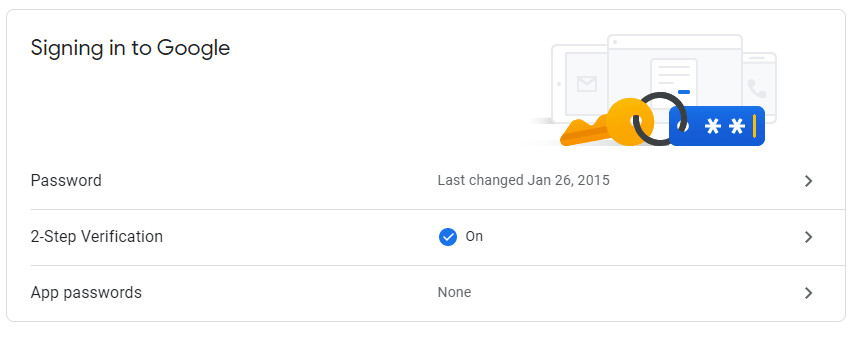
Scroll down until you see the option “Signing in to Google.” Here, click the “App passwords” option as shown below.
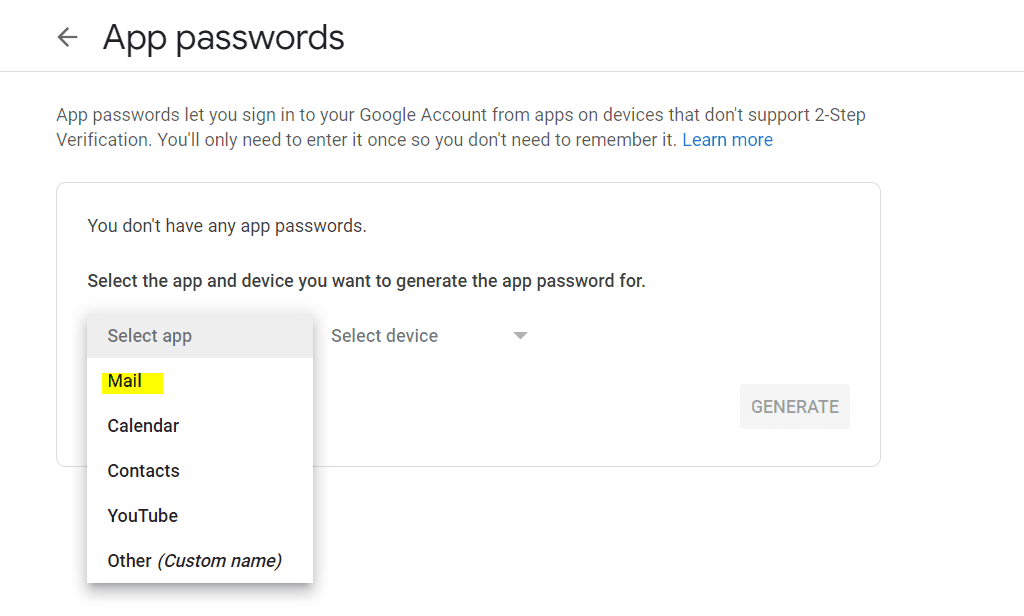
From the “Select app” drop down list, choose “Mail”.
And from the “Select device” dropdown list, click “Other (Custom name).”
Enter any name for your application and click the “GENERATE” button, just like we did in the screenshot below:
Note, if the “Other (Custom name)” option doesn’t respond, you can click any of the other items in the dropdown. You just won’t be able to provide your own custom label, but that’s not a big deal.
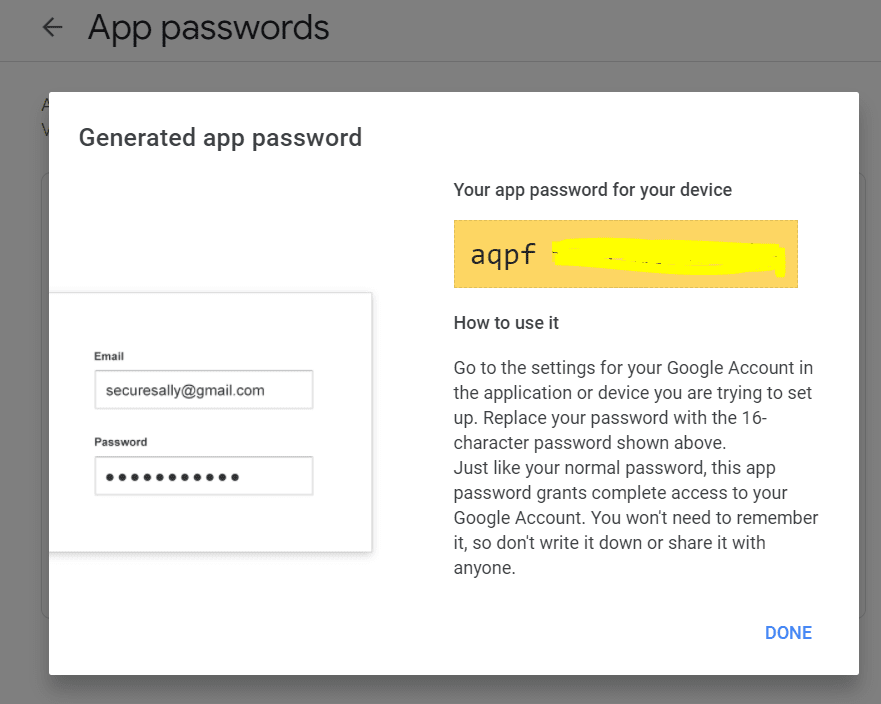
Either way, you should see your application password generated inside a yellow box, like this:
Save this password. You’ll need it in following section in order to send emails through your account.
Step 3: Build Email with Python
To send emails, you need your email address, the application password you just generated and the email address of the recipient you want to send an email to.
Let’s first enter your email address. The following script asks users to enter a string in a hidden manner. For the safety of your account, it is always a good practice to enter emails and passwords in the form of hidden strings. To capture user input in a hidden format, you can use the getpass() method of the getpass module:
import getpass
my_email = getpass.getpass("Enter your email:")
Output:
Enter your email:········Once you enter your email, the next step is enter your application password that you generated in the previous step. Execute the following script and enter your application password.
my_pass = getpass.getpass("Enter your app password:")Output:
Enter your app password:········Now you can login to your Google account via your Python application. To do so, call the login() method from your SMTP object and pass your email and application password as parameters to the method. Here’s the script:
smtp_obj.login(my_email, my_pass)If your login is successful, you should see the following message:
Output:
(235, b'2.7.0 Accepted')The following script asks you to enter the email address of your intended recipient, but you can also directly create a string variable containing the recipient’s email address.
to_email = getpass.getpass("Enter email of the recipient:")Output:
Enter email of the recipient:········The following script creates two variables containing the from and to email addresses, in case you want to hard-code them.
email_from_address = my_email
email_to_address = to_email
The next step is to create the text for your email. The following script asks users to first enter the email subject and then the email body. Finally, the subject and the body of the email are concatenated to create the final text for the email. Alternately, you can hard-code the text for these variables. That’s likely the preferred approach since you’re likely following this tutorial because you want to automate a tedious process.
email_subject = input("Enter the subject of the email: ")
email_body = input("Enter the body of the email: ")
email_text = "Subject: "+email_subject+"\n"+email_body
Output:
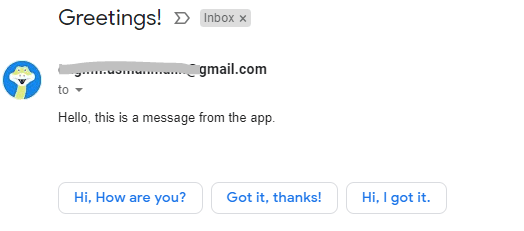
Enter the subject of the email: Greetings!
Enter the body of the email: Hello, this is a message from the app.
The last step is to send your email. To do so, you need to call the sendmail() method of the SMTP object and pass it the email address of the sender, the email address of the receiver and the email text, as depicted in the following script:
smtp_obj.sendmail(email_from_address, email_to_address, email_text)If you see empty curly brackets in the output, your email has been successfully sent. If you don’t see any output and encountered no errors, it likely worked successfully, as well.
Finally, you have to close your email session after you’ve sent your email. Call the quit() method on the SMTP object, like this:
smtp_obj.quit()You’ll either get no response or output like this demonstrating a successful closure of your email session:
(221, b'2.0.0 closing connection a15sm7173525wrn.75 - gsmtp')
The email you sent will look like this in your recipient’s inbox.
Your full Python code for sending emails with Gmail might look something like this:
import smtplib
smtp_obj = smtplib.SMTP("smtp.gmail.com", 587)
smtp_obj.ehlo()
smtp_obj.starttls()
import getpass
my_email = getpass.getpass("Enter your email:")
my_pass = getpass.getpass("Enter your app password:")
smtp_obj.login(my_email, my_pass)
to_email = getpass.getpass("Enter email of the receiver:")
email_from_address = my_email
email_to_address = to_email
email_subject = input("Enter the subject of the email: ")
email_body = input("Enter the body of the email: ")
email_text = "Subject: "+email_subject+"\n"+email_body
smtp_obj.sendmail(email_from_address, email_to_address, email_text)
smtp_obj.quit()
I recommend you hard-code the email to and from fields, and the subject and body text to speed up the automation.
Bonus: Sending Python Emails with Attachments
You can also use the Python smtplib module to send emails with attached files, like text documents, images, Excel files and more. To do so, you need to first install the email module. Execute the following command at your command terminal to install this module:
$pip install email
The process is similar to sending plain emails without attachments. You need to activate Google’s two step verification and obtain your app password, just like you did above. You can use the same app password and the same SMTP settings you used to send plain text emails in the last section.
Next, you need to import the MIMEMultipart, MIMEBase and encoders classes from different modules of the email library, as shown below.
import smtplib
from email.mime.multipart import MIMEMultipart
from email.mime.base import MIMEBase
from email import encoders

email_subject = "Email with attachment"

email_content = MIMEMultipart()
email_content['Subject'] = email_subject
email_content['From'] = email_from_address
email_content['To'] = email_to_address
As a first step, you have to create an object of the MIMEMultipart class and add the email subject, sender’s email address and recipient’s email address to the object.
Next, you have to create an object of the MIMEBase class, which basically serves as your attachment. The path to the file you want to attach is passed to the set_payload() method. The attached file is imported into the attachment via the read() method. To encode the attached file into base64 format, the object of the MIMEBase class is passed to the encode_base64() method of the encoders module, like this:
attachment = MIMEBase('application', "octet-stream")
attachment.set_payload(open("E:\my_file.pdf", "rb").read())
encoders.encode_base64(attachment)
The next step is to add an attachment header. For that, you need to call the add_header() method and pass the string literal Content-Disposition as the first parameter; the string literal attachment as the second parameter and the path to the file you want to attach as the third parameter. Finally, the attachment is attached to the email content via the attach() method as shown in the following script:
attachment.add_header('Content-Disposition', 'attachment; filename="E:\my_file.pdf"')
email_content.attach(attachment)
The final step is to send an email with your newly attached attachment. To do so you need to call the sendmail() method of the SMTP class object with the sender’s email address, recipient’s email address and the email_content() object that contains your attachment. Don’t forget to call as_string() on the email_content() object since the sendmail() method expects the email content to be in string format.
Once that’s all set up, execute the following script to send your email with an attachment using Python:
smtp_obj.sendmail(email_from_address, email_to_address, email_content.as_string())If you found this tutorial helpful, please subscribe using the form below so we can share other short, powerful Python tips we’ve learned through the years.
