What is a Python Virtual Environment?
In simplest terms, a Python virtual environment is an isolated directory that contains the Python interpreter, packages, dependencies and scripts installed within that isolated directory. A Python virtual environment separates dependencies for different projects by isolating the dependencies in different locations.
Why and When Do We Need Virtual Environments?
Different Python applications require different dependencies, but they also can rely on some of the same dependencies. In some cases, two or more Python applications require different version of the same Python package or an application you built with one Python package may no longer work if you updated that package to the latest version.
For example, consider a scenario where you have the default Python environment shared by all your applications. You developed an application
Python virtual environments help you solve this problem by isolating dependencies for different projects. Let’s explore how you can create virtual environments in Python.
Creating a Python Virtual Environment
To create a virtual environment, you can use the virtualenv package.
The following command installs the virtualenv package.
pip install virtualenvAs an example, in this tutorial, we’ll create two virtual environments for two sample projects
Output:

Code More, Distract Less: Support Our Ad-Free Site
You might have noticed we removed ads from our site - we hope this enhances your learning experience. To help sustain this, please take a look at our Python Developer Kit and our comprehensive cheat sheets. Each purchase directly supports this site, ensuring we can continue to offer you quality, distraction-free tutorials.
Ideally, you should create a virtual environment in the root directory of the project that will use this environment. For that reason, we’ll create our virtual environments in the root directories for our projects
Let’s first create a virtual environment for the
To create a virtual environment you have to specify the command virtualenv followed by the name of your virtual environment. The script below creates a virtual environment named proj_env in the root directory of the
(base) manimalik@manimalik-Precision-3561:~$ cd Projects/MyProject

(base) manimalik@manimalik-Precision-3561:~/Projects/MyProject$ virtualenv proj_env
Once you execute the above command, you’ll see the following output. It shows that a virtual environment has been created. The default Python version and other tools and packages installed are shown in the output.

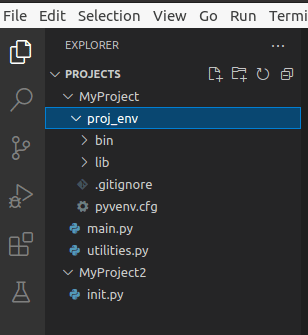
Now if you look at your directory structure in the

To activate your virtual environment, in Linux (ubuntu) run the command, where
source environment_name/bin/activateIn windows, you need to run the following command:
environment_name\Scripts\activateWe’ll be using the Ubuntu OS, in this tutorial, so we’ll run the following command to activate our proj_env.
source proj_env/bin/activateOnce you activate a virtual environment, you can see its name prefixed with your commands as shown below.

Now, any package you install from within your virtual environment, will be installed in the local environment proj_env. Let’s install the NumPy library with version 1.20.0.
pip install numpy==1.20.0Output:

From this virtual environment, when you run any Python project within the proj_env, it will use the NumPy version 1.20.0.
To deactivate a virtual environment, you can use the deactivate command as shown below:
(proj_env) (base) manimalik@manimalik-Precision-3561:~/Projects/MyProject$ deactivateSuppose you want to use a different NumPy version for your other project,
We’ll create a virtual environment proj_env2 in the root directory of our
(proj_env2) (base) manimalik@manimalik-Precision-3561:~/Projects/MyProject2$ pip install numpy==1.22.0At this point, the NumPy version in the proj_env virtual environment is 1.20.0 as shown below.

The NumPy version in the virtual environment proj_env2 is 1.22.0, as shown below.

By using virtual environments, we were able to separate dependencies for our two projects. Now, the project using the NumPy version 1.20.0 can be run with the virtual environment proj_env, while the project using the NumPy version 1.22.0 can be executed in the virtual environment proj_env2.
Code More, Distract Less: Support Our Ad-Free Site
You might have noticed we removed ads from our site - we hope this enhances your learning experience. To help sustain this, please take a look at our Python Developer Kit and our comprehensive cheat sheets. Each purchase directly supports this site, ensuring we can continue to offer you quality, distraction-free tutorials.
