Zero-shot object detection is a task that aims to locate and identify objects in images without having any visual examples of those objects during training. This is useful because it allows us to detect new and rare objects that may not be present in the existing datasets.
Hugging Face Transformers is a framework that offers many pre-trained models for different modalities and tasks, including zero-shot object detection.
In this tutorial, you will learn how to use Hugging Face Transformers to perform zero-shot object detection on single and multiple images. You will also see how to use the Hugging Face pipeline function and a Hugging Face model for zero-shot object detection.
Installing Required Libraries
We’re going to run the code presented in this tutorial in a Google Colab notebook. It comes pre-loaded with most of the libraries required to run the scripts in this tutorial. However, you will still need to install the following libraries:
! pip install --upgrade tensorflow
! pip install accelerate -U
! pip install transformers
Note: Though Google Colab comes with a default installation of TensorFlow, we had to upgrade it to the latest version to run the Hugging Face pipeline functions.
Zero-Shot Object Detection with Hugging Face Pipeline Function
Let’s first see how to perform zero-shot object detection with the Hugging Face pipeline function.
The following script defines the get_image_object function that accepts the path to the input image and returns the image object. This method also displays the image in the output. We will use this method to import our input image.
import numpy as np
from PIL import Image
import matplotlib.pyplot as plt

def get_image_object(image_path):

  #Load the image using PIL

  image = Image.open(image_path)

  #Display the image with Matplot lib

  plt.figure(figsize=(10, 8))  # Width, height in inches

  plt.imshow(image)
  plt.axis('off')  # To turn off the axis
  plt.show()
  print(image_path)
  return image

#Replace with the path to your image file

image_path = '/content/2024-01-05-sample-input-image-for-object-detection.jpg'
image1 = get_image_object(image_path)
Output:

This is the image we’re going to use for the first part of this tutorial. You’re welcome to save it and upload it to your own Colab notebook. You can see that the image contains a man sitting in a room along with a variety of objects. We’re going to detect some of these objects in this tutorial.
To do so, we will import the pretrained OWL-ViT (short for Vision Transformer for Open-World Localization) transformer model that allows zero-shot detection of objects within an image. We will import this model from a pre-trained checkpoint using the Hugging Face pipeline function.
from transformers import pipeline

checkpoint = "google/owlvit-base-patch32"
object_detector = pipeline(model=checkpoint, task="zero-shot-object-detection")
Next, to detect objects within the input image, pass the input image and the candidate labels you want to search to the object_detector constructor you created in the previous script.
The object_detector will return a list of dictionaries where each dictionary contains bounding box coordinates, labels, and prediction confidence scores for the detected objects.
predictions = object_detector(
    image1,
    candidate_labels=["human face",
                      "bed",
                      "lamp",
                      "clock",
                      "couch",
                      "picture",
                      "cup",
                      "shoes"]
)
predictions
Output:

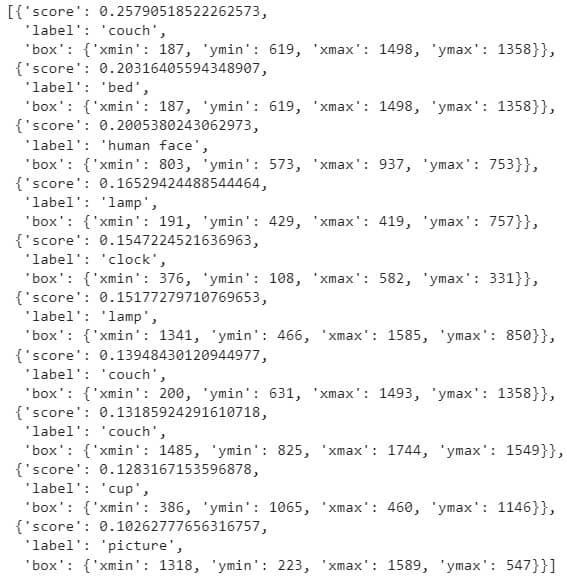
The above output shows the list of detected objects for the candidate labels.
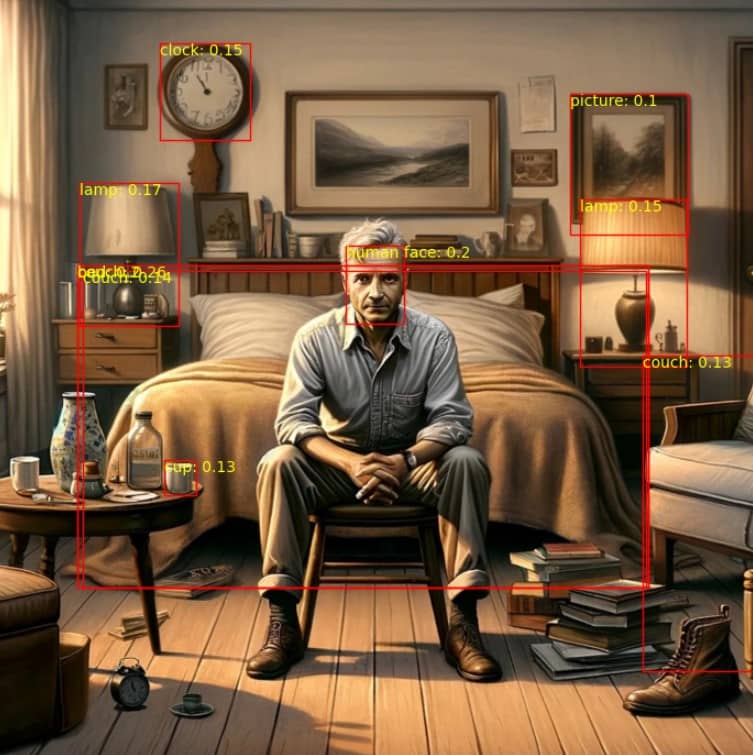
You can iterate through all the dictionaries in the predictions object to create a bounding box around the detected object and display the object label and confidence score for each object using the following script.
import matplotlib.patches as patches

#Convert PIL Image, convert it to a format suitable for matplotlib
image_np = np.array(image1)

#Create a matplotlib figure and axis
fig, ax = plt.subplots(figsize=(12, 9))  # Width, height in inches
ax.imshow(image_np)

for prediction in predictions:
    box = prediction["box"]
    label = prediction["label"]
    score = prediction["score"]

    xmin, ymin, xmax, ymax = box.values()

    #Create a Rectangle patch
    rect = patches.Rectangle((xmin, ymin), xmax - xmin, ymax - ymin, linewidth=1, edgecolor='red', facecolor='none')

    #Add the rectangle to the Axes
    ax.add_patch(rect)

    #Add text
    plt.text(xmin, ymin, f"{label}: {round(score,2)}", color='yellow', fontsize=10, verticalalignment='top')

#Display the image
plt.axis('off')  # Turn off axis
plt.show()
Output:

The above output displays the detected objects, their labels, and confidence scores.
The pipeline function is a good choice if you plan to detect objects in a single image or if you simply don’t want to fine-tune the object detection model. Otherwise, you should use a Hugging Face object detection model, as we’ll demonstrate in the next section.
Zero-Shot Object Detection with Hugging Model
Now, we’re going to detect objects in the following sample image using the same OWL-ViT transformer, but this time with a Hugging Face model.
image_path = '/content/2024-01-05-a-boy-playing-with-a-ball-on-a-beach.jpg'
image2 = get_image_object(image_path)
Output:

This next script imports the OWL-ViT transformer as a Hugging Face model. The script also imports the OWL-ViT processor that preprocesses the input image and candidate labels before passing them to the OWL-ViT transformer model.
from transformers import AutoProcessor, AutoModelForZeroShotObjectDetection

model = AutoModelForZeroShotObjectDetection.from_pretrained(checkpoint)
processor = AutoProcessor.from_pretrained(checkpoint)
Next, you need to define the candidate labels and pass the input image and candidate labels to the image processor’s images and text attributes, respectively.
Finally, you can pass the processed inputs to the model object. The image processor post-processes the model outputs using the post_process_object_detection function and returns the results dictionary that contains bounding box objects, confidence scores, and labels for the detected objects.
import torch

candidate_labels = ["human face",
                  "ball",
                  "chair",
                  "castle",
                  "basket",
                  "mat"]

inputs = processor(text = candidate_labels, images = image2, return_tensors="pt")


with torch.no_grad():
    outputs = model(**inputs)
    target_sizes = torch.tensor([image2.size[::-1]])
    results = processor.post_process_object_detection(outputs, threshold=0.1, target_sizes=target_sizes)[0]
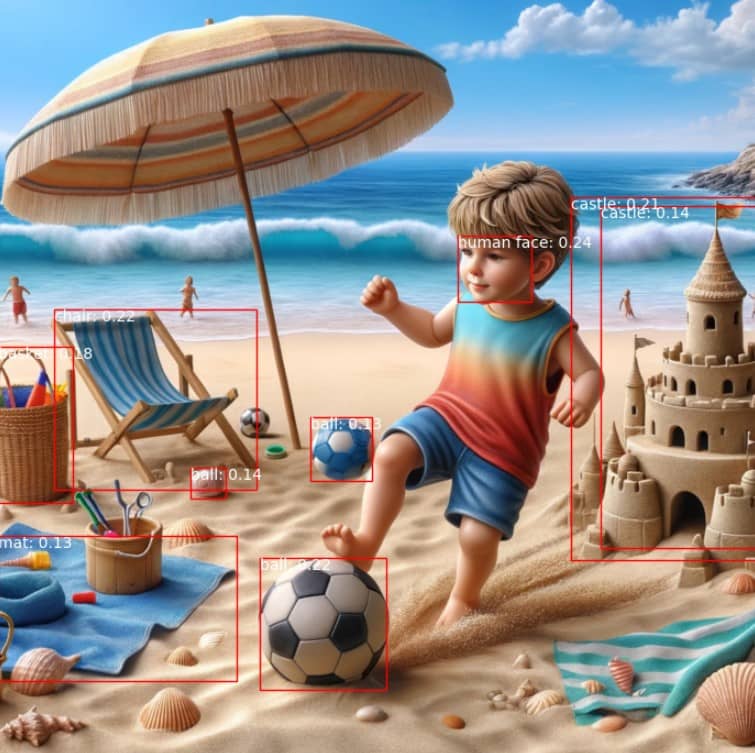
To display the output image with the detected objects, you can iterate through each list in the results dictionary and display the bounding box, object label, and prediction confidence score, like we did earlier. The display_detected_objects function in the following script displays the output image with detected objects.
def display_detected_objects(input_image, candidate_labels, results):

  #Convert PIL Image, convert it to a format suitable for matplotlib
  image_np = np.array(input_image)

  #Create a matplotlib figure and axis
  fig, ax = plt.subplots(figsize=(12, 9))  # Width, height in inches
  ax.imshow(image_np)

  scores = results["scores"].tolist()
  labels = results["labels"].tolist()
  boxes = results["boxes"].tolist()

  for box, score, label in zip(boxes, scores, labels):

      xmin, ymin, xmax, ymax = box

      #Create a Rectangle patch
      rect = patches.Rectangle((xmin, ymin), xmax - xmin, ymax - ymin, linewidth=1, edgecolor='red', facecolor='none')

      #Add the rectangle to the Axes
      ax.add_patch(rect)

      #Add text
      plt.text(xmin, ymin, f"{candidate_labels[label]}: {round(score,2)}", color='white', fontsize=10, verticalalignment='top')

  #Display the image
  plt.axis('off')  #Turn off axis
  plt.show()


display_detected_objects(image2, candidate_labels, results)
Output:

Zero-Shot Object Detection in Multiple Images with Hugging Face Model
You can process image batches for object detection with the Hugging Face model object for the OWL-ViT transformer, as well. To do so, pass the input image objects and their corresponding candidate labels as lists to the image processor’s images and text attributes.
Next, you can pass the processed inputs to the OWL-ViT model object.
In the following script, we pass the two input images you previously saw to the OWL-ViT model.
The output will contain a list of result dictionaries, with each dictionary item corresponding to one of the images.
images = [image1, image2]
candidate_labels = [
    ["human face", "bed","lamp", "clock", "couch", "picture", "cup", "shoes"],
    ["human face", "ball", "chair", "castle", "basket", "mat"]
]
inputs = processor(text = candidate_labels, images=images, return_tensors="pt")


with torch.no_grad():
    outputs = model(**inputs)
    target_sizes = [x.size[::-1] for x in images]
    results = processor.post_process_object_detection(outputs, threshold=0.1, target_sizes=target_sizes)
You can use the following script to display the first output image (image at index 0).
image_index = 0

display_detected_objects(images[image_index],
                         candidate_labels[image_index],
                         results[image_index])
Output:

Similarly, the following displays the second output image.
image_index = 1

display_detected_objects(images[image_index],
                         candidate_labels[image_index],
                         results[image_index])
Output:

Conclusion
Zero-shot object detection is a challenging and exciting task that enables us to discover new and unseen objects in images. In tutorial article, you learned how to use the Hugging Face Transformers library, a powerful and easy-to-use framework, to perform zero-shot object detection on single and multiple images. You also learned how to use the Hugging Face pipeline function and a Hugging Face model for zero-shot object detection.
There’s a lot you can do with this skill. For example, you can experiment with different object detection models to see how well they perform on this task and even take a video frame by frame and process each image to detect objects in a video.
