Introduction
Delete Sheet with Specific Name
Delete Sheet if it Exists
Delete Sheets Without Warning Prompt
Loop Through Sheets and Delete Without Prompting if Sheet Exists
Final Thoughts
Introduction
In this tutorial, I’ll show you 4 ways to delete worksheets using VBA, including examples of how to delete a sheet if it exists and how to delete sheets without the annoying Excel warning prompt.
Delete Sheet with Specific Name
Example 1
Sub VBA_Delete_Sheet()
     Sheets("Sheet1").Delete
End Sub
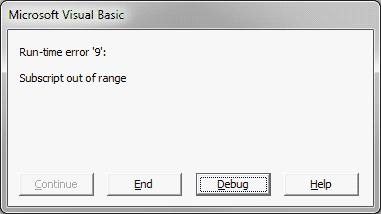
This is the simplest way to delete a worksheet. However, it’s not very robust. For example, if you try to delete a worksheet that doesn’t exist using this macro, you’ll get an error like this one:

You can prevent the “subscript out of range” error by testing if the worksheet exists before trying to delete it. This is exactly what we’ll do in our next example. I’ve developed an introduction to the Worksheet Object tutorial to help you out if you’re feeling a bit uncomfortable using the Sheets object.
Make powerful macros with our free VBA Developer Kit It’s easy to copy and paste a macro like this, but it’s harder make one on your own. To help you make macros like this, we built a free VBA Developer Kit and wrote the Big Book of Excel VBA Macros full of hundreds of pre-built macros to help you master file I/O, arrays, strings and more - grab your free copy below.
Delete Sheet if it Exists
Example 2
Sub VBA_Delete_Sheet2()
For Each Sheet In ActiveWorkbook.Worksheets
     If Sheet.Name = "Sheet1" Then
          Sheet.Delete
     End If
Next Sheet
End Sub
This macro loops through each sheet in your active workbook. It checks to see if a sheet exists, and if it does, it deletes it. This particular example looks for a sheet named
If you use either of the two previous macros to delete a worksheet that isn’t empty, you’ll probably get a warning prompt like this one:

This happens every time you try to delete a worksheet with content on it. It’s unbelievably annoying if you’re trying to delete multiple sheets in one macro. Scroll down to the next VBA example for a solution to this problem.
Delete Sheets Without Warning Prompt
Example 3
Sub VBA_Delete_Sheet3()
Application.DisplayAlerts = False
Worksheets("Sheet1").Delete
Application.DisplayAlerts = True
End Sub
This macro hides the Excel warning prior to deleting your sheet and re-activates the alerts immediately after deleting your sheet. By doing this, you no longer get pestered by the message saying “Data may exist in the sheet(s) selected for deletion.”
That’s right - no more warning prompt! Your sheet just automatically deletes. No questions asked.
Loop Through Sheets and Delete Without Prompting if Sheet Exists
Example 4
Sub VBA_Delete_Sheet4()
For Each Sheet In ActiveWorkbook.Worksheets
    If Sheet.Name = "Sheet1" Then
        Application.DisplayAlerts = False
        Worksheets("Sheet1").Delete
        Application.DisplayAlerts = True
    End If
Next Sheet
End Sub
This final macro combines everything you’ve learned in this tutorial. It loops through all the sheets in your Excel workbook and, if the sheet you want to delete exists, it will delete it without warning.
I’m rather fond of this macro because it shows the beauty of VBA. Why do I like it? I’ve said it once, and I’ll happily say it again. This macro shows how you can (and should!) combine each new skill you learn into wonderful and clean macros.
Final Thoughts
I hope you found these tutorials helpful. You now know 4 ways to delete worksheets using VBA and you’ve learned how you can combine these examples into powerful macros. Powerful macros that bypass the “content exists” warning prompt and that will not generate an error if the sheet you’re trying to delete doesn’t exist.
For more VBA tips, techniques, and tactics, subscribe to our VBA Insiders email series using the form below. After you do that, share this article on Twitter and Facebook.

