Table of Contents
- Introduction
- Change ListBox Selection Type
- Return Position of Selected Item in ListBox
- Return Name of Selected Item in ListBox
- Changing which ListBox Items are Selected
- Assigning a Macro to your ListBox
- Determine which ListBox called a Macro
- Enabling/Disabling ListBoxes
- Adding/Deleting a ListBox
- Add Items to your ListBox list
- Link Range to a ListBox
- Remove items from your ListBox
- Edit an Item in your ListBox
- Selecting a ListBox
- Linking ListBox Selection to a Cell
- Enable 3D Shading with VBA
- Prevent ListBox from Printing
- Control ListBox Object Positioning
- Looping Through All ListBoxes
- Closing Thoughts
Introduction
This VBA Guide will teach you everything you could possibly want to know about handling Excel Form Control Listboxes using VBA. When I say “Form Control” ListBox, I’m talking about this little guy located under “Form Controls” on the Developer Tab > Insert menu:

Form Control ListBox
If you want to read more complete guides to Form Control or ActiveX Controls, visit my ActiveX and Form Control Guides page.
Before I get criticized, yes, I know the formal term is the two-word phrase List Box but I’m partial to referring to it like you would when writing a VBA macro: ListBox. You’ll find I use them interchangeably throughout this guide.
I made a calendar form using Excel Form Control ListBoxes, which I’ll reference throughout this guide as we learn how to manipulate our listboxes with VBA macros.
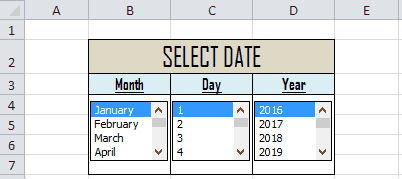
Excel ListBox Form
In the form control world, a listbox contains all the items in your list with an up and down scroll bar on the right side. If it’s a dropdown list your after, you need to try a combobox.
In this tutorial, I’ll show you how to select items, enable multiple selections, return the value of your listbox, link your listbox to a range, assign a macro to your listbox and loop through all the listboxes in your form - all using VBA!
Jump to Table of Contents
Change ListBox Selection Type
How you control the selected values in a listbox using VBA depends largely on what you’ve chosen for your Selection Type. That’s why we’re starting here, first. The selection type can be changed by right clicking your ListBox, selecting Format Control and clicking the Control tab. Your choices are:
- Single - allows only one selection (xlNone).
- Multi - allows multiple selections (xlSimple).
- Extend - allows multiple selections and allows you to select a range of items in the list by shift-clicking (xlExtended).
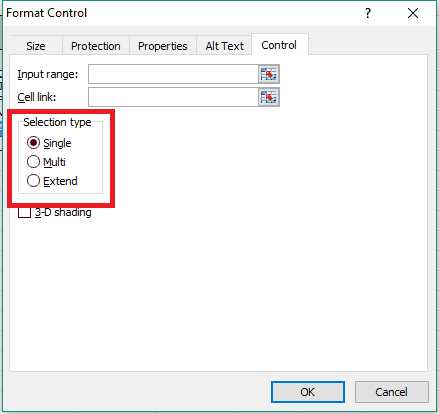
Selection Type
Let’s change the selection type of our listboxes using VBA. Remember, the listbox name can be found in the upper left of Excel when you have your listbox selected:
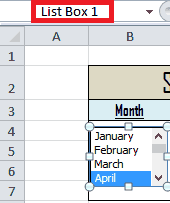
List Box 1
Each of the three methods below can be used to change the MultiSelect property to any of the three acceptable values (xlNone, xlSimple and xlExtended).
Method 1
Sub ListBoxMulti_Method1()
    ActiveSheet.Shapes("List Box 1").ControlFormat.MultiSelect = xlNone 'Single
End Sub
Method 2
Sub ListBoxMulti_Method2()
    ActiveSheet.Shapes("List Box 1").OLEFormat.Object.MultiSelect = xlSimple 'Multi
End Sub
Method 3
Sub ListBoxMulti_Method3()
    ActiveSheet.ListBoxes("List Box 1").MultiSelect = xlExtended 'Extend
End Sub
Jump to Table of Contents
Return Position of Selected Item in ListBox
How you return the value of a selected item in a listbox depends on what you’ve chosen for your Selection Type.
Just like with Form Control Checkboxes, there are many ways to run the same command with Excel Form Control ListBoxes. I’ll present three ways. The following macros return the index position of the selected item in a listbox named “
Return Position with Single Selection
First, we’ll assume your Selection Type is set to single, so only one item can be selected at a time:
Method 1
Sub ListBoxValue_Method1()
    Dim lbValue As Long
    lbValue = ActiveSheet.Shapes("List Box 1").ControlFormat.Value
End Sub
Method 2
Sub ListBoxValue_Method2()
    Dim lbValue As Long
    lbValue = ActiveSheet.Shapes("List Box 1").OLEFormat.Object.Value
End Sub
Method 3
Sub ListBoxValue_Method3()
    Dim lbValue As Long
    lbValue = ActiveSheet.ListBoxes("List Box 1").Value
End Sub
Make powerful macros with our free VBA Developer Kit It’s easy to copy and paste a macro like this, but it’s harder make one on your own. To help you make macros like this, we built a free VBA Developer Kit and wrote the Big Book of Excel VBA Macros full of hundreds of pre-built macros to help you master file I/O, arrays, strings and more - grab your free copy below.
Instead of using the Value property of the ListBoxes, you could also use the ListIndex property. The ListIndex and the Value properties both behave the same way in the above examples.
Either way, if April was selected in
If no items are selected, the .Value and .ListIndex properties both return a value of 0.
Return Positions with Multiple Selections
What if your Selection Type is set to multi or extend? The best way to return all the selected items is to loop through each list item in your listbox. The ListCount property returns the total number of items in your listbox.
Method 1
Sub ListBoxSelected_Method1()
    Dim i As Long
    With ActiveSheet.ListBoxes("List Box 1")
        For i = 1 To .ListCount
            If .Selected(i) Then
                MsgBox i 'item i selected
            End If
        Next i
    End With
End Sub
Method 2
Sub ListBoxSelected_Method2()
    Dim i As Long
    With ActiveSheet.Shapes("List Box 1").OLEFormat.Object
        For i = 1 To .ListCount
            If .Selected(i) Then
                MsgBox i 'item i selected
            End If
        Next i
    End With
End Sub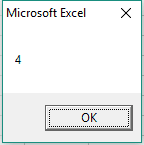
ListBox Selected Position
Notice the ControlFormat method we used for single selection types doesn’t work for multi or extended selection types. Just like with checkboxes and option buttons, the ControlFormat method has limitations.
The .Selected approach works for any Selection Type, but the .Value approach only works for the Single Selection Type. It’s like the old adage a square is a rectangle, but a rectangle is not a square. When in doubt, use a loop with the .Selected approach.
Jump to Table of Contents
Return Name of Selected Item in ListBox
Returning the integer relative position of the selected item is nice, but what if you wanted the actual text of the item selected? To determine the text string of the selected items using VBA, you would wrap the integer index position in a List property:
Return Name with Single Selection
If only one item is selected, you can use these methods:
Method 1
Sub ListBoxListValue_Method1()
    Dim lbText As String
    With ActiveSheet.Shapes("List Box 1").ControlFormat
        lbText = .List(.Value)
    End With
End Sub
Method 2
Sub ListBoxListValue_Method2()
    Dim lbText As String
    With ActiveSheet.Shapes("List Box 1").OLEFormat.Object
        lbText = .List(.Value)
    End With
End Sub
Method 3
Sub ListBoxListValue_Method3()
    Dim lbText As String
    With ActiveSheet.ListBoxes("List Box 1")
        lbText = .List(.Value)
    End With
End Sub
Again, you could also replace .Value with .ListIndex in the above macro examples.
Return Names with Multiple Selections
If multiple items are selected, you’ll need to loop through each item to find out which items in the list are selected:
Method 1
Sub ListBoxItemText_Method1()
    Dim i As Long
    With ActiveSheet.ListBoxes("List Box 1")
        For i = 1 To .ListCount
            If .Selected(i) Then
                MsgBox .List(i) 'item i selected
            End If
        Next i
    End With
End Sub
Method 2
Sub ListBoxItemText_Method2()
    Dim i As Long
    With ActiveSheet.Shapes("List Box 1").OLEFormat.Object
        For i = 1 To .ListCount
            If .Selected(i) Then
                MsgBox .List(i) 'item i selected
            End If
        Next i
    End With
End Sub
If April is selected, a message box with the string “April” will appear instead of just the integer “4.”
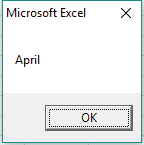
ListBox Selected Item
Jump to Table of Contents
Changing which ListBox Items are Selected
If you want to change which items in your Form Control ListBox are selected, try one of the following:
Method 1 - Single Selection
Sub ListBoxChangeSelection_Method1()
    ActiveSheet.Shapes("List Box 1").OLEFormat.Object.Selected = 3
End Sub
Method 2 - Single Selection
Sub ListBoxChangeSelection_Method2()
    ActiveSheet.ListBoxes("List Box 1").Selected = 3
End Sub
Both of these VBA macros change the selected item to “March” in our calendar form.
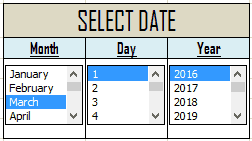
ListBox Change Selected Item
If you were to add a line below with a .Selected = 2, the 3rd item would become deselected and only the 2nd item would be selected. This is true whether or not you have multiple selections enabled. So, how would you select multiple items with VBA? Let’s take a look.
Method 1 - Multiple Selections
Sub ListBoxMultiSelection_Method1()
    With ActiveSheet.Shapes("List Box 1").OLEFormat.Object
        .Selected(2) = True
        .Selected(3) = True
    End With
End Sub
Method 2 - Multiple Selections
Sub ListBoxMultiSelection_Method2()
    With ActiveSheet.ListBoxes("List Box 1")
        .Selected(2) = True
        .Selected(3) = True
    End With
End Sub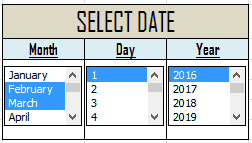
ListBox Select Multiple Items
As you probably guessed, setting an item to
Jump to Table of Contents
Assigning a Macro to your ListBox
The following VBA macros demonstrate how to assign a macro to a ListBox. When an item in the ListBox is clicked, the macro you assign will trigger and execute. This is the same as right clicking your ListBox and selecting Assign Macro.
These examples assign the macro .OnAction property:
Method 1
Sub AssignMacro_Method1()
    ActiveSheet.Shapes("List Box 1").OLEFormat.Object.OnAction = "Module1.DisplayMessage"
End Sub
Method 2
Sub AssignMacro_Method2()
    ActiveSheet.ListBoxes("List Box 1").OnAction = "Module1.DisplayMessage"
End Sub
Like Form Control Checkboxes, the ControlFormat method we demonstrated earlier will not work to assign a macro to a ListBox.
To unassign a macro to your ListBox, set the OnAction property equal to an empty string:
Unassign Macro
Sub UnassignMacro()
    ActiveSheet.Shapes("List Box 1").OLEFormat.Object.OnAction = ""
End Sub
Jump to Table of Contents
Determine which ListBox called a Macro
If you have multiple ListBoxes linked to the same macro (i.e., more than one ListBox running the same macro when an item is selected or deselected), you can find out which listbox called the macro with Application.Caller.
In the Assigning a Macro example, we set our ListBox to run
Sub DisplayMessage()
    MsgBox Application.Caller
End Sub
When you click an item inside the
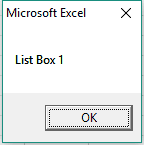
List Box 1
This is useful if you have one macro that you want to run down different branches depending on which list you’re handling.
In case you were curious, the name that displays via Application.Caller is the .Name property of the list box, as demonstrated by the following macro:
Sub DisplayName()
    MsgBox ActiveSheet.ListBoxes("List Box 1").Name
End Sub
Jump to Table of Contents
Enabling/Disabling your ListBox
Excel Form Control ListBoxes don’t gray out when you disable them, but disabling them does prevent the user from clicking new selections. There’s no way to tell your ListBoxes are disabled by looking at them - at least not in Excel 2010.
There aren’t very many reasons to do thos, but I said this is a complete guide so here you go. Here are three ways to disable an Excel Form Control ListBox using VBA:
Method 1
Sub DisableListBox()
    ActiveSheet.Shapes("List Box 1").ControlFormat.Enabled = False
End Sub
Method 2
Sub DisableListBox2()
    ActiveSheet.Shapes("List Box 1").OLEFormat.Object.Enabled = False
End Sub
Method 3
Sub DisableListBox3()
    ActiveSheet.ListBoxes("List Box 1").Enabled = False
End Sub
Note that this does not disable the macro associated with your ListBox if you’ve already assigned one. All it does is prevent the user from making new selections. Your macro will still run when a user attemps to select a new item in your list, even though the item will not become selected.
To enable your listbox again, just set the .Enabled property back to True using whichever method you prefer. Here’s an example:
Sub EnableListBox()
    ActiveSheet.ListBoxes("List Box 1").Enabled = True
End Sub
Jump to Table of Contents
Adding/Deleting a ListBox
To add a Form Control List Box, you need to know where you want to place the list box and what size you want it to be. The following example adds a new ListBox to the range you currently have selected. It also adjusts the list boxes size to match the dimensions of the selected range.
Add a ListBox
Sub AddListBox()
    With ActiveSheet.ListBoxes.Add(Selection.Left, Selection.Top, Selection.Width, Selection.Height)
        .Name = "NewListBox"
    End With
End Sub
Notice how this macro used the .Name property we briefly mentioned earlier to make a new ListBox with a custom name.
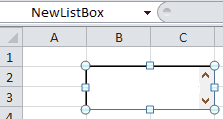
Creating a New ListBox with VBA
To delete the list box named “NewListBox”, run this VBA macro:
Delete a ListBox
Sub DeleteListBox()
    ActiveSheet.ListBoxes("NewListBox").Delete
End Sub
Jump to Table of Contents
Add Items to your ListBox list
This is an important section. In this section, we’ll show you how to dynamically add items to your listbox using VBA.
This is great for filling out a listbox when your workbook opens and you don’t want to link it to a range.
Add Item to Bottom of ListBox
The following macros add items to the list using three different methods, all of which use the AddItem method. You can choose to use any method you want. Most people opt for the method with the least amount of coding!
Sub AddListBoxItem()
    ActiveSheet.ListBoxes("List Box 1").AddItem "Dog"
    ActiveSheet.Shapes("List Box 1").OLEFormat.Object.AddItem "Cat"
    ActiveSheet.Shapes("List Box 1").ControlFormat.AddItem "Rabbit"
End Sub
Add an item to a ListBox with VBA
The commonality between each of these methods is they all use the AddItem property to add the new item and they all add the new item to the end of the listbox by default.
Add Item Anywhere in ListBox List
The beauty of the AddItem property is that you can change where you want to add an item. To do that, you just need to tell your form control listbox the index position where you want your new item. Here’s an example illustrating how to add an item to the top of your list:
Sub AddListBoxItemToTop()
    ActiveSheet.ListBoxes("List Box 1").AddItem "Horse", 1
End Sub
Add Item to Top of ListBox
Similarly, change the
Add Static Items Based on Range
Let’s say you want to populate a listbox based on the values in a range of cells in Excel, but you don’t want the values in your listbox to change when the values in your range change. To hardcode the value to a range of values without linking the listbox to the cell, try the following macros:
Method 1
Sub PopulateWithStaticRange()
    ActiveSheet.Shapes("List Box 1").ControlFormat.List = ActiveSheet.Range("F1:F4").Value
End Sub
Method 2
Sub PopulateWithStaticRange2()
    ActiveSheet.Shapes("List Box 1").OLEFormat.Object.List = ActiveSheet.Range("F1:F4").Value
End Sub
Method 3
Sub PopulateWithStaticRange3()
    ActiveSheet.ListBoxes("List Box 1").List = ActiveSheet.Range("F1:F4").Value
End Sub
Because you didn’t link the ListBox to the range itself, you can change the values in cells
Note, you may run into errors trying this method when you have numbers stored in the range. Make sure your numbers are represented as text or loop through each cell in the range and convert the values to strings using the VBA cStr function before adding them to your ListBox.
Jump to Table of Contents
Link Range to a ListBox
To dynamically link a range to your ListBox such that the content of your listbox automatically updates when you change the cells in the linked range, use the ListFillRange keyword. Here are some examples:
Method 1
Sub LinkListBoxToRange1()
    ActiveSheet.Shapes("List Box 1").ControlFormat.ListFillRange = "Sheet4!$A$1:$A$4"
End Sub
Method 2
Sub LinkListBoxToRange2()
    ActiveSheet.Shapes("List Box 1").OLEFormat.Object.ListFillRange = "Sheet4!$A$1:$A$4"
End Sub
Method 3
Sub LinkListBoxToRange3()
    ActiveSheet.ListBoxes("List Box 1").ListFillRange = "Sheet4!$A$1:$A$4"
End Sub
This macro links your ListBox to the range
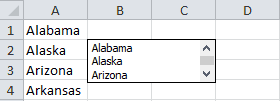
Before

After
Notice that this is the same as right clicking your ListBox, clicking Format Control, navigating to the Control tab and changing the “Input Range” field.
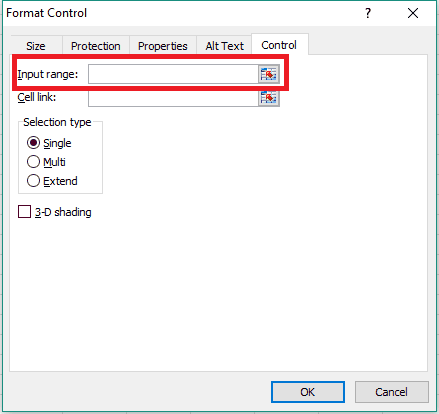
Form Control ListBox Input Range
Jump to Table of Contents
Remove items from your ListBox
Remove Single Item in your ListBox
You can remove a single item with the RemoveItem command. Follow it with the number of the item you want to remove. For example, a 4 removes the 4th item in the list.
Method 1
Sub RemoveListBoxItem()
    ActiveSheet.Shapes("List Box 1").ControlFormat.RemoveItem 4
End Sub
Method 2
Sub RemoveListBoxItem2()
    ActiveSheet.Shapes("List Box 1").OLEFormat.Object.RemoveItem 4
End Sub
Method 3
Sub RemoveListBoxItem3()
    ActiveSheet.ListBoxes("List Box 1").RemoveItem 4
End Sub
Remove All Items in your ListBox
If you prefer to delete all the items in your list, use the RemoveAllItems command.
Method 1
Sub RemoveAllListBoxItems()
    ActiveSheet.Shapes("List Box 1").ControlFormat.RemoveAllItems
End Sub
Method 2
Sub RemoveAllListBoxItems2()
    ActiveSheet.Shapes("List Box 1").OLEFormat.Object.RemoveAllItems
End Sub
Method 3
Sub RemoveAllListBoxItems3()
    ActiveSheet.ListBoxes("List Box 1").RemoveAllItems
End Sub
Once you run one of these commands, you’ll be left with an empty ListBox.
Jump to Table of Contents
Edit an Item in your ListBox
You can change an individual item in your ListBox using VBA by combining the .RemoveItem property and the .AddItem property. You first have to delete the 2nd item, then add a new item in its place. There’s no way to directly alter the text of the item in the ListBox once it’s already in there.
The following examples change the 2nd item in the ListBox list from Alaska to Montana. You must unlink your ListBox from a range in order for this to work!
Method 1
Sub ChangeListBoxItem()
    ActiveSheet.Shapes("List Box 1").ControlFormat.RemoveItem 2
    ActiveSheet.Shapes("List Box 1").ControlFormat.AddItem "Montana", 2
End Sub
Method 2
Sub ChangeListBoxItem2()
    ActiveSheet.Shapes("List Box 1").OLEFormat.Object.RemoveItem 2
    ActiveSheet.Shapes("List Box 1").OLEFormat.Object.AddItem "Montana", 2
End Sub
Method 3
Sub ChangeListBoxItem3()
    ActiveSheet.ListBoxes("List Box 1").RemoveItem 2
    ActiveSheet.ListBoxes("List Box 1").AddItem "Montana", 2
End Sub
Here’s the end product:

Change ListBox Item
Jump to Table of Contents
Selecting a ListBox
To select a ListBox titled
Sub SelectListBox()
    ActiveSheet.ListBoxes("List Box 2").Select
End Sub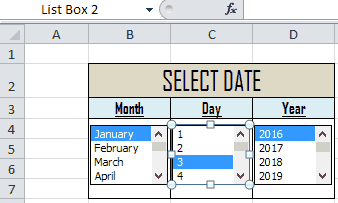
Select "List Box 2"
Jump to Table of Contents
Linking ListBox Selection to a Cell
To link the selected value in a ListBox to a cell using VBA, execute one of these macros:
Method 1
Sub LinkListBox()
    ActiveSheet.Shapes("List Box 1").ControlFormat.LinkedCell = "Sheet1!$A$1"
End Sub
Method 2
Sub LinkListBox2()
    ActiveSheet.Shapes("List Box 1").OLEFormat.Object.LinkedCell = "Sheet1!$A$1"
End Sub
Method 3
Sub LinkListBox3()
    ActiveSheet.ListBoxes("List Box 1").LinkedCell = "Sheet1!$A$1"
End Sub
Cell ListIndex position associated with the selected item. In other words, if the third item in the ListBox is selected, the value in cell
If no item is selected, the cell value would be 0.
Jump to Table of Contents
Enable 3D Shading with VBA
To enable 3D shading for your ListBox using VBA, change the Display3DShading property to True. To disable it, change it to False.
Method 1
Sub Enable3DShading()
    ActiveSheet.Shapes("List Box 1").OLEFormat.Object.Display3DShading = True
End Sub
Method 2
Sub Enable3DShading2()
    ActiveSheet.ListBoxes("List Box 1").Display3DShading = True
End Sub
3D shading makes your Form Control ListBoxes look kind of like ActiveX ListBoxes. They’re beveled a bit near the edges to give it a sunken appearance. You cannot change the 3D shading by using the ControlFormat method.

Display3DShading True (Left) vs False (Right)
Jump to Table of Contents
Prevent ListBox from Printing
There are times when you may want your ListBox to be displayed on your excel sheet but you don’t want it to print when you print your workbook. You can prevent your listboxes from printing by disabling the PrintObject property.
Method 1
Sub DisablePrinting()
    ActiveSheet.Shapes("List Box 1").ControlFormat.PrintObject = False
End Sub
Method 2
Sub DisablePrinting2()
    ActiveSheet.Shapes("List Box 1").OLEFormat.Object.PrintObject = False
End Sub
Method 3
Sub DisablePrinting3()
    ActiveSheet.ListBoxes("List Box 1").PrintObject = False
End Sub
Set PrintObject back to True if you want to print your listboxes, or set it to false to prevent your listboxes from printing with the rest of your sheet. This is equivalent to unchecking and checking the “Print object” box when you right click your listbox > Format Control > Properties.
Jump to Table of Contents
Control ListBox Object Positioning
Like other control objects, you can fix your ListBoxes to the screen so they don’t move when you add cells, delete cells, adjust column widths or adjust row heights. To do this, you would right click your list box and go to Format Control > Properties. You would then adjust the options under “Object positioning.”
To automate these actions with VBA, change the Placement property:
Method 1
Sub ControlPlacement()
    ActiveSheet.ListBoxes("List Box 1").Placement = xlFreeFloating
End Sub
Method 2
Sub ControlPlacement2()
    ActiveSheet.Shapes("List Box 1").OLEFormat.Object.Placement = xlMove
End Sub
There are three possible values for the .Placement property, but you can only use 2 of them with the list box, as described below:
| Value | Description |
|---|---|
| xlMoveAndSize | Move and size with cells. This option is unavailable for Form Control List Boxes. |
| xlMove | Move but don’t size with cells. When a cell is added or resized, the position of the control will change. |
| xlFreeFloating | Don’t move or size the cells. When a cell is added or resized, the control will stay in the same position. The position of the control is locked. |
Jump to Table of Contents
Looping Through All ListBoxes
I’m going to close out this massive tutorial with an example macro that loops through all the Form Control List Boxes in your active and lets you take different actions depending on which items are selected.
Be sure to read the comment cards to determine how you can better use this VBA macro. As always, I encourage you to combine this loop with the List Box lessons you learned throughout this article to create your own powerful VBA macros.
Sub ListBoxLoop()
Dim lb As Shape, i As Long
'Loop through ListBoxes
  For Each lb In ActiveSheet.Shapes
    If lb.Type = msoFormControl Then
      If lb.FormControlType = xlListBox Then
        For i = 1 To lb.OLEFormat.Object.ListCount
            If lb.OLEFormat.Object.Selected(i) Then
                'item i selected
            Else
                'item i not selected
            End If
        Next i
      End If
    End If
  Next lb
End Sub
Jump to Table of Contents
Closing Thoughts
This is one of my longest ActiveX and Form Control Guides - I hope you enjoyed it! When you’re ready to take your VBA to the next level, subscribe using the form below and follow me on Twitter .

