Table of Contents
- Introduction
- Check the Value of an Option Button
- Checking/Unchecking
- Assigning a Macro
- Determine which Option Button called a Macro
- Enabling/Disabling Option Buttons
- Editing Label
- Adding/Deleting Option Buttons
- Selecting an Option Button
- Linking to a Cell
- Enable 3D Shading with VBA
- Prevent Option Button from Printing
- Control Option Button Object Positioning
- Looping Through All Option Buttons
- Closing Thoughts
Introduction
This VBA Guide will teach you everything you ever wanted to know about handling Excel Form Control Option Buttons using VBA. By “Form Control” option buttons, also known as radio buttons, I mean this fellow located under “Form Controls” on the Developer Tab > Insert menu:
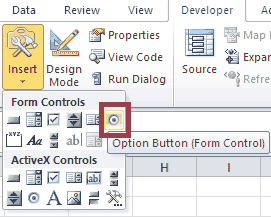
Form Control Option Button
If you want to read more complete guides to Form Control or ActiveX Controls, visit my ActiveX and Form Control Guides page.
I created an order form using Excel Form Control Option Buttons, or radio buttons. I’ll reference this order form throughout the guide as we learn how to manipulate our option buttons with VBA macros.
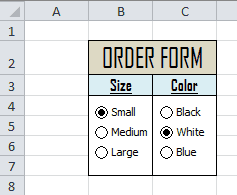
Excel Option Button Form
Remember, you can only select one option button at a time, unless you place them in different “groups.” These groups are also called “Frames” or “Group Controls.” In my sample form, I placed the color radio buttons in their own group so the user can select both a size AND a color.
This website gets picked on a lot for using Excel 2010. I know I’m half a dozen years behind the times - I’m okay with that!
Anyway, keep reading to learn how to check, uncheck, assign a macro to and loop through all form control option buttons!
Jump to Table of Contents
Return the Value of your Option Button
There’s more than one way to check the value of a form control option button. I’ll present three ways. The following macros return the value of an option button named “
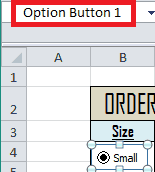
Option Button 1
Method 1
Sub OptionButtonValue_Method1()
    Dim rbValue As Long
    rbValue = ActiveSheet.Shapes("Option Button 1").ControlFormat.Value
End Sub
Method 2
Sub OptionButtonValue_Method2()
    Dim rbValue As Long
    rbValue = ActiveSheet.Shapes("Option Button 1").OLEFormat.Object.Value
End Sub
Method 3
Sub OptionButtonValue_Method3()
    Dim rbValue As Long
    rbValue = ActiveSheet.OptionButtons("Option Button 1").Value
End Sub
Make powerful macros with our free VBA Developer Kit This is actually pretty neat. If you have trouble understanding or remembering it, our free VBA Developer Kit can help. It’s loaded with VBA shortcuts to help you make your own macros like this one - we’ll send a copy, along with our Big Book of Excel VBA Macros, to your email address below.
All three methods do the same thing, so it’s up to personal preference. There are two possible values of an option button.
| Value | Example | Description |
|---|---|---|
| 1 |  |
Checked (xlOn) |
| -4146 |  |
Unchecked (xlOff) |
Jump to Table of Contents
Checking/Unchecking your Option Button
Checking and unchecking your Option Button (Radio Button) is almost identical to returning the value of your option button. Again, at least three methods can be used. The following macros first check the button, then uncheck the button:
Method 1
Sub Check_Method1()
    'Check the Option Button
    ActiveSheet.Shapes("Option Button 1").ControlFormat.Value = 1 'can also set to xlOn
    'Uncheck the Option Button
    ActiveSheet.Shapes("Option Button 1").ControlFormat.Value = -4146 'can also set to 0 or xlOff
End Sub
Method 2
Sub Check_Method2()
    'Check the Option Button
    ActiveSheet.Shapes("Option Button 1").OLEFormat.Object.Value = 1 'can also set to xlOn
    'Uncheck the Option Button
    ActiveSheet.Shapes("Option Button 1").OLEFormat.Object.Value = -4146 'can also set to 0 or xlOff
End Sub
Method 3
Sub Check_Method3()
    'Check the Option Button
    ActiveSheet.OptionButtons("Option Button 1").Value= 1 'can also set to xlOn
    'Uncheck the Option Button
    ActiveSheet.OptionButtons("Option Button 1").Value = -4146 'can also set to 0 or xlOff
End Sub
Jump to Table of Contents
Assigning a Macro to your Option Button
The following macro shows you how to assign a macro to an Option Button. When the Option Button is clicked, the macro you assign will execute. This is the same as right clicking your option button and clicking Assign Macro. These examples assign the macro .OnAction property:
Method 1
Sub AssignMacro_Method1()
    ActiveSheet.Shapes("Option Button 1").OLEFormat.Object.OnAction = "Module1.DisplayMessage"
End Sub
Method 2
Sub AssignMacro_Method2()
    ActiveSheet.OptionButtons("Option Button 1").OnAction = "Module1.DisplayMessage"
End Sub
Like Form Control Checkboxes, the ControlFormat method we demonstrated earlier will not work to assign a macro to radio buttons.
To unassign a macro to your option button, set the OnAction property equal to an empty string:
Unassign Macro
Sub UnassignMacro()
    ActiveSheet.Shapes("Option Button 1").OLEFormat.Object.OnAction = ""
End Sub
Jump to Table of Contents
Determine which Option Button called a Macro
If you have multiple option buttons linked to the same macro (i.e., more than one option button running the same macro when checked), it would be useful to be able to tell which option button called the macro. I’d argue, this would be even more useful than it was for Form Control Checkboxes since you can only have one radio button per group checked at a time. You can find out which button called the macro with Application.Caller.
In the Assigning a Macro example, we set our Option Button to run
Sub DisplayMessage()
    MsgBox Application.Caller
End Sub
When you click the
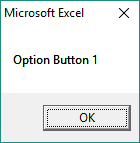
Option Button 1
This is useful if you have one macro that you want to run down different branches depending on which radio button is checked.
In case you were curious, the name that displays via Application.Caller is the .Name property of the option button, as demonstrated by the following macro:
Sub DisplayName()
    MsgBox ActiveSheet.OptionButtons("Option Button 1").Name
End Sub
Jump to Table of Contents
Enabling/Disabling your Option Button
Unfortunately, Form Control Option Buttons don’t gray out when you disable them. All disabling them does is prevent you from selecting (checking) the option button. If the button is checked when you disable it, you will still be able to uncheck it by selecting another radio button, but you won’t be able check it again until you enable the radio button, again. Sadly, you can’t even tell the radio buttons are disabled by looking at them - at least not in Excel 2010. It’s all pretty pointless.
Method 1
Sub DisableOptionButton()
    ActiveSheet.Shapes("Option Button 1").ControlFormat.Enabled = False
End Sub
Method 2
Sub DisableOptionButton2()
    ActiveSheet.Shapes("Option Button 1").OLEFormat.Object.Enabled = False
End Sub
Method 3
Sub DisableOptionButton3()
    ActiveSheet.OptionButtons("Option Button 1").Enabled = False
End Sub
It’s important to note that this does not disable the macro associated with the option button if you’ve set it to one. All it does is prevent the user from checking the option button. Your macro will still run when the radio button is clicked, even though the radio button itself will not become checked. Like I said, it’s pretty pointless!
To enable your option button again, just set the .Enabled property back to True using whichever method you prefer. Here’s an example:
Sub EnableOptionButton()
    ActiveSheet.OptionButtons("Option Button 1").Enabled = True
End Sub
Jump to Table of Contents
Editing the Label (Caption) of your Option Button
You can change the caption of your Option Button using the .Caption property. The following examples change the label beside
Method 1
Sub ChangeCaption()
    ActiveSheet.Shapes("Option Button 4").OLEFormat.Object.Caption = "Green"
End Sub
Method 2
Sub ChangeCaption2()
    ActiveSheet.OptionButtons("Option Button 4").Caption = "Green"
End Sub
Here’s the end product:

Green
Just like when we were Assigning a Macro, the ControlFormat method will not work to change the caption.
Jump to Table of Contents
Adding/Deleting an Option Button
To add a Form Control Option Button, you need to know where you want to place the option button and what size you want it to be. The following example adds a new option button to the cell you currently have selected. It also adjusts the option button’s size to match the dimensions of the selected cell.
Add an Option Button
Sub AddOptionButton()
    With ActiveSheet.OptionButtons.Add(Selection.Left, Selection.Top, Selection.Width, Selection.Height)
        .Name = "NewOptionButton"
        .Caption = "Green"
    End With
End Sub
Notice how this macro combines the .Name and .Caption properties we discussed earlier to make a new radio button with a custom label and custom name.

Creating a New Option Button with VBA
To delete the option button named “NewOptionButton”, run this VBA macro:
Delete an OptionButton
Sub DeleteOptionButton()
    ActiveSheet.OptionButtons("NewOptionButton").Delete
End Sub
Jump to Table of Contents
Selecting an Option Button
To select an option button titled
Sub SelectOptionButton()
    ActiveSheet.OptionButtons("Option Button 5").Select
End Sub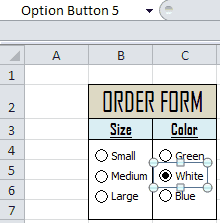
Select "Option Button 5"
Jump to Table of Contents
Linking Option Button to a Cell
To link an option button to the value of a cell using VBA, you would execute one of the following methods:
Method 1
Sub LinkOptionButton()
    ActiveSheet.Shapes("Option Button 5").ControlFormat.LinkedCell = "Sheet1!$A$1"
End Sub
Method 2
Sub LinkOptionButton2()
    ActiveSheet.Shapes("Option Button 5").OLEFormat.Object.LinkedCell = "Sheet1!$A$1"
End Sub
Method 3
Sub LinkOptionButton3()
    ActiveSheet.OptionButtons("Option Button 5").LinkedCell = "Sheet1!$A$1"
End Sub
Now, cell “A1” in “Sheet1” changes from 0 to N, where N is the number of option buttons in the group. Because
Notice, you don’t have to link a cell for each radio button in a group. Once you link one radio button to a cell, all the cells in that group are automatically linked. This is the same type of behavior that occurs when right-clicking your option button > Format Control > Control > Selecting a cell beside “Cell link.”
Jump to Table of Contents
Enable 3D Shading with VBA
To enable 3D shading for your Option Button using VBA, change the .Display3DShading property to True. To disable it, change it to False.
Method 1
Sub Enable3DShading()
    ActiveSheet.Shapes("Option Button 2").OLEFormat.Object.Display3DShading = True
End Sub
Method 2
Sub Enable3DShading2()
    ActiveSheet.OptionButtons("Option Button 2").Display3DShading = True
End Sub
3D shading makes your Form Control radio buttons look more like ActiveX radio buttons. You cannot change the 3D shading by using the ControlFormat method.

Display3DShading True (Left) vs False (Right)
Jump to Table of Contents
Prevent Option Button from Printing
There are times when you may want your option button to be displayed on your excel sheet but you don’t want it to print when you print your workbook. You can prevent your option buttons from printing by disabling the .PrintObject property.
Method 1
Sub DisablePrinting()
    ActiveSheet.Shapes("Option Button 2").ControlFormat.PrintObject = False
End Sub
Method 2
Sub DisablePrinting2()
    ActiveSheet.Shapes("Option Button 2").OLEFormat.Object.PrintObject = False
End Sub
Method 3
Sub DisablePrinting3()
    ActiveSheet.OptionButtons("Option Button 2").PrintObject = False
End Sub
Set .PrintObject to True to allow your radio buttons to print, or set it to false to prevent your radio buttons from printing with the rest of your sheet. This is equivalent to unchecking and checking the “Print object” box when you right click your radio button > Format Control > Properties.
Jump to Table of Contents
Control Option Button Object Positioning
Like other control objects, you can fix your option buttons to the screen so they don’t move when you add cells, delete cells, adjust column widths or adjust row heights. To do this, you would right click your option button and go to Format Control > Properties. You would then adjust the options under “Object positioning.”
To automate these actions with VBA, change the .Placement property:
Method 1
Sub ControlPlacement()
    ActiveSheet.OptionButtons("Option Button 2").Placement = xlFreeFloating
End Sub
Method 2
Sub ControlPlacement2()
    ActiveSheet.Shapes("Option Button 2").OLEFormat.Object.Placement = xlMove
End Sub
There are three possible values for the .Placement property, but you can only use 2 of them with the Option Button, as described below:
| Value | Description |
|---|---|
| xlMoveAndSize | Move and size with cells. This option is unavailable for Form Control Option Buttons. |
| xlMove | Move but don’t size with cells. When a cell is added or resized, the position of the control will change. |
| xlFreeFloating | Don’t move or size the cells. When a cell is added or resized, the control will stay in the same position. The position of the control is locked. |
Jump to Table of Contents
Looping Through All Option Buttons
This example macro loops through all the Form Control Option Buttons in your active sheet and serves as a nice template for you if you want to take action on radio buttons meeting different conditions. Be sure to read the comments to understand how you can use the VBA macro.
Sub OptionButtonLoop()

Dim rb As Shape

'Loop through Option Buttons
  For Each rb In ActiveSheet.Shapes
    If rb.Type = msoFormControl Then
      If rb.FormControlType = xlOptionButton Then
        If rb.ControlFormat.Value = 1 Then
          'Do something if checked...
        ElseIf rb.ControlFormat.Value = -4146 Then
          'Do something if not checked...
        End If
      End If
    End If
  Next rb

End Sub
Jump to Table of Contents
Closing Thoughts
That’s all for this tutorial. When you’re ready to take your VBA to the next level, subscribe using the form below.

