Within the overarching Application object, there is a FileDialog object that allows you to customize four types of file dialogs: Open, Save As, Folder Picker, and File Picker. The Open dialog is similar to the GetOpenFileName dialog, except GetOpenFileName is a function that only returns the selected file’s path. It can’t actually open the file. The Open file dialog box, or msoFileDialogOpen, is an object, so you can actually use it to directly open files - although it’s not necessarily the best option.
This tutorial is going to describe the msoFileDialogOpen object and teach you how to customize the dialog box for your own application.
- VBA FileDialog Object
- Adding Filters to the Dialog Box
- Initial Values
- Persistence
- msoFileDialogOpen Methods
- Complete msoFileDialogOpen macro example
We’ll build our macro piece by piece, and then present a complete macro at the end with an image of our fully customized dialog box. We’ll also describe how to interact with the file or files your user selected.
VBA FileDialog Object
Similar to other file dialogs, our base setup will look like this:
Dim oFD As FileDialog
Set oFD = Application.FileDialog(msoFileDialogOpen)
Notice the msoFileDialogOpen parameter. We’ve set the variable .Show and .Execute. Since FileDialog is more customizable than the basic GetOpenFileName, there are a few properties we can set, too. We’re going to describe how to use these properties to change file filters and adjust dialog box text. We’ll also include some other options that are convenient for users.
Customizing the Labels
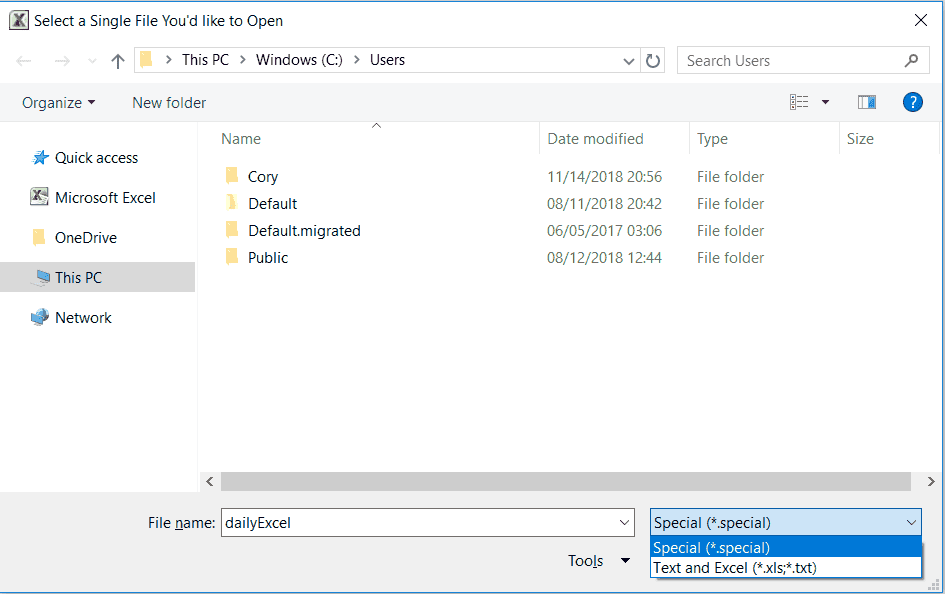
Because its so simple to do, let’s go ahead and modify the text on the open file dialog box. You can rename the execute button and the title of the dialog like this:
oFD.ButtonName = "Press me to Go"
oFD.Title = "Select a Single File You'd Like to Open"
The button is what the user will click to finally open the file. One thing you’ll probably notice is that your custom button name won’t appear until after the user clicks a file. I can’t explain it, but that’s the way it is.
You know how some buttons have an underlined letter so you can quickly select it by pressing a key combination, like Alt+O? You can do that on your own file dialog boxes by putting an ampersand before your shortcut letter, like this:
oFD.ButtonName = "Press &me to Go"In this example, pressing Alt+m will automatically select the button.
AllowMultiSelect to select multiple files
Another important property to set, which defaults to True, is AllowMultiSelect. If you want to disallow opening more than one file at a time, make sure to set this property to False.
oFD.AllowMultiSelect = FalseAdding Filters to the Dialog Box
All the properties we’ve talked about so far are pretty straightforward. You call up the property and pass it a string or a boolean. That’s simple enough, right? File Filters are a bit more complicated. File filters tell your dialog box what type of file to display, like .xlsx or .txt files.
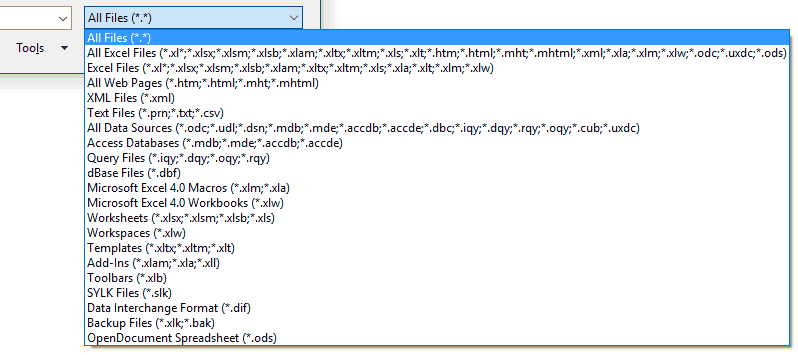
When you start a FileDialog, Microsoft will conveniently fill up the Filters collection with a list of default filters (assuming you haven’t already cleared them in your current session - we’ll talk more about persistence later). You should see about 20 default filters for the Open dialog.

Filters are stored in a collection called Filters, and you can access each Filter’s description and extensions if you want. To see the fifth filter’s description and extension strings, for example, you could type this into the VBA Immediate Window. Recall, the VBE shortcut for launching the Immediate Window is Ctrl+g.
?oFD.Filters(5).Description:?oFD.Filters(5).ExtensionsIf your default filters are like mine, you’ll get this output:
XML Files
*.xml
For the most part, the built-in filters will be sufficient for your needs and you might not need to change anything at all. But sometimes you want to enforce certain file types, filter your own file types, or just make your user’s experience more enjoyable. We’re going to give you several examples of how you can control filtering in your VBA file dialog box to restrict which files your user can open.
Defaulting by Index
The FilterIndex property let’s you set the default filter when opening the open file dialog box. For example, if you think most of your users will be opening tab-delimited text files for further processing in Excel, you can set FilterIndex = 6. When the dialog is shown, the
That’s valuable in some instances, but sometimes the user may try to open a file type that causes your macro to crash. That’s why we should learn how to restrict users from selecting certain file types.
Restricting the File Types
Maybe you know your user might open a few different file tpyes but they certainly have no need to open .html and .txt files. You can completely eliminate filters from the dropdown list using the Filters.Delete([Item]).
For example, if you don’t want your users to open text files (filter number 6), you can simply add the line
Filters.Delete(6) 'use with caution...which will remove the sixth item. The item that’s deleted will be completely eliminated for as long as you have your current Excel application open. The item that was previously index 7 will now be index 6, so new sixth item will be deleted each time you run this line of code. In other words, be careful about running this multiple times. Eventually, you’ll have fewer than 6 filters remaining and you’ll get a “Subscript out of range” error. This is a feature known as “persistance.” We’ll talk more about persistence shortly.
The other method, and definitely the preferred method, is to simply clear the entire collection and write your own filters. You can delete all the filters by adding Filters.Clear to your macro. Once this is run, the Filters collection will be empty and you can start adding your own custom filters.
If you don’t input any filters after clearing, VBA will automatically create an
Creating Your Own Filters
So how do you add your own custom filters? Say you want only files with extensions of .xlsx, .txt, and a custom-format
Sub filtering_file_types()
Dim oFD As FileDialog
Set oFD = Application.FileDialog(msoFileDialogOpen)
oFD.Filters.clear
oFD.Filters.Add "Special", "*.special"
oFD.Filters.Add "Text and Excel", "*.xlsx, *.txt"
'oFd.Show
End Sub
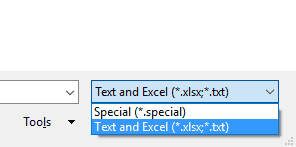
It’s important that you place an asterisk before the extension. Otherwise you’ll get errors or no files at all. If you were to show the dialog box, you’ll notice we combined the Text and Excel filters into a single item in our dropdown menu.

Make powerful macros with our free VBA Developer Kit It’s easy to copy and paste a macro like this, but it’s harder make one on your own. To help you make macros like this, we built a free VBA Developer Kit and wrote the Big Book of Excel VBA Macros full of hundreds of pre-built macros to help you master file I/O, arrays, strings and more - grab your free copy below.
Initial Values
Before we show the dialog, let’s quickly look at two more properties we can control.
The .InitialView property has several built-in styles, such as msoFileDialogViewProperties and msoFileDialogViewDetails. This controls the way your files are displayed in your dialog box, just like you can do manually under the View tab of a Windows Explorer window. If you declared (dimensionalized) your FileDialog object as a FileDialog, you should get an Intellisense dropdown of your options.
Here’s a little snippet to get you started:
oFD.InitialView = msoFileDialogViewDetailsThis table shows the complete list of all the InitialView styles.
| List of InitialView Styles |
|---|
| msoFileDialogViewDetails |
| msoFileDialogViewLargeIcons |
| msoFileDialogViewList |
| msoFileDialogViewPreview |
| msoFileDialogViewProperties |
| msoFileDialogViewSmallIcons |
| msoFileDialogViewThumbnail |
| msoFileDialogViewTiles |
| msoFileDialogViewWebView |
I do have one word of caution for you. Sometimes the InitialView behavior is a little finicky and you’re stuck with whatever view you put in the first time. If you restart Excel, your new view should work fine, but, again, you might be stuck with the first InitialView you enter. It’s a weird little quirk.
Setting the Initial Filename and Folder
To force your user to start looking for a file in a certain folder, you can preset the filename and folder for them. This is particularly useful if you don’t want your users to navigate through a big filesystem with hundreds of folders or if you know the file name won’t change.
To set the default folder, simply add a line of code like this
oFD.InitialFileName = "C:\Users\"Notice the backslash at the end. This will open the dialog in the
oFD.InitialFileName = "C:\Users\dailyExcel"Whatever comes after the final backslash will automatically populate the file name box in the dialog. If you just want to point to a folder without suggesting a filename, make sure you have that trailing backslash at the end.
Persistence
At this point, it’s important to note that only one FileDialog can exist in a single application instance. For example, the following code block will create two objects, Filters and SelectedItems collections are forced to remain identical. If you change oFD.Filters then oFD1.Filters will change simultaneously and identically.
Dim oFD As FileDialog
Dim oFD1 As FileDialog

Set oFD = Application.FileDialog(msoFileDialogOpen)
Set oFD1 = Application.FileDialog(msoFileDialogOpen)
Perhaps more importantly, the changes will persist until the parent application (i.e., Excel) is ended. That means all the customizations you do to your dialog are retained for the life of your Excel application. They don’t clear when your macro ends.
This is nice when a FileDialog object is started in one macro, but is closed before another macro starts. The subsequent macro can simply start the FileDialog (as the same type), and all the filters and properties will already be there. On the other hand, this can cause problems if you want to revert back to the default settings or file filter options after you’ve created a custom dialog.
Resetting a VBA FileDialog Box
One trick to resetting the dialog box back to its default is to toggle the dialog box variable to a new type, then switch it back to your desired FileDialog type. When you run this code, the second time FileDialog(msoFileDialogOpen) is started,
Sub resetting_a_filedialog()
Dim oFD As FileDialog
Dim oFD1 As FileDialog

Set oFD = Application.FileDialog(msoFileDialogOpen)
oFD.Filters.clear
oFD.Filters.Add "Special", "*.special"
oFD.Title = "first run"

Set oFD = Application.FileDialog(msoFileDialogFilePicker) 'change dialog types
Set oFD = Application.FileDialog(msoFileDialogOpen) 'change it back

End Sub
To be honest, I’m not sure if this is meant to happen or is simply a bug in VBA. If it is the latter, this might disappear in future versions of VBA, so implement this “solution” with caution.
msoFileDialogOpen Methods
There are only two methods associated with the FileDialog object: .Show and .Execute.
Showing the Dialog Box
The Show method creates an interactive visual for the user to manually select the file they want to open. You can bring up the open file dialog box with a code as short as this, but it’s not the preferred method:
Set oFD = Application.FileDialog(msoFileDialogOpen)
oFD.Show
The reason this snippet isn’t preferred is because it’s harder to control what happens if the user presses cancel. The preferred way of calling the .Show method is wrapping the .Show method in a conditional statement:
Set oFD = Application.FileDialog(msoFileDialogOpen)
If oFD.Show <> 0 Then
    'your code for handling files goes here
End If
Inside the If statement, you can control how your macro processes the files. Once a file is selected and the open button is pressed, the filepath is stored in the FileDialog’s SelectedItems collection, which is just a set of filepath strings.
You can loop through all the files the user selected with a code like this:
For Each vItem In oFD.SelectedItems
    Debug.Print vItem 'prints the file path of each file
Next
Storing the file path to the variable
The Execute Method
You can also open the files using the .Execute method, but that’s probably not your best choice. When you use .Execute, Excel will attempt to open whatever filepaths are present in the SelectedItems collection. If you’re trying to open Excel files, this is perfectly fine.
If oFD.Show <> 0 Then
    oFD.Execute 'tries to open your file in Excel
End If
This issue is that regardless of what type of file you’re trying to open, the .Execute method will open it in Excel. For text files, for example, Excel will parse them such that each line in the text file will be one row in the new workbook, and Excel will automatically parse tab-delimited text files by putting each tab into a new column. Things get even uglier if you’re trying to open a binary file or an image file.
Each file will be opened in a new workbook with the name of the file, and you can save it either manually or programmatically using Application.Workbooks, but let’s be real. Why would you want to open a text file in Excel? If you’re going through the trouble of writing a macro for your user to select a file in a dialog box, you probably want to process the file using the same macro.
You’re much better off opening your file with the VBA open statement, or even reading it with the FSO OpenTextFile method. If you absolutely must open the file so your user can see it, at least open it in its native application using the VBA Shell command.
Complete msoFileDialogOpen macro example
The FileDialog object is slightly different from the Application function of GetOpenFileName, since you can directly operate on the object (Execute and Show). The msoFileDialogOpen object also has more properties you can customize than you can with standard pre-built dialogs. It’s nice to be able to change filters and initial file paths.
One of the most important things to remember, though, is that FileDialogs are persistent. This is easy to forget since most VBA objects aren’t. If you forget this, you might end up frustrating your end users. For example, if your first dialog restricts file types to .xls extensions but the next run expects .txt files and you didn’t reset your filters, your user won’t be able to select their file through your program.
I know there have been a lot of moving parts to this tutorial. What you really want is a ready-to-use macro example you can copy and paste in your own application, right? Here’s a code block to get you started. It implements several of customizations we explored in this tutorial and the image at the end shows you what our final dialog box looks like.
Sub show_final_opendialog()
Dim oFD As FileDialog
Dim oFD1 As FileDialog
Dim vItem As Variant

Set oFD = Application.FileDialog(msoFileDialogOpen)
oFD.ButtonName = "Press me to Go"
oFD.Title = "Select a Single File You'd like to Open"
oFD.AllowMultiSelect = True

oFD.Filters.Clear
oFD.Filters.Add "Special", "*.special"
oFD.Filters.Add "Text and Excel", "*.xls, *.txt"

oFD.InitialView = msoFileDialogViewDetails
oFD.InitialFileName = "C:\Users\dailyExcel"

If oFD.Show <> 0 Then
    For Each vItem In oFD.SelectedItems
        '
        'add your file processing code here
        '
        Debug.Print vItem 'prints the file path of the first file selected
    Next
End If

Set oFD = Nothing

End Sub
The For Each loop at the end of the macro works even if you have .AllowMultiSelect set to False. Your loop will just contain one item. The alternative is to change the If block to something like this:
If oFD.Show <> 0 Then
    '
    'add your file processing code here
    '
    Debug.Print oFD.SelectedItems(1) 'prints the file path of each file
End If
That’s all for this tutorial. When you’re ready to take your VBA to the next level, subscribe using the form below.

