The copy/paste function of computers is so commonplace it is almost second nature to most people now. We trust computers to copy entire texts perfectly when we press Ctrl+C / Ctrl+V, and there’s no reason not to trust them. If we humans had to type out a 50-digit code, we would almost certainly make a mistake - at the very least, it would take much longer than the copy/paste we are used to.
However, sometimes we want to copy more than just plain text. Excel offers all kinds of features, like conditional formatting, data validation, data-type formatting, and beautifying aspects like borders and cell colors, and we can copy all of them or a subset thereof. Maybe you like your coworker’s color scheme but need static data (i.e., no formulas) or maybe the formulas are awesome and you hate the color scheme. Whatever your needs, the VBA PasteSpecial method can probably help you.
This isn’t the first time we’ve used the VBA PasteSpecial command here. A couple months ago, we had a wonderful wellsrPRO community submission showing how to paste values using VBA.
Our Dataset
In this tutorial, we are going to use a contrived dataset that incorporates many options under the PasteSpecial method so we can experiment with a number of things using the same dataset.
Our data looks like this:

Dataset with various layers of formatting, not just text and number data
Notice the different background colors and the borders in cells E1 and F1 as well as the bold font across the top row.
There are several important hidden things to note here, as well:
- Conditional formatting on the
Change % column (any negative difference is green, and a positive difference over 5% is red) - Data-type formatting for percentages or currency amounts
- Formulas in the change columns
- Data validation requiring a number greater than or equal to zero in the
Quantity column
So let’s see how PasteSpecial can copy all or part of this dataset with complex formatting.
The Range Object
Before we begin our journey, we need to clarify the object associated with PasteSpecial: the Range object.
Our range in the dataset is
Dim range_to_copy As Range, range_for_pasting As Range
Set range_to_copy = Range("A1:F5")
Set range_for_pasting = Range("A7")
Now we can easily copy by referencing range_to_copy.Copy, and we can paste into A7 with range_for_pasting.PasteSpecial.
Since you’ll need to clear everything each time to play around with pasting, you can use this subroutine to clear the pasted area before pasting anything new:
Sub clear_all()
Range("A7:F11").ClearFormats
Range("A7:F11").ClearContents
Range("A7:F11").Validation.Delete
End Sub
This will remove data-type formatting, colors, borders, data validation, and conditional formatting in our paste range.
PasteSpecial Pasting Options
Now that we have set our ranges, we can use VBA PasteSpecial to copy different components of our range.
Although we’re focusing on copying information from Excel ranges, you can use PasteSpecial to paste almost anything copied to your clipboard.
The VBA PasteSpecial Method accepts 4 arguments, all of which are actually optional:
range_for_pasting.PasteSpecial( [Paste] , [Operation] , [SkipBlanks] , [Transpose] )The first two arguments control what you want PasteSpecial to do with your copied content, and the second two arguments control the behavior of the PasteSpecial method. We’re going to cover each of these arguments in detail and give you helpful examples to demonstrate how they work.
Paste as XlPasteType
The first argument for .PasteSpecial is Paste, which determines exactly what you want to paste: formats, formulas, validation, and so on. There’s a long list of accepted values for the Paste (XlPasteType) argument. We’ll demonstrate the important ones, but here’s a complete list of all of them:
- xlPasteAll
- xlPasteAllExceptBorders
- xlPasteAllMergingConditionalFormats
- xlPasteAllUsingSourceTheme
- xlPasteColumnWidths
- xlPasteComments
- xlPasteFormats
- xlPasteFormulas
- xlPasteFormulasAndNumberFormats
- xlPasteValidation
- xlPasteValues
- xlPasteValuesAndNumberFormats
Make powerful macros with our free VBA Developer Kit It’s easy to copy and paste a macro like this, but it’s harder make one on your own. To help you make macros like this, we built a free VBA Developer Kit and wrote the Big Book of Excel VBA Macros full of hundreds of pre-built macros to help you master file I/O, arrays, strings and more - grab your free copy below.
Let’s start looking at a few examples.
Value and Formats Example
Let’s pretend you just want to paste values and formats (currency, percentage, and so forth). Maybe you don’t want all the conditional formatting, coloring, and data validation. Maybe you also need the data to remain static, so you want to remove the formulas.
People need to do this all the time when storing data in a spreadsheet like a database (which is a bad idea and you should really use Access for database functions, but neverthless massive database-like spreadsheets are extremely common).
You can send your data to our
Sub Paste_Range()
Dim range_to_copy As Range, range_for_pasting As Range
Set range_to_copy = Range("A1:F5")
Set range_for_pasting = Range("A7")

range_to_copy.Copy
range_for_pasting.PasteSpecial Paste:=xlPasteValuesAndNumberFormats
End Sub
You will end up with this as a result:
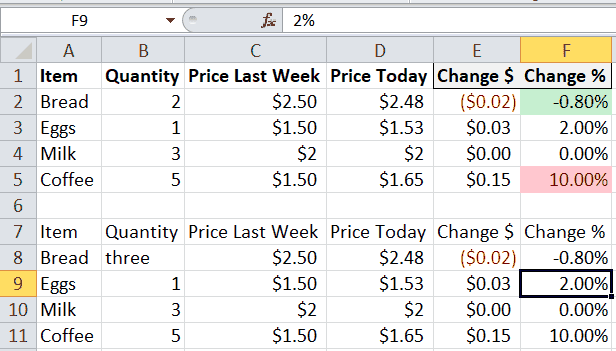
The original and value/format datasets
It’s very important that you remember to copy something to your clipboard before you try to paste. If you’re copying a range from Excel, you would just use the .Copy method of the Range object, like we did in our example.
As you can see, the cell F9 has no formula in it while the original, F3, does. Furthermore, we manually typed “three” into cell B8 (after running the macro). The data validation in our original data set would have prevented us from having a text entry, but since we only copied values and formulas, the data validation rules in our pasted range are gone. The ability to paste what you want and ignore what you don’t want makes VBA PasteSpecial a really valuable feature.
Note, if you’d rather paste the values only, without the number formats, you would run a macro with a snippet like this:
range_for_pasting.PasteSpecial xlPasteValuesPasting Formulas with VBA PasteSpecial
On the other hand, maybe you want just the formulas. This might be useful if you already have some complex formulas written out and need them applied to another dataset.
range_for_pasting.PasteSpecial xlPasteFormulaswill yield
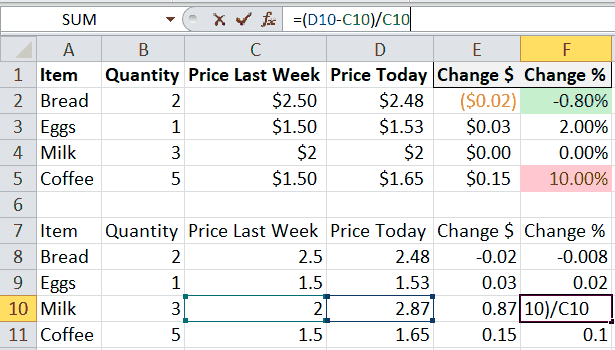
The original and copied dataset with only formulas copied
Here we can see the data-type formating is lost. What we’re left with are pure numbers in the change columns (no formatting for percentage or currency). You can also see the new formulas are applied to the new range, not the original. Now we can make changes in our new dataset and see the results without impacting our original dataset.
Formatting and Validation
Sometimes you don’t want the original data at all, but the rules and formats associated with the original range. The xlPasteValidation, xlPasteFormats, xlPasteColumnWidths, and xlPasteComments options allow this.
For example, say you have some complex formatting scheme, like this:
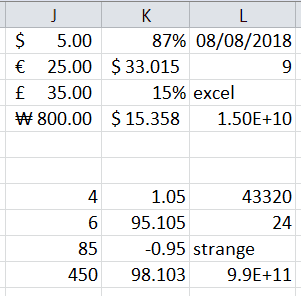
The top dataset has various formatting rules while the bottom is all formatted as "General" type
If we run this code
Range("J1:L4").Copy
Range("J7").PasteSpecial xlPasteFormats
We end up with the bottom dataset formatted just like the top, transferring our complex formatting rules seamlessly.
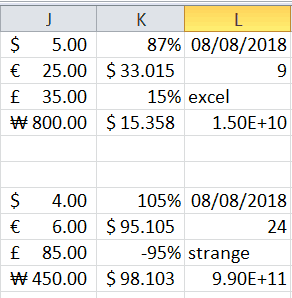
The formats from the top range are transferred to the bottom
This same type of PasteSpecial can be done for validation rules, column widths, and comments. Simply change the keyword after the PasteSpecial command to xlPasteValidation, xlPasteColumnWidths, or xlPasteComments.
Another need option I find myself using a lot is the xlPasteAllExceptBorders. It’s nice to be able to paste everything but the borders into a new range.
Operation as XlPasteSpecialOperation
The second optional argument for the PasteSpecial method is Operation. This nifty little argument lets you perform mathematical operations between copied and destination data. You can use one of the four basic arthimetic operations (add, subtract, multiply, divide). These arithmetic operations are represented by the following keywords:
- xlPasteSpecialOperationAdd
- xlPasteSpecialOperationSubtract
- xlPasteSpecialOperationMultiply
- xlPasteSpecialOperationDivide
There’s also an xlPasteSpecialOperationNone keyword, but it doesn’t do any arithmetic operations. This is the default value.
When you specify an XlPasteSpecialOperation value, your VBA macro will take the range you copied,
Commutative Operations
A commutative operation is one in which a.b = b.a, where . is the operator, or in other words, when order doesn’t matter. Addition and multiplication are commutative, because the order doesn’t matter.
Let’s use these two datasets
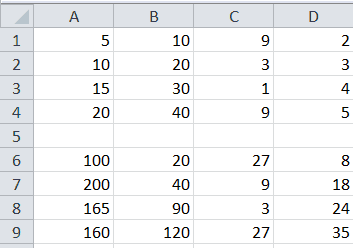
Two sets of numbers for doing math operations
If you just want to add the numbers together, you can use this code:
Sub add_two_ranges_together()
Dim range_to_copy as Range, range_for_pasting As Range
Set range_to_copy = Range("A1:D4")
Set range_for_pasting = Range("A6")

range_to_copy.Copy
range_for_pasting.PasteSpecial Operation:= xlPasteSpecialOperationAdd
End Sub
Your final result will look like this:
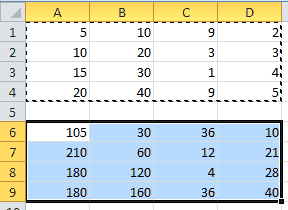
The lower set is the addition of the original two sets
The bottom range of our dataset now contains the sum of our original bottom dataset PLUS our top dataset.
The same idea works for multiplication, except we use xlPasteSpecialOperationMultiply. Since the order doesn’t matter, you can simply replace “Add” with “Multiply” in the code above.
Non-commutative Operations
Division and subtraction are non-commutative, so order is important.
There are two possiblities for non-commutative operations for VBA PasteSpecial:
- for subtraction, the original, copied range will be subtracted from the destination range - xlPasteSpecialOperationSubtract
- for division, the destination range will be divided by the numbers in the original, copied range - xlPasteSpecialOperationDivide
With our original numbers from above, if you use the top set as
Let’s take a look at a division PasteSpecial example.
Sub divide_two_sets()
Dim range_to_copy as Range, range_for_pasting As Range
Set range_to_copy = Range("A1:D4")
Set range_for_pasting = Range("A6")

range_to_copy.Copy
range_for_pasting.PasteSpecial Operation:=xlPasteSpecialOperationDivide
End Sub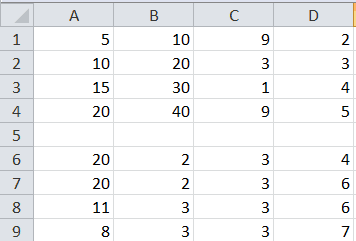
The bottom set is all even numbers, since we divided the original bottom set by the top set
Performing math on entire range based on value in one cell
Let’s go back to our original dataset. A nifty trick is to use a single cell, which is to say one number, to divide an entire range:
Sub divide_set_by_one_number()
Dim range_to_copy as Range, range_for_pasting As Range
Set range_to_copy = Range("D1")
Set range_for_pasting = Range("A6:D9")

range_to_copy.Copy
range_for_pasting.PasteSpecial Operation:=xlPasteSpecialOperationDivide
End Sub
you would end up with this result:
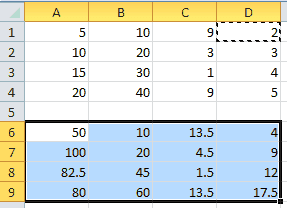
The two datasets after dividing by
You can use the same concept to add, multiple and subtract an entire range based on the contents of a single cell.
PasteSpecial Behavior Options
The other two options, both accepting Boolean values of TRUE or FALSE, are for omitting blanks in the copied range and transposing your data. This is why I said the last two arguments control the behavior of PasteSpecial, rather than controlling what’s actually pasted.
For this part, let’s use the following dataset:
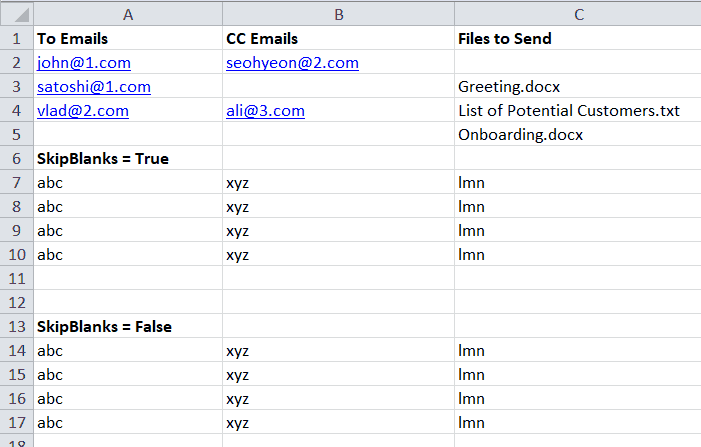
Some email addresses and files to send, with a dummy dataset
The SkipBlanks Option
Using TRUE or FALSE for the SkipBlanks argument controls what the PasteSpecial method does when it encounters an empty cell. The following macro demonstrates each method and gives us the following results after running this code block:
Sub to_skipblanks_or_not_to_skipblanks()
Dim range_to_copy As Range, range_for_pasting As Range, range_for_pasting_two As Range
Set range_to_copy = Range("A1:C5")
Set range_for_pasting = Range("A7")
Set range_for_pasting_two = Range("A14")

range_to_copy.Copy
range_for_pasting.PasteSpecial SkipBlanks:=True
range_for_pasting_two.PasteSpecial SkipBlanks:=False
End Sub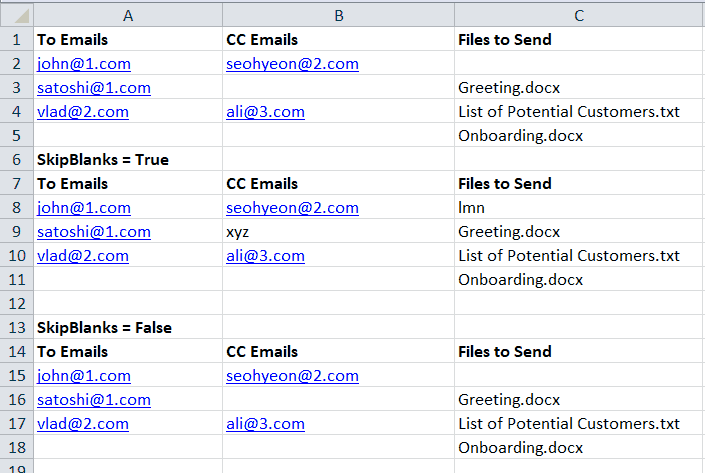
If we skip blanks, the original data is retained, but if we do not skip blanks, the original data is overwritten with empty cells.
The Transpose Option
The final option in PasteSpecial is Transpose, which will transpose your row/column data into a column/row arrangement. This simply means your rows become columns in the new dataset and your columns become rows. We’ve got an entire post dedicated to transposing data in VBA, which includes some really neat macros for transposing data while maintaining the original cell formatting.
Using the same email and files dataset, if we set Transpose to TRUE, we get the following output:

Data before and after transposing and pasting
You can run this block to achieve the above result:
Sub to_transpose()
Dim range_to_copy As Range, range_for_pasting As Range
Set range_to_copy = Range("A1:C5")
Set range_for_pasting = Range("A7")

range_to_copy.Copy
range_for_pasting.PasteSpecial Transpose:=True
End Sub
Conclusion
Each of these options can be combined with other options to create some complex copy/paste operations. It is especially helpful if you have complex rules that you don’t want to recreate in the new range or if you have a huge (i.e., database-like) spreadsheet that requires specific formatting or contains lots of embedded formulas.
Sometimes you get spreadsheets from coworkers and you really only need certain components. Now you can programatically copy the parts you like while eliminating the parts you don’t.
For more VBA tips, techniques, and tactics, subscribe to our VBA Insiders email series using the form below.
Once you subscribe, please share this article on Twitter and Facebook.

