While TensorFlow Keras provides a robust set of ready-to-use tools for building machine learning models, there are instances where the default options may fall short of addressing the specific requirements of your project. In particular, while useful in many scenarios, the built-in loss functions and metrics that come with TensorFlow Keras may not always be sufficient to tackle the intricacies of your unique machine-learning tasks.
In this tutorial, we’ll explain how to implement custom loss functions and metrics in TensorFlow Keras and how to use them while training deep learning models.
Importing Required Libraries
The first step, as always, is to import our required libraries.
import pandas as pd
from keras.preprocessing.text import Tokenizer
from keras.preprocessing.sequence import pad_sequences
from keras.models import Sequential
from keras.layers import Embedding, LSTM, Flatten, Dense
from sklearn.model_selection import train_test_split
from sklearn.metrics import classification_report, f1_score
import numpy as np
import tensorflow as tf
Importing the Dataset
In this tutorial, we will use the toxic comments dataset to train our deep learning models. You can use any other dataset since our goal here is to learn how to implement custom loss functions and metrics and not to solve any particular data science problem. Whichever dataset you choose, remember you can import a kaggle dataset directly into Google Colab
The following script imports the train.csv file from the dataset.
file_path = r"/content/jigsaw-toxic-comment-classification-challenge/train.csv"

dataset = pd.read_csv(file_path)
print(dataset.shape)
dataset.head()
Output:

The dataset contains texts from various social media comments. A comment can belong to one or more of six class labels: "toxic", "severe_toxic", "obscene", "threat", "insult", "identity_hate".
We will filter comments that have at least one of the six labels. After filtering, we are left with a total of 16225 text comments.
dataset = dataset[(dataset[['toxic', 'severe_toxic', 'obscene', 'threat', 'insult', 'identity_hate']] == 1).any(axis=1)]
print(dataset.shape)
Output:
(16225, 8)Let’s divide our dataset into text comments and output labels. Furthermore, we will divide the dataset into 80% train and 20% test sets.
texts = dataset["comment_text"].values
labels = dataset[label_columns].values

X_train, X_test, y_train, y_test = train_test_split(texts, labels, test_size=0.2, random_state=42)
We will train a multi-label classification model which, when provided with an input text, will predict the relevant class labels associated with that text.
Data Preprocessing
We must preprocess the text data to make it suitable for model training in Keras. To do so, we will first use tokenization to convert the text into numeric sequences and then use padding to ensure that all input sequences have equal lengths.
max_words = 10000
maxlen = 200

tokenizer = Tokenizer(num_words=max_words)

tokenizer.fit_on_texts(X_train)

train_sequences = tokenizer.texts_to_sequences(X_train)
test_sequences = tokenizer.texts_to_sequences(X_test)

X_train = pad_sequences(train_sequences, maxlen=maxlen)
X_test = pad_sequences(test_sequences, maxlen=maxlen)
In the upcoming sections, we’ll explain how to implement custom loss functions and metrics in Keras, but first, let’s see how to use the default TensorFlow Keras loss functions and metrics so we know what we’re working with.
Model Training with Default Loss & Metrics
We will define a sequential model with embedding and 3 LSTM layers, followed by a dense output layer with a sigmoid activation function. The model is compiled using the adam optimizer, binary_crossentropy loss, and accuracy as the metric. The binary cross entropy loss and the accuracy metrics are built-in Keras functions.
def get_model():
  model = Sequential()
  model.add(Embedding(input_dim=max_words, output_dim=100, input_length=maxlen))
  model.add(LSTM(256, return_sequences=True))
  model.add(LSTM(256, return_sequences=True))
  model.add(LSTM(256))
  model.add(Dense(6, activation='sigmoid'))
  return model
As you can see in the following script, you pass the loss function and metric name to the loss and metrics attributes of the model.compile() method, respectively. Finally, the fit() method trains the model.
model = get_model()

model.compile(optimizer='adam', loss='binary_crossentropy', metrics=['accuracy'])

model.fit(X_train, y_train, epochs=5, batch_size=32, validation_split=0.2)
Output:

In the output, you can see the loss and accuracy metrics. However, what if you want to see micro-f1 or macro-f1 scores? These metrics are often used for imbalanced datasets and multi-label classification problems. One way to calculate the values for these metrics on test sets is via the following script.
predictions = model.predict(X_test)
predictions = np.round(predictions)
print(classification_report(y_test, predictions))
Output:

However, what if you want to calculate F1 scores after each training batch as you calculated loss and accuracy? This is where custom metrics come into play. By default, Keras does not provide an implementation for F1 scores. You have to implement custom metrics to calculate F1 scores during training. This is precisely what we’ll show you in the next section.
Defining Custom Metrics
To define a custom metric in TensorFlow Keras, you must define a function that takes target and predicted values as parameters. Inside the method, you can write custom logic for your metric. The method should return the calculated values for the metric.
The following script defines the macro_f1_score() method that uses the f1_score function from sklearn.metrics module to calculate the F1 score. Notice that the model’s final layer uses the sigmoid function to output a decimal value between 0 and 1, which we round to a binary value.
def macro_f1_score(y_true, y_pred):

    # Convert probabilities to binary predictions (0 or 1)
    y_pred_binary = tf.round(y_pred)

    macro_f1 = f1_score(y_true,
             y_pred_binary,
             average='macro',
             zero_division = 0.0)

    return macro_f1
Note: Since we are converting tensor values to NumPy arrays in the macro_f1_score() method, you might see some warnings, which you can suppress using the following script.
tf.config.run_functions_eagerly(True)
tf.data.experimental.enable_debug_mode()
Model Training with Custom Metrics
Once you define the metrics function, training your deep learning model using this custom function is straightforward. You just need to pass the metrics method name to the metrics attribute.
In the following script, we train our text classification model with the default accuracy metric and our custom macro_f1_score metric.
model = get_model()
model.compile(optimizer='adam', loss='binary_crossentropy', metrics=['accuracy', macro_f1_score])

model.fit(X_train, y_train, epochs=5, batch_size=32, validation_split=0.2)
Output:

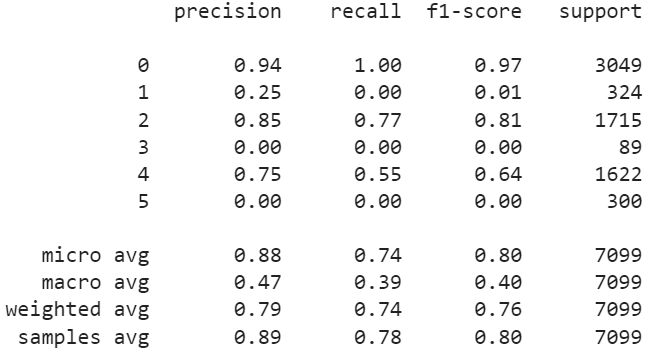
The output shows that loss, accuracy, and macro F1 scores are visible during training. After each epoch, you can also see the validation loss, accuracy, and macro F1 scores.
predictions = model.predict(X_test)
predictions = np.round(predictions)
print(classification_report(y_test, predictions))
Output:

In the next section, we’ll walk through how to define a custom loss function in TensorFlow Keras.
Defining Custom Loss Functions
Defining a custom loss function is similar to defining a custom metric. You have to define a method that accepts actual and predicted values as parameters. Inside the method, you define the logic to calculate loss and return the loss value.
For example, in the following script, we define a method combined_loss() that adds the binary cross entropy loss and the mean squared error loss.
def combined_loss(y_true, y_pred):
    # Binary Cross-Entropy Loss
    bce_loss = tf.keras.losses.binary_crossentropy(y_true, y_pred)

    # Mean Squared Error Loss
    mse_loss = tf.keras.losses.mean_squared_error(y_true, y_pred)

    # Combine the losses
    alpha = 0.5  # adjust this based on the importance of each loss
    combined_loss = alpha * bce_loss + (1 - alpha) * mse_loss

    return combined_loss
Model Training with Custom Loss
To use a custom loss function during training, you must pass the name of your custom loss function to the loss attribute of the model.compile() method. Here’s an example:
model = get_model()

model.compile(optimizer='adam',  loss=combined_loss, metrics=['accuracy'])

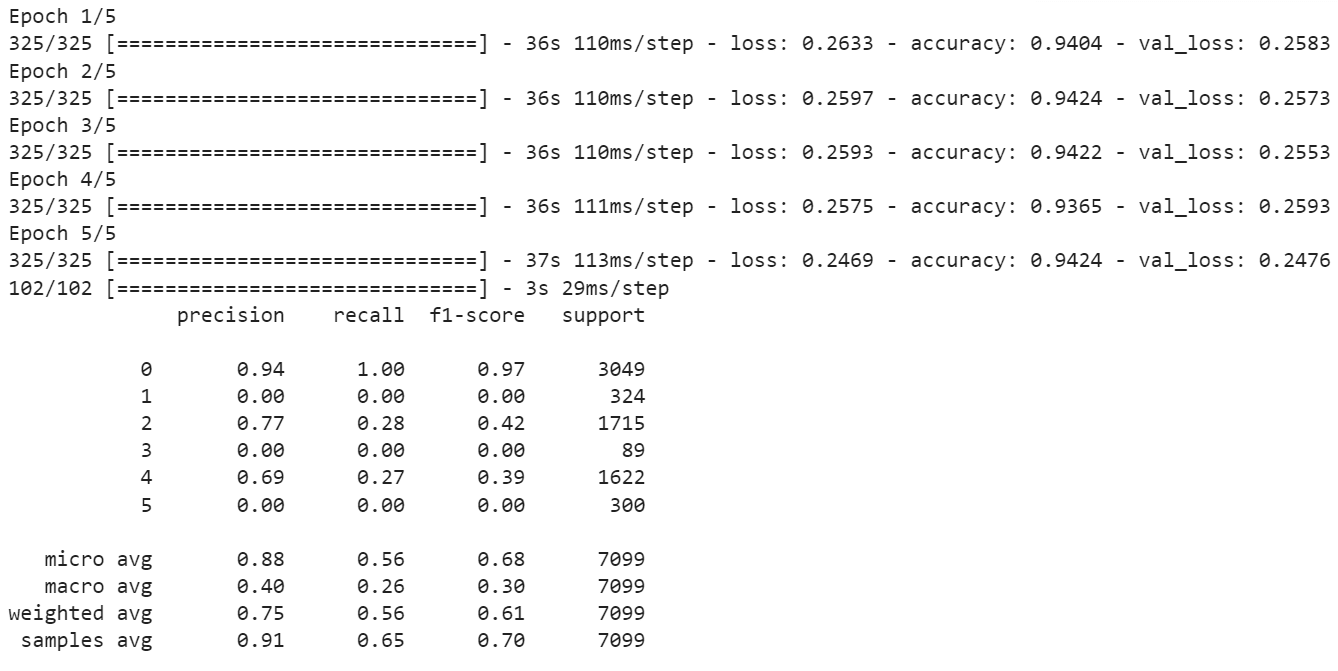
model.fit(X_train, y_train, epochs=5, batch_size=32, validation_split=0.2)

predictions = model.predict(X_test)
predictions = np.round(predictions)
print(classification_report(y_test, predictions))
Output:

That’s all you have to do to define and use custom loss functions and metrics in Keras! Not too bad, eh?
Conclusion
The loss function and evaluation metrics are two of the most crucial factors in training deep learning models. Luckily, Keras provides functionalities to implement custom loss functions and metrics.
In this tutorial, you saw how to implement custom loss functions and metrics in TensorFlow Keras. In a nutshell, all you have to do is define methods for your custom loss functions and metrics and pass the method names to the loss and metrics attributes of the model.compiled() method.
