Data is everywhere and it comes in many forms. Text, images, audio and video are all sources of information we can use to understand the world. But what if we want to combine different types of data and analyze them together?
This is where multimodal data processing comes in. Multimodal data processing is the ability to handle and integrate data from different modalities, such as text and images. Combining different data types can help us extract more information and insights than using a single modality alone. One of the state-of-the-art methods for multimodal data processing is using transformer architectures.
This tutorial will show you how to fine-tune a multimodal transformer from the Python Hugging Face library in PyTorch. We will use a pre-trained model called Flava, a transformer that can process text and images. As an example problem, we will predict sentiment expressed in memes containing image and text captions.
If you want to know how to perform sentiment analysis using textual information only, step through our tutorial on fine funing BERT for sentiment analysis with PyTorch.
Many of the concepts in this tutorial, particularly PyTorch dataset creation and model training and evaluation, are derived from that tutorial. However, in this tutorial, we will focus on multimodal data.
Here we go!
Installing and Importing the Required Libraries
Before we start, we need to install and import the required libraries for our project. Since we’re running our code on Google Colab, we already have access to all the required libraries except the Accelerate and Transformers libraries. The following script installs these two libraries.
! pip install accelerate -U
! pip install datasets transformers[sentencepiece]
The script below imports the required libraries into our Python code.
import pandas as pd
import os
from PIL import Image
from sklearn.model_selection import train_test_split
import numpy as np
import torch
import torch.nn as nn
from torch.utils.data import Dataset, DataLoader
from transformers import AutoProcessor, FlavaModel
from PIL import ImageFile
ImageFile.LOAD_TRUNCATED_IMAGES = True
import warnings
warnings.simplefilter(action='ignore', category=FutureWarning)
from sklearn.metrics import classification_report, confusion_matrix, accuracy_score
Code More, Distract Less: Support Our Ad-Free Site
You might have noticed we removed ads from our site - we hope this enhances your learning experience. To help sustain this, please take a look at our Python Developer Kit and our comprehensive cheat sheets. Each purchase directly supports this site, ensuring we can continue to offer you quality, distraction-free tutorials.
Importing and Preprocessing the dataset
The next step is to import and preprocess the dataset we’ll use for fine-tuning our multimodal Hugging Face transformer model. We will use the multimodal memes dataset, which contains 6,992 image memes with text descriptions, along with their sentiment labels. It’s pretty easy to import a Kaggle dataset directly into Google Colab, so I recommend you do that.
We downloaded our dataset into a folder called

The nested images folder contains the images of the memes, and the labels.csv file contains the image name, meme text, and the corresponding sentiment labels.
The following script imports the labels.csv file in the pandas dataframe and displays the dataframe header.
dataset = pd.read_csv("/content/memes-dataset/labels.csv")
dataset.head()
Output:

You can see that the dataframe has four relevant columns: image_name, text_ocr, text_corrected, and overall_sentiment.
The image_name column contains the names of the images; the text_ocr column contains the text extracted via an OCR (optical character recognizer.); the text_corrected column contains the manually corrected text of the memes, and the overall_sentiment column contains the sentiment labels.
We will create a new column, image_path, in our dataset, which contains the complete path to the image file for each record in the dataset.
We will also filter out any rows that have missing or empty values in the text_corrected column.
Finally, we will filter the text_corrected, image_path, and overall_sentiment, columns and remove the remaining columns from our dataset.
The following script performs the above tasks.
image_folder_path = '/content/memes-dataset/images/images'
dataset['image_path'] = dataset['image_name'].apply(lambda x: os.path.join(image_folder_path, x))
dataset = dataset[dataset['text_corrected'].notna() & (dataset['text_corrected'] != '')]
dataset = dataset.filter(["text_corrected", "image_path", "overall_sentiment"])

print("==============================================")
print(f'The shape of the dataset is: {dataset.shape}')
print("==============================================")
print(f'The number of sentiments in each category is:\n{dataset.overall_sentiment.value_counts()}')
print("==============================================")

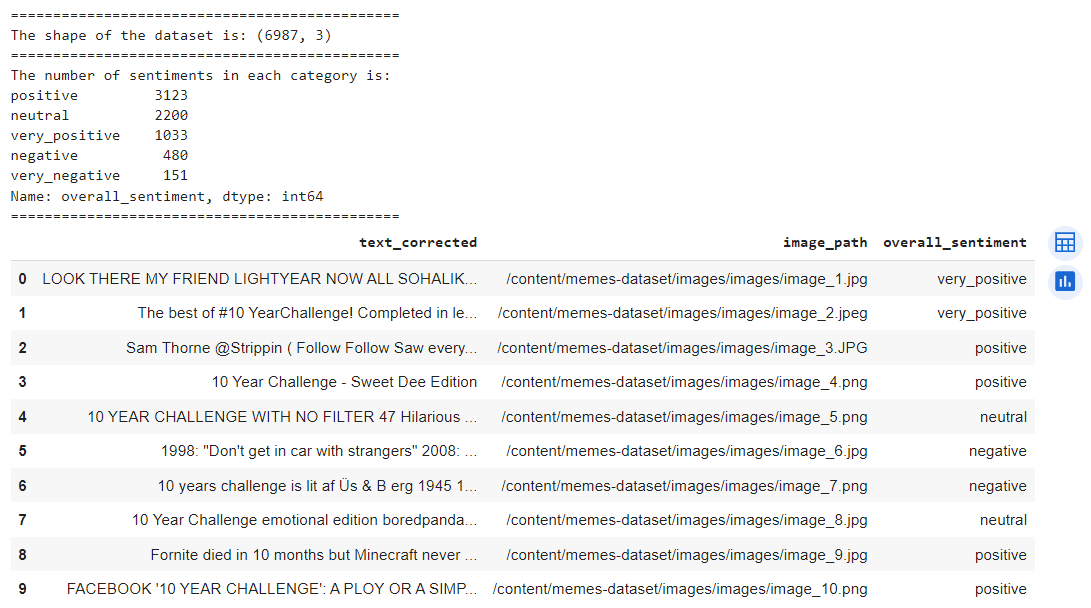
dataset.head(10)
Output:

You can see that we have five categories of sentiments: very_positive, positive, neutral, negative, and very_negative. The dataset is highly imbalanced across these categories.
Let’s print a sample meme along with its text and sentiment label.
index = 523

image_path = dataset["image_path"].iloc[index]
sample_image = Image.open(image_path)
sample_text = dataset["text_corrected"].iloc[index]
sentiment = dataset["overall_sentiment"].iloc[index]
print(sample_text)
print(sentiment)
sample_image
Output:

The next preprocessing step is to convert the sentiment labels into numeric values that our model can use. We will use the following mapping:
- very_positive -> 2
- positive -> 2
- neutral -> 1
- negative -> 0
- very_negative -> 0
The above mapping will also reduce the number of classes from five to three by merging the very positive and positive classes and the very negative and negative classes. This mapping may make the task easier for our model, but it may also lose some information about the intensity of the sentiments. You can keep all five classes if you want.
The following script applies the sentiment mapping to the overall_sentiment column. In the output, you can see the number of records for each sentiment category. Again, the dataset is highly imbalanced.
dataset['overall_sentiment'] = dataset['overall_sentiment'].replace({
                                                            'very_positive': 2,
                                                            'positive': 2,
                                                            'neutral': 1,
                                                            'very_negative': 0,
                                                            'negative': 0})

print(f'The number of sentiments in each category is:\n{dataset.overall_sentiment.value_counts()}')
print("==============================================")
dataset.head()
Output:

Finally, we will split our dataset into train, test, and validation sets with a ratio of 80, 10, and 10, respectively. Though we will only use the training and test sets in this article, you can use the validation set to select the best parameters for your model.
dataset = dataset.sample(frac=1, random_state=42)

train_data, temp_data = train_test_split(dataset, test_size=0.2, random_state=42)

test_data, valid_data = train_test_split(temp_data, test_size=0.5, random_state=42)

print("Train set shape:", train_data.shape)
print("Test set shape:", test_data.shape)
print("Validation set shape:", valid_data.shape)
Output:

Now that we have imported and preprocessed the dataset, we’re almost ready to fine-tune our model. Before that, though, we will create a PyTorch dataset that helps us load the data in batches for training our multimodal transformer model.
Code More, Distract Less: Support Our Ad-Free Site
You might have noticed we removed ads from our site - we hope this enhances your learning experience. To help sustain this, please take a look at our Python Developer Kit and our comprehensive cheat sheets. Each purchase directly supports this site, ensuring we can continue to offer you quality, distraction-free tutorials.
Creating a PyTorch Dataset
Well, before we create a PyTorch dataset, we need to import a pre-trained multimodal transformer from Hugging Face. We will also import a transformer processor that merges and converts the text and image information in our dataset to a data format that we can use to fine-tune a multimodal transformer.
For this tutorial, we’re going to use Facebook’s Flava multimodal transformer. You can use any other multimodal transformer from Hugging Face, if you’d like. The general implementation concept remains the same.
The following script imports the Flava model and preprocessor.
flava_model = FlavaModel.from_pretrained("facebook/flava-full")
processor = AutoProcessor.from_pretrained("facebook/flava-full")
device = torch.device('cuda' if torch.cuda.is_available() else 'cpu')
Next, we will define the MultimodalDataset class, which inherits from the torch.utils.data.Dataset class.
The __getitem__() method of the MultimodalDataset class is the most important as it contains the logic for merging and converting the text and image information in the dataset to the Flava model compliant format.
In the __getitem__() method, we pass the meme text and image to the text and images attributes of the Flava processor class we imported earlier. The processor returns input_ids, token_type_ids, attention_mask, and pixel_values. These values are used as inputs to the Flava model.
class MultimodalDataset(Dataset):
    def __init__(self, data):
        self.data = data
        self.max_length = 128

    def __len__(self):
        return len(self.data)

    def __getitem__(self, index):
        text = self.data.iloc[index]["text_corrected"]
        image_path = self.data.iloc[index]["image_path"]
        image = Image.open(image_path).convert("RGB")

        labels = self.data.iloc[index][['overall_sentiment']].values.astype(int)

        inputs = processor(text = text,
                   images= image,
                   return_tensors="pt",
                   padding=True
                   )

        input_ids = inputs['input_ids'][0]
        token_type_ids =  inputs['token_type_ids'][0]
        attention_mask = inputs['attention_mask'][0]
        pixel_values =  inputs['pixel_values'][0]

        input_ids = nn.functional.pad(input_ids, (0, self.max_length - input_ids.shape[0]), value=0)
        token_type_ids = nn.functional.pad(token_type_ids, (0, self.max_length - token_type_ids.shape[0]), value=0)
        attention_mask = nn.functional.pad(attention_mask, (0, self.max_length - attention_mask.shape[0]), value=0)

        return input_ids, token_type_ids, attention_mask, pixel_values , torch.tensor(labels)
We can now use the MultimodalDataset class to create the PyTorch datasets for train_dataset, test_data, and val_dataset dataframes.
We can also create data loader objects that can provide batches of data to our model. The code for creating the datasets and the data loaders is as follows:
train_dataset = MultimodalDataset(train_data)
test_dataset = MultimodalDataset(test_data)
val_dataset = MultimodalDataset(valid_data)

batch_size = 16

train_loader = DataLoader(train_dataset, batch_size=batch_size, shuffle=True)
test_loader = DataLoader(test_dataset, batch_size=batch_size, shuffle=False)
val_loader = DataLoader(val_dataset, batch_size=batch_size, shuffle=False)
Now that we have created the datasets and the data loaders, we can fine-tune the multimodal Flava transformer.
Creating and Fine-Tuning a Multimodal Classifier
Creating and fine-tuning a multimodal classification model in PyTorch is similar to creating any other model. You have to make a PyTorch model that inherits from the nn.Module class. You define the model layers in the __init__() method and the training logic in the forward() method.
We create a sequential model whose first layer is the multimodal Flava model we imported. The input_ids, token_type_ids, attention_mask, and pixel_values, returned by the data loaders are passed as inputs to the Flava model.
The last context vector for the multimodal embeddings from the Flava model is passed to the first linear layer in the sequential model. Five more linear layers are added to learn more complex representations.
You can add or remove the linear layers as you like, but the output from the Flava model must be passed as the input to the first linear layer.
class MultimodalClassifier(nn.Module,):
    def __init__(self, num_labels, flava_model):
        super(MultimodalClassifier, self).__init__()
        self.model = flava_model
        self.classifier = nn.Sequential(

            nn.Linear(self.model.config.hidden_size, 1024),
            nn.ReLU(),

            nn.Linear(1024, 512),
            nn.ReLU(),

            nn.Linear(512, 256),
            nn.ReLU(),

            nn.Linear(256, 128),
            nn.ReLU(),

            nn.Linear(128, 64),
            nn.ReLU(),

            nn.Linear(64, num_labels)

        )

    def forward(self, input_ids, token_type_ids, attention_mask, pixel_values):
        outputs = self.model(input_ids = input_ids,
                        token_type_ids = token_type_ids,
                        attention_mask = attention_mask,
                        pixel_values = pixel_values
                        )

        multimodal_embeddings = outputs.multimodal_embeddings
        x = multimodal_embeddings[:, -1, :]
        x = self.classifier(x)
        return x
Next, we will create an object of the MultimodalClassifier class and set the loss function and the optimizer. We will train the model for ten epochs and display the loss for every batch.
num_labels = train_data['overall_sentiment'].nunique()
model = MultimodalClassifier(num_labels, flava_model).to(device)
criterion = nn.CrossEntropyLoss()
optimizer = torch.optim.Adam(model.parameters(), lr = 2e-4)

num_epochs = 10
n_total_steps = len(train_loader)
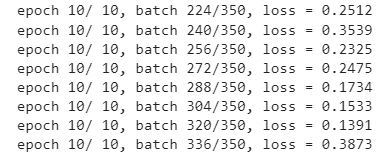
The following script contains the training loop. We fetch a batch of training data, pass it to our multimodal classifier, get the outputs, calculate the loss, and perform backpropagation to update the model weights. The output shows the training losses for the last eight batches of the final epoch.
for epoch in range(num_epochs):

  for i, batch in enumerate (train_loader):

    input_ids, token_type_ids , attention_mask, pixel_values, labels = batch
    input_ids = input_ids.to(device)
    token_type_ids  = token_type_ids.to(device)
    attention_mask = attention_mask.to(device)
    pixel_values = pixel_values.to(device)

    labels = labels.view(-1)
    labels = labels.to(device)

    optimizer.zero_grad()

    logits = model(input_ids = input_ids,
                   token_type_ids = token_type_ids,
                   attention_mask = attention_mask,
                   pixel_values = pixel_values
    )

    loss = criterion(logits, labels)
    loss.backward()
    optimizer.step()


    if (i+1) % 16 == 0:
        print(f'epoch {epoch + 1}/ {num_epochs}, batch {i+1}/{n_total_steps}, loss = {loss.item():.4f}')
Output:

We are now ready to evaluate the model performance on the test. The code remains the same as the training loop, except that we convert the SoftMax probabilities of predictions into binary values and compare the predictions with target labels.
all_labels = []
all_preds = []

with torch.no_grad():
  n_correct = 0
  n_samples = 0
  for i, batch in enumerate (test_loader):

    input_ids, token_type_ids , attention_mask, pixel_values, labels = batch
    input_ids = input_ids.to(device)
    token_type_ids  = token_type_ids.to(device)
    attention_mask = attention_mask.to(device)
    pixel_values = pixel_values.to(device)

    labels = labels.view(-1)
    labels = labels.to(device)

    optimizer.zero_grad()

    outputs = model(input_ids = input_ids,
                   token_type_ids = token_type_ids,
                   attention_mask = attention_mask,
                   pixel_values = pixel_values
    )

    _, predictions = torch.max(outputs, 1)

    all_labels.append(labels.cpu().numpy())
    all_preds.append(predictions.cpu().numpy())

all_labels = np.concatenate(all_labels, axis=0)
all_preds = np.concatenate(all_preds, axis=0)

print(classification_report(all_labels, all_preds))
print(accuracy_score(all_labels, all_preds))
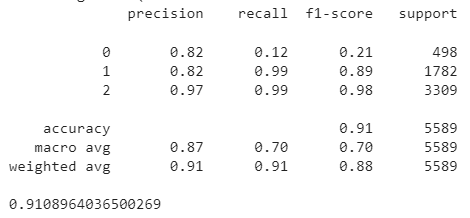
Output:

The output shows that we achieved an overall accuracy of 91%. However, the output shows we performed poorly on the negative sentiments (label 0). This is most likely due to their low presence in our imbalanced dataset. Now that you know the fundamentals, you can try drop-out, regularization, or weighted loss to see if you can get better results.
Conclusion
As more and more data combines different types of information, it’s crucial to process this multimodal data effectively. Recently, solid transformer architectures capable of processing multimodal data have been developed. This tutorial showed you how to fine-tune a multimodal transformer from the Python Hugging Face library in PyTorch. We predicted sentiment of memes containing image and textual information. Using this approach, you can solve any other problem involving image and textual information.
Code More, Distract Less: Support Our Ad-Free Site
You might have noticed we removed ads from our site - we hope this enhances your learning experience. To help sustain this, please take a look at our Python Developer Kit and our comprehensive cheat sheets. Each purchase directly supports this site, ensuring we can continue to offer you quality, distraction-free tutorials.
