Data is often referred to as the “new oil” in today’s digital age, and for a good reason. It fuels everything from business decisions to groundbreaking scientific discoveries. However, there’s a catch. Raw data is rarely pristine; it’s more like crude oil that needs refining. This refinement process is what we call data cleaning.
In this article, we’ll take you on a journey through the world of data cleaning with PyJanitor. By the end, you’ll be equipped with the knowledge and tools needed to whip your messy datasets into shape, ensuring your data-driven endeavors are built on a solid foundation. Let’s roll up our sleeves and get ready to clean house.
Why Data Cleaning Matters?
Data cleaning is a crucial step in the data analysis and machine learning pipeline development. Think of it as the art of transforming messy, inconsistent, or incomplete data into a structured and usable format. Without proper data cleaning, any analysis or machine learning model built on this foundation is like a house of cards, prone to collapse under the weight of inaccuracies.
Consider this scenario: you’re analyzing sales data for a retail company. Some entries have missing values, others contain typos or duplicates, and the date formats are all over the place. Without proper cleaning, drawing meaningful insights or making accurate predictions becomes an arduous task.
Introducing PyJanitor: Your Data Cleaning Ally
Meet PyJanitor, a Python library designed to simplify and supercharge your data cleaning efforts. PyJanitor is like having a dedicated data janitor at your disposal, ready to effortlessly tidy up your datasets.
Key Features and Benefits of PyJanitor:
Inspired by the R Package Janitor: PyJanitor takes inspiration from the popular R package “janitor,” known for its user-friendly data cleaning functions. Now, Python users can enjoy the same convenience and ease.
Built on Top of Pandas: PyJanitor seamlessly integrates with the powerful pandas library, leveraging its data manipulation capabilities. If you’re already familiar with pandas, you’ll find PyJanitor a breeze to work with.
Supports Method Chaining: One of PyJanitor’s standout features is its support for method chaining. This means you can string together multiple data cleaning operations, making your code more concise and readable.
Provides a Collection of General and Domain-Specific Functions: Whether you’re working on financial data, scientific datasets, or any other domain, PyJanitor offers a rich set of functions tailored to your specific needs.
Installation and Setup
Now that you’re eager to get started with PyJanitor, let’s dive right in. In this section, we’ll guide you through the PyJanitor installation process. We will also import a dummy dataset that we will use for data cleaning examples throughout this tutorial.
Installing PyJanitor
You can install PyJanitor using your preferred Python package manager—whether it’s PyPI, or Conda.
Using PyPI (Python Package Index): Open your terminal or command prompt and enter the following command:
pip install pyjanitorUsing Conda: If you’re using Conda, you can install PyJanitor from the Conda-Forge channel with the following command:
conda install -c conda-forge pyjanitorImporting PyJanitor and Pandas
With PyJanitor installed, let’s import the relevant libraries. You’ll want to import both the PyJanitor and Pandas libraries to run scripts in this tutorial.
import janitor
import pandas as pd
Loading a Sample dataset
To practice your data cleaning skills, it’s helpful to work with a sample dataset. In this article, you will work with the Melbourne Housing Snapshot dataset. You can manually download the dataset from Kaggle or import the Kaggle dataset directly into Google Colab and load it into a Pandas DataFrame using the following code:
housing_df = pd.read_csv(r"D:\Datasets\melb_data.csv")

#Display the first few rows of the dataset
housing_df.head()
Output:
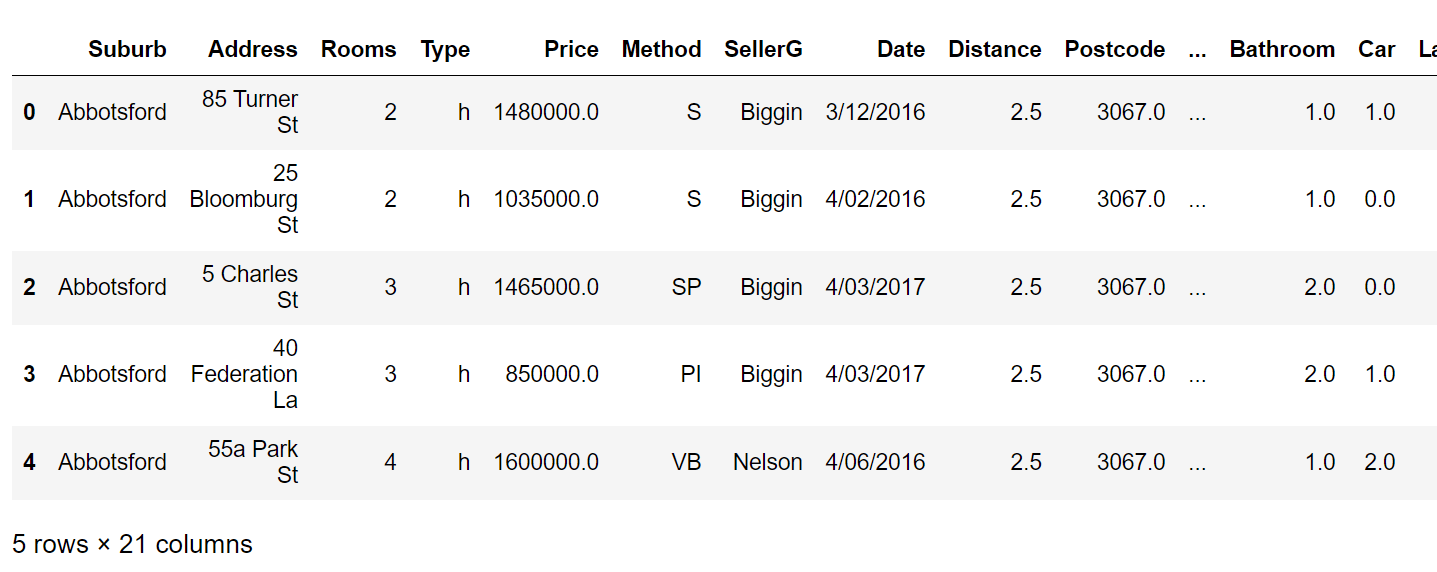
Now that you’ve successfully installed PyJanitor, imported the necessary libraries, and loaded a dataset, you’re all set to embark on your data cleaning journey. In the next section, we’ll start exploring the powerful data cleaning functions PyJanitor has to offer.
Data Cleaning with PyJanitor
In this section, we’ll show you how to perform common data cleaning tasks with PyJanitor.
1. Cleaning Column Names
The first step in any data cleaning process is often addressing messy column names. PyJanitor makes this task easier with the help of the clean_names() method.
In order to demonstrate the use of the clean_names() method, let me first rename some columns manually so they’re a little messier. The following script renames the BuildingArea and YearBuilt columns.
housing_df = housing_df.rename(columns={'BuildingArea': 'building area',
                                        'YearBuilt': 'Year-Built'})
housing_df.head()
Output:
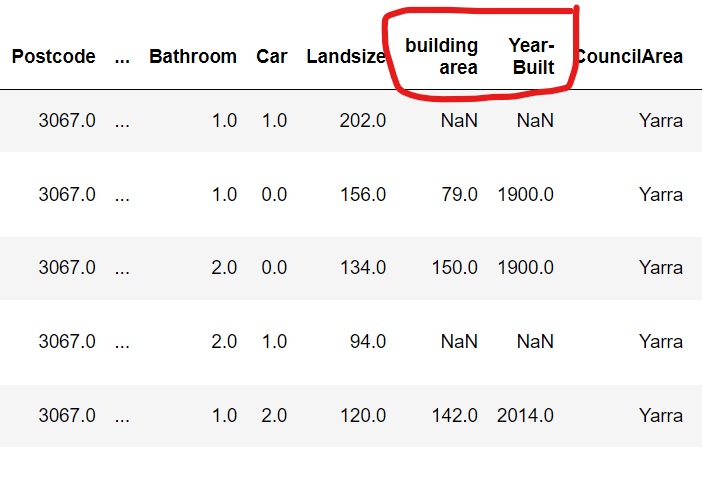
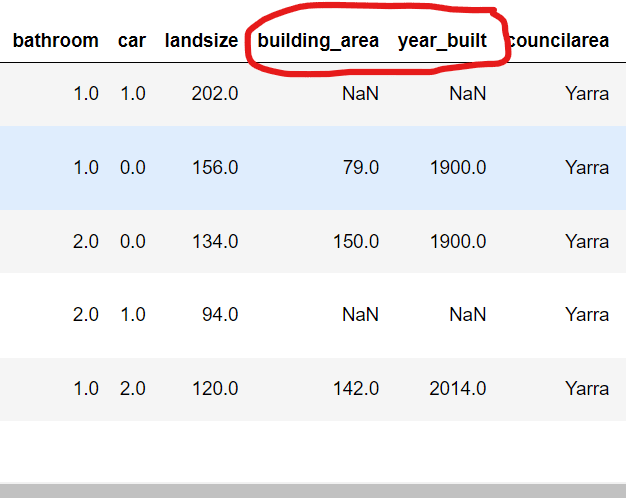
The clean_names() method will uniformly convert all column names to lower case and will replace all spaces and symbols with an underscore symbol, as shown in the output below.
housing_df_cleaned = housing_df.clean_names()
housing_df_cleaned.head()
Output:
2. Removing Empty Rows and columns
A dataset often comes with emtpy rows and columns which you can remove using the remove_empty() method.
housing_df_cleaned = housing_df_cleaned.remove_empty()3. Splitting Data into Features and Targets
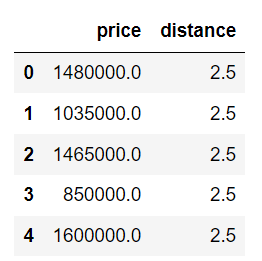
When working with machine learning, you often need to separate features from the target variable. PyJanitor simplifies this operation using the get_features_targets() method. You need to pass the target column names in a list to the target_column_names attribute.
X, y = housing_df_cleaned.get_features_targets(target_column_names = ["price", "distance"] )
y.head()
Output:
4. Adding/Removing columns
You can use the add_column() method to add a new column to an existing Pandas DataFrame. Here is an example where we add a new column titled new column and set all their values to
housing_df_cleaned = housing_df_cleaned.add_column(column_name = "new column", value = "A")
housing_df_cleaned.head()
Output:
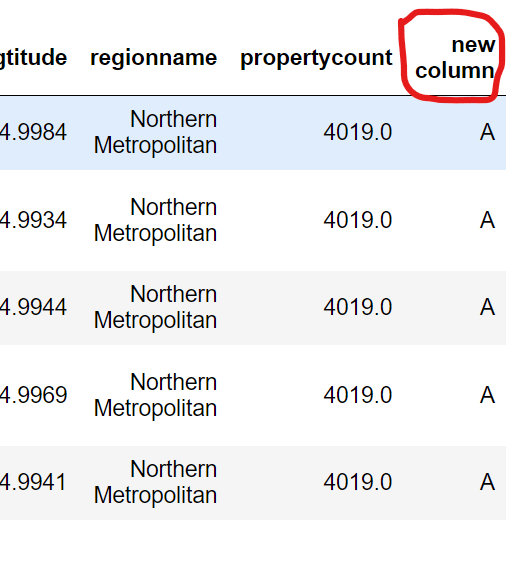
Similarly, you can use the remove_columns() method to remove multiple columns from your Pandas DataFrame.
housing_df_cleaned = housing_df_cleaned.remove_columns(column_names = ["new column"])
housing_df_cleaned.head()
Notice the new column column we added is now gone.
5. Concatenating and De-concatenating columns
Concatenating and de-concatenating two columns is important for merging or separating information within datasets, enabling flexible data manipulation and analysis without data loss or duplication.
The concatenate_columns() method allows you to concatenate columns passed to its column_names attribute. You also need to pass the name for your merged column and the separator used to separate values from the original columns. Here is an example that merges the suburb and regionname columns using colon as a separator.
housing_df_cleaned = housing_df_cleaned.concatenate_columns(column_names = ["suburb", "regionname"],
                                                           new_column_name = "Area",
                                                           sep = ":")

housing_df_cleaned.head()
Output:
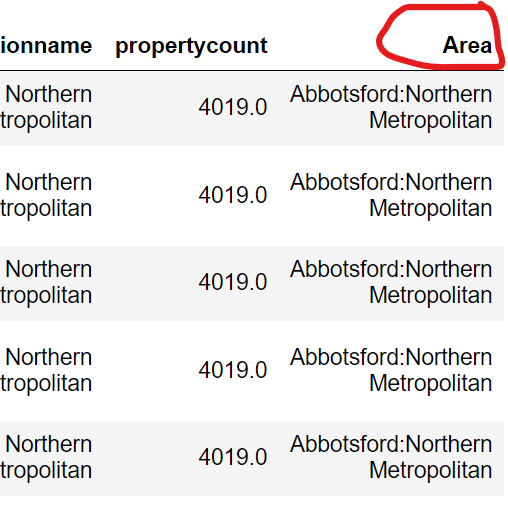
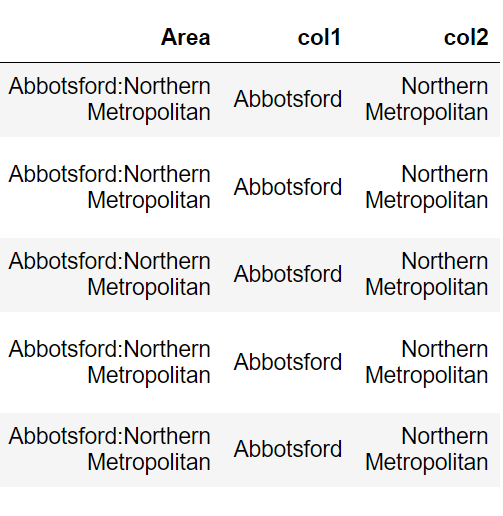
Similarly, you can de-concatenate or separate two columns using the deconcatenate_column() method, as shown in the following exmaple.
housing_df_cleaned = housing_df_cleaned.deconcatenate_column("Area",
                                                              sep =":",
                                                              autoname = "col")

housing_df_cleaned.head()
Output:
6. Finding Duplicate rows
Duplicate rows can be a problem in a Pandas DataFrames because they can distort statistical analyses and lead to incorrect insights due to data redundancy. Therefore, it is essential to find duplicate rows in your DataFrame. You can find duplicate rows using the get_dupes() method.
housing_df_cleaned.get_dupes()7. Moving Rows and columns
PyJanitor contains a move() method, which you can use to change the positions of rows and columns in a Pandas DataFrame.
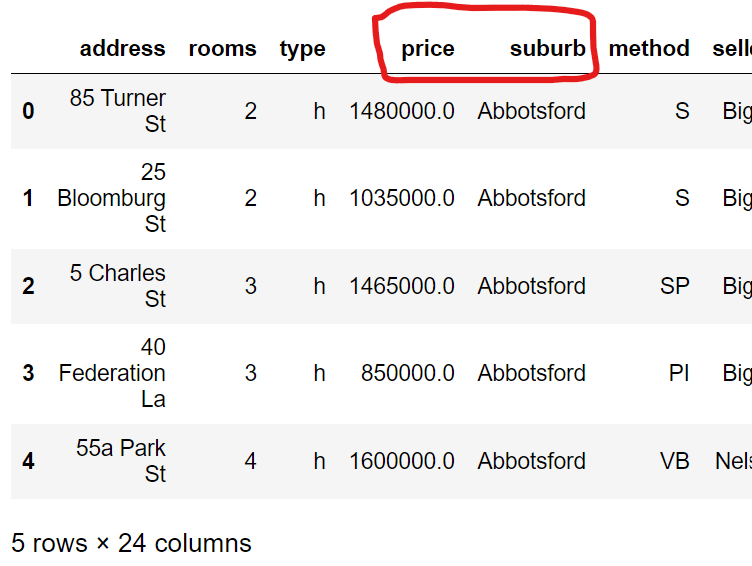
For instance, the following script moves the suburb column one position after the price column. The axis = 1 here specifies that we want to move columns.
housing_df_cleaned = housing_df_cleaned.move(source = "suburb",
                                            target = "price",
                                            axis = 1,
                                            position = 'after')

housing_df_cleaned.head()
Output:
To move a row, you have to pass the row indexes. For instance, the following script moves the row at index 0 to one position before the row at index 2.
housing_df_cleaned = housing_df_cleaned.move(source = 0,
                                            target = 2,
                                            axis = 0,
                                            position = 'before')

housing_df_cleaned.head()
Output:
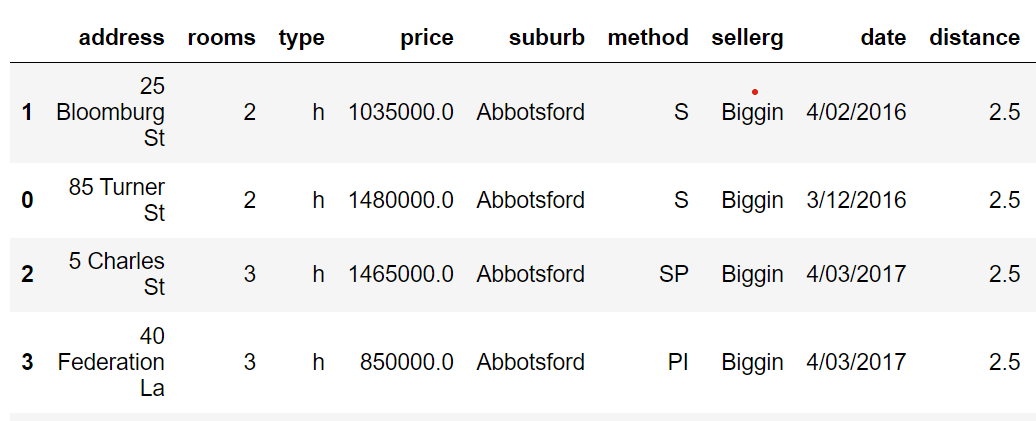
See how the row indexing in the first column now goes 1, 0, 2, 3? That shows we’ve successefully moved row 0 one position down so it now resides above row 2.
8. Update Columns Based on Conditions
Updating DataFrame columns based on conditions in other columns is crucial for data preprocessing, as it allows for feature engineering and the creation of new insights tailored to specific analytical needs. The update_where() method allows you to achieve this task.
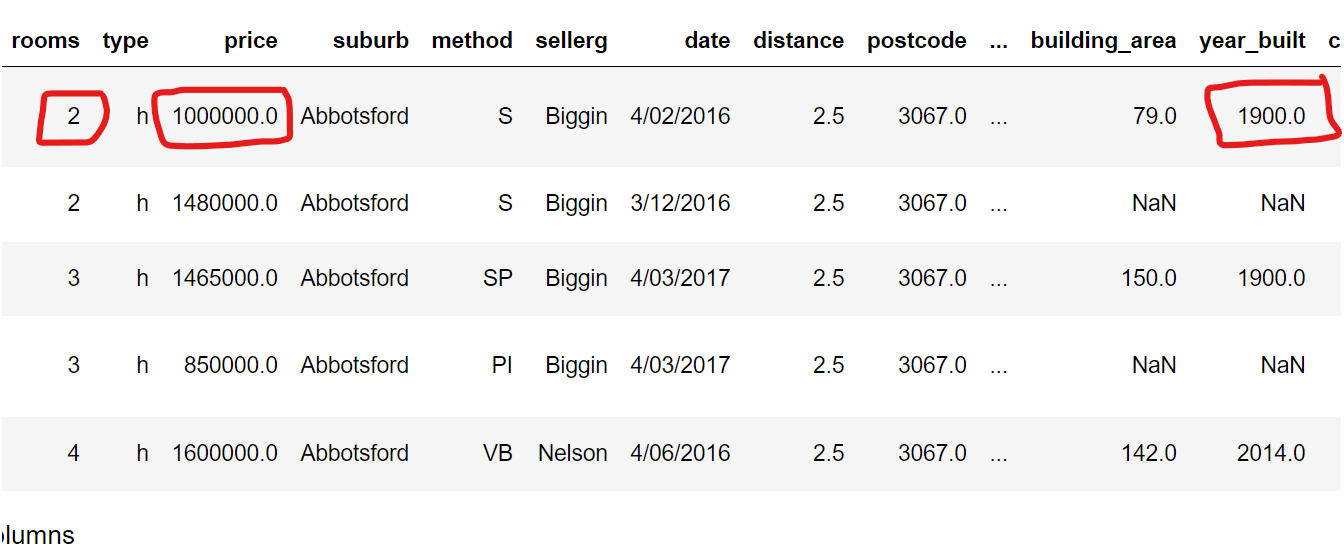
For example, in the following example, we assign a price of $1,000,000 to houses constructed before 1950 with exactly 2 rooms.
housing_df_cleaned = housing_df_cleaned.update_where(conditions = (housing_df_cleaned.year_built < 1950) & (housing_df_cleaned.rooms == 2),
                                                     target_column_name = "price",
                                                     target_val = 1000000
                                                    )

housing_df_cleaned.head()
Output:
Conclusion
In conclusion, PyJanitor stands as a valuable asset in the toolkit of data enthusiasts and professionals alike, streamlining the often intricate process of data cleaning. Throughout this article, we’ve explored its versatile features and functions, accompanied by hands-on examples. Armed with the power of PyJanitor, you’re now equipped to effortlessly prepare and cleanse your data. Whether you’re doing data analysis or machine learning, PyJanitor’s simple approach will save you time and help you get better results. So, give it a try and see how it can make your data cleaning job simpler and more efficient. Happy data cleaning!
