Introduction | Design Splash Screen | Animate Splash Screen | Hide Title Bar (Optional) | Display Splash Screen | Final Thoughts
Introduction
Give your spreadsheet the grand entrance it deserves by designing and displaying an awesome animated splash screen when your workbook is opened. A high-quality launch page for your spreadsheet is just what it needs to make it look more professional. This VBA tutorial will give you step by step instructions on how to build and display an eye-catching splash screen when someone opens your workbook, so you’ll be able to stand out among the growing Excel crowd.
Design Splash Screen
The fun part of creating a splash screen is actually designing your UserForm. If you’re new to VBA, follow these steps to add a UserForm.
- Open the VBA Editor (Alt+F11)
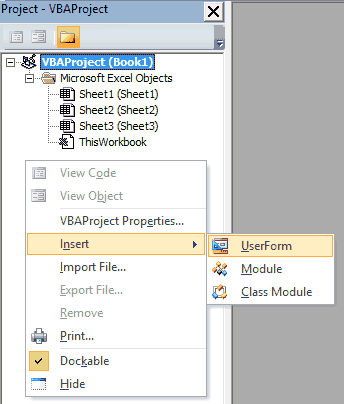
- Insert a UserForm
- Right-click the Project Explorer Pane
- Hover over Insert
- Click Userform

- Start designing!
You can design your splash screen however you like. When I create an Excel splash screen, I like to include a logo, the title of my project, my name, a copyright year, a link to my website and a label at the bottom that I’ll use to update the status.
It doesn’t matter what you name your objects, but if you’d like to follow along exactly how my splash screen is labeled then you can match the following 2 object names:
- Name your userform
SplashUserForm . - Name the last label - the one that says “Loading Data…” in the image below -
Label1 .
Don’t worry about the caption of your userform. We’re going to hide the title bar when we’re done so people won’t even see it!
Here’s an example of my splash screen for a Species List project I’m working on. If you’re interested, my Species List project is a project for documenting, tracking and trending the animals you see in your area.

Animate Splash Screen
Let’s apply a quick animation to our Excel splash screen. As it loads, we’ll change the caption of
'PLACE IN YOUR USERFORM CODE
Private Sub UserForm_Activate()
    Application.Wait (Now + TimeValue("00:00:01"))
    SplashUserForm.Label1.Caption = "Loading Data..."
    SplashUserForm.Repaint
    Application.Wait (Now + TimeValue("00:00:01"))
    SplashUserForm.Label1.Caption = "Creating Forms..."
    SplashUserForm.Repaint
    Application.Wait (Now + TimeValue("00:00:01"))
    SplashUserForm.Label1.Caption = "Opening..."
    SplashUserForm.Repaint
    Application.Wait (Now + TimeValue("00:00:01"))
    Unload SplashUserForm
End Sub
Make powerful macros with our free VBA Developer Kit It’s easy to copy and paste a macro like this, but it’s harder make one on your own. To help you make macros like this, we built a free VBA Developer Kit and wrote the Big Book of Excel VBA Macros full of hundreds of pre-built macros to help you master file I/O, arrays, strings and more - grab your free copy below.
What this does is update the caption of Label1 every 1 second, before exiting the userform. Be patient! I’ll show the Excel splash screen in action in a few minutes! Before I do that, let’s fine-tune how the screen displays.
Hide Title Bar (Optional)
This section is optional! If you’re in a hurry or this section looks too complicated, you can skip to the section titled Display Splash Screen.
Most of the hard work is done. The next few steps control how we want the excel splash screen to display. Consider this section a visual enhancement.
Right now, if we display our userform, you’ll still see the title bar showing “UserForm1” with the red X in the upper right. We want to hide that. Hiding the title bar makes your splash screen look incredible! Let’s begin.
- Insert a Standard Module
- Right-click the Project Explorer Pane
- Hover over Insert
- Click Module

- Paste the following macro into the module
'PLACE IN A STANDARD MODULE
Option Explicit
Option Private Module

Public Const GWL_STYLE = -16
Public Const WS_CAPTION = &HC00000
Public Declare Function GetWindowLong _
                       Lib "user32" Alias "GetWindowLongA" ( _
                       ByVal hWnd As Long, _
                       ByVal nIndex As Long) As Long
Public Declare Function SetWindowLong _
                       Lib "user32" Alias "SetWindowLongA" ( _
                       ByVal hWnd As Long, _
                       ByVal nIndex As Long, _
                       ByVal dwNewLong As Long) As Long
Public Declare Function DrawMenuBar _
                       Lib "user32" ( _
                       ByVal hWnd As Long) As Long
Public Declare Function FindWindowA _
                       Lib "user32" (ByVal lpClassName As String, _
                       ByVal lpWindowName As String) As Long

Sub HideTitleBar(frm As Object)
    Dim lngWindow As Long
    Dim lFrmHdl As Long
    lFrmHdl = FindWindowA(vbNullString, frm.Caption)
    lngWindow = GetWindowLong(lFrmHdl, GWL_STYLE)
    lngWindow = lngWindow And (Not WS_CAPTION)
    Call SetWindowLong(lFrmHdl, GWL_STYLE, lngWindow)
    Call DrawMenuBar(lFrmHdl)
End Sub
Once you do this, go back to your SplashUserForm code and paste the following macro:
'PLACE IN YOUR USERFORM CODE
Private Sub UserForm_Initialize()
    HideTitleBar Me
End Sub
Display Splash Screen
To be an effective splash screen, you want it to display when your spreadsheet is first opened. To do that, double-click ThisWorkbook in your Project Explorer Pane and paste the following VBA macro:
'PLACE IN ThisWorkbook SHEET MODULE
Private Sub Workbook_Open()
    Application.ScreenUpdating = False
    ActiveWindow.Visible = False
    SplashUserForm.Show
    Windows(ThisWorkbook.Name).Visible = True
    Application.ScreenUpdating = True
End Sub
We’re done! Save your workbook, close it and reopen it to see your incredible Excel Splash Screen masterpiece.

Excel Splash Screen in Action
Pretty cool, isn’t it?
Final Thoughts
Now that you know how to make an Excel Splash Screen, go out and impress your boss!
Combine this tutorial with my guide on making transparent UserForms or fading your VBA UserForm for some truly spectacular splash screens.
That’s all for this tutorial. When you’re ready to take your VBA to the next level, subscribe using the form below and share this article with your friends on Facebook and Twitter.

