In this tutorial, you will learn how to fine-tune a Hugging Face model within the TensorFlow Keras framework. You will discover how to integrate a Hugging Face model as a layer in the Keras functional API. As a practical example, we will implement a model for classifying messages as ham or spam using TensorFlow Keras. This model will employ the BERT transformer from Hugging Face as its text encoder layer.
While the Hugging Face library offers the Trainer class for model fine-tuning, this may not suffice for specialized use cases, especially when incorporating additional layers into Hugging Face models for tailored tasks. Fortunately, Hugging Face models can be seamlessly integrated as layers in both PyTorch and TensorFlow Keras. Having previously discussed fine-tuning Hugging Face models in PyTorch, this tutorial will concentrate on TensorFlow Keras. Let’s get started.
Importing and Installing Required Libraries
The first step is to install and import the libraries we’ll use throughout this tutorial.
We’re going to use the transformers library from Hugging Face to access the BERT model and tokenizer. The following script installs this library.
!pip install transformers -qSince we’re using a Google Colab notebook, we won’t need to install any other library.
The following script imports the required libraries. If you’re not using Google Colab, these import statements will help you see which libraries are required.
import pandas as pd
import numpy as np
from sklearn.model_selection import train_test_split
from transformers import AutoTokenizer, TFBertModel
import tensorflow as tf
from tensorflow.keras.callbacks import ModelCheckpoint
Importing and Preprocessing the Dataset
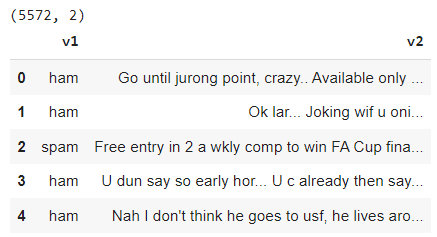
We’ll use a dataset of SMS messages that are labeled as ham (legitimate) or spam (fraudulent). You can download the dataset from this Kaggle Link.
The dataset is in CSV format and comprises five columns: v1, v2, Unnamed: 2, Unnamed: 3, and Unnamed: 4. The v1 column holds labels while the v2 contains messages. The remaining columns are empty.
If you are using Google Colab, remember there’s a simple way to import your kaggle datasets using Google Drive.
The following script imports the dataset into a Pandas dataframe and removes all the columns except v1 and v2. The script also prints the dataset header.
dataset = pd.read_csv(r"/content/spam.csv", encoding = "latin")
dataset = dataset[["v1","v2"]]
print(dataset.shape)
dataset.head()
Output:

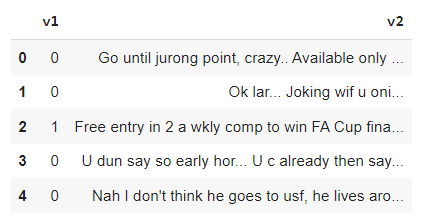
Since deep learning models work with numbers, we will encode the labels as 0 for ham and 1 for spam.
dataset['v1'] = dataset['v1'].map({'ham': 0, 'spam': 1})
dataset.head()
Output:

Finally, we will split the dataset into 80% training and 20% test sets.
train_texts, test_texts, train_labels, test_labels = train_test_split(dataset['v2'], dataset['v1'], test_size=0.2, random_state=42)Tokenize the Dataset
Next, we will tokenize the text messages using the AutoTokenizer class from the transformers library. This class will load the tokenizer for the bert-base-uncased model, an uncased version of the BERT transformer. The tokenizer will convert the texts into numerical tokens that can be fed into the model.
We will also apply some options to the tokenizer, such as padding, truncation, and max length, to ensure that all the text messages have the same length and format.
Okay, let’s define the tokenize_data function and apply it to the training and test sets.
tokenizer = AutoTokenizer.from_pretrained("bert-base-uncased")

def tokenize_data(texts):
    return tokenizer(texts.to_list(), padding=True, truncation=True, max_length=128, return_tensors="tf")

train_encodings = tokenize_data(train_texts)
test_encodings = tokenize_data(test_texts)
Defining TensorFlow Keras Model with Hugging Face BERT transformer
Next, we will define our TensorFlow Keras model that will integrate the BERT transformer as a text encoder layer.
We will load the bert-base-uncased model using the TFBertModel class from the transformers library. We will then create our model using the Keras functional API.
Our model will have two input layers for the input ids and the attention mask, which are the outputs of the tokenizer. We will pass these inputs to the BERT model layer, returning a pooled output representing the whole text.
We will add additional layers on top of the pooled output, such as a dropout layer, a dense layer, and a final output layer with a sigmoid activation function. This output layer will predict the probability of the text being spam or ham.
We will compile our model with the Adam optimizer, the binary cross-entropy loss function, and the accuracy metric.
bert_model = TFBertModel.from_pretrained("bert-base-uncased")

input_ids = tf.keras.layers.Input(shape=(128,), dtype=tf.int32, name='input_ids')
attention_mask = tf.keras.layers.Input(shape=(128,), dtype=tf.int32, name='attention_mask')

outputs = bert_model(input_ids, attention_mask=attention_mask)

pooled_output = outputs.pooler_output

x = tf.keras.layers.Dropout(0.1)(pooled_output)
x = tf.keras.layers.Dense(32, activation='relu')(x)
output = tf.keras.layers.Dense(1, activation='sigmoid')(x)

model = tf.keras.Model(inputs=[input_ids, attention_mask], outputs=output)

model.compile(optimizer=tf.keras.optimizers.Adam(learning_rate=2e-5),
              loss='binary_crossentropy',
              metrics=['accuracy'])
Finally, we will train the model for two epochs and reserve 20% of the training set to validate model performance after every epoch.
model.fit(
    {'input_ids': train_encodings['input_ids'],
     'attention_mask': train_encodings['attention_mask']},
    train_labels.to_numpy(),
    validation_split=0.2,
    epochs=2,
    batch_size=32,
    verbose = 1,
)
Output:
Epoch 1/2
112/112 [==============================] - 133s 815ms/step - loss: 0.1496 - accuracy: 0.9383 - val_loss: 0.0719 - val_accuracy: 0.9832
Epoch 2/2
112/112 [==============================] - 92s 818ms/step - loss: 0.0266 - accuracy: 0.9930 - val_loss: 0.0874 - val_accuracy: 0.9821
The above output shows that we get a validation accuracy of 98.21%.
Evaluating the Model and Making Predictions
Finally, we will evaluate our model on the test set and make some predictions on new text messages. We will use the model.evaluate() method to calculate the loss and accuracy on the test set.
model.evaluate(
    {'input_ids': test_encodings['input_ids'],
     'attention_mask': test_encodings['attention_mask']},
    test_labels.to_numpy()
)
Output:
0.035451341420412064, 0.9901345372200012]The above output shows that the model achieves an accuracy of 99.01% on the test set. Pretty impressive, eh?
Next, we will define preprocess_single_text() and predict_single_text() functions to preprocess and predict the label for a single text, respectively.
def preprocess_single_text(text):
    encoded_input = tokenizer(text, padding='max_length', truncation=True, max_length=128, return_tensors="tf")
    return encoded_input
def predict_single_text(text):
encoded_input = preprocess_single_text(text)
prediction = model.predict({'input_ids': encoded_input['input_ids'],
'attention_mask': encoded_input['attention_mask']})
print(prediction)
predicted_label = 'spam' if prediction[0][0] >= 0.5 else 'ham'
return predicted_labelFor example, the following script calculates the label for a sample input text.
text = "You have won a free iPhone! Click here to claim your prize!"
predicted_label = predict_single_text(text)
print(f"Predicted label for '{text}': {predicted_label}")
Output:
[[0.9225279]]
Predicted label for 'You have won a free iPhone! Click here to claim your prize!': spam
The above output shows that our input text contains a spam message.
Conclusion
Now you know how to integrate a Hugging Face model as a layer in TensorFlow Keras. Using this knowledge, you can create highly specialized NLP models for downstream tasks by fine-tuning Hugging Face models in TensorFlow. For more tutorials like this one, please subscribe using the form below.
