Automatic face detection is the process of detecting faces from images and videos. Face detection is an important precursor to using facial features to perform emotion detection, surprise detection, and boredom detection. In this tutorial, we’ll walk you through the entire process, including how to detect eyes and smiles using the Python OpenCV library.
Before we begin, I want to be clear that most tutorials out there confuse the terms face detection and facial recognition. Face detection means an algorithm can detect that a human face is present in an image. Facial recognition, on the other hand, can detect the presence of a face and determine the identify of the face. Face detection is the first step toward facial recognition, and that’s that’s the step we’ll be describing today.
Installing Required Libraries
The first thing you’ll need to do is install the OpenCV library. You can do that by executing the following pip command on your command terminal.
$ pip install opencv-pythonAlthough not required for face detection, we’re going to use Matplotlib to give us more control over the images we display during our facial recognition demo. To make sure you have Matplotlib installed, run the following command on your terminal:
pip install matplotlibImporting Images with OpenCV
The next step is to import the libraries you’ll need to detect faces. Execute the following script to do so:
import cv2
import matplotlib.pyplot as plt
%matplotlib inline
The %matplotlib inline code will give you an error if you’re not using the Jupyter Notebook. If you don’t have the Jupyter Notebook installed, just comment that line out and add the line plt.show() right after the point where we start showing images. We’ll give you an example so you can follow along with or without the Jupyter Notebook.
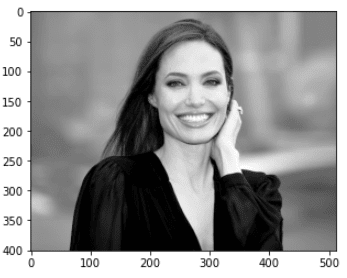
Before you can detect a face within an image in OpenCV, you need to import the image. The imread() method from the OpenCV module can be used to import an image. To plot an image, you can use the imshow() method. The following script imports and plots a random image of the famous actress Angelina Jolie. You can use whatever image you want, as long as it has a human face.
face1 = cv2.imread(r"C:/Datasets/faces/aj6.jpg", 0)
plt.imshow(face1, cmap ="gray")
Output:
If you’re not using the Jupyter Notebook, here’s the code you’ll need to make sure the image shows:
import cv2
import matplotlib.pyplot as plt
face1 = cv2.imread(r"C:/Datasets/faces/aj6.jpg", 0)
plt.imshow(face1, cmap ="gray")
plt.show()
Python Whole Face Detection
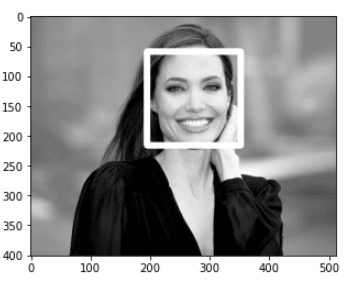
Now that we’ve read our image, let’s try to detect the face from the image you imported. To demonstrate facial detection, we’re going to plot a rectangle around the detected face. OpenCV actually contains several objects that can be used for tasks such as face detection, eye detection, and smile detection. We’re going to focus on facial detection, but to see the list of all the available objects, execute the following script:
print(cv2.data.haarcascades)The output shows the directory where OpenCV objects for face detection and other tasks are stored. On my system, I get the following path. Depending on your OS and environment variable setup, you might get a different path.
Output:
'C:\ProgramData\Anaconda3\lib\site-packages\cv2\data\'You can navigate to that folder if you want to see all the options available, but we’re not going to worry about that just yet. We’re ready to detect faces.
The most commonly used OpenCV object used to detect faces is “haarcascades_frontalface_default.xml”. The following script imports the object and stores it in the
fd = cv2.CascadeClassifier(cv2.data.haarcascades + 'haarcascade_frontalface_default.xml')Next, to detect the face and plot a rectangle around it, we’ll write a simple method which accepts an image object as a parameter and returns the same object with rectangles drawn around faces in the image.
Look at the following script. Here you define a method, get_detected_face(). Inside the method, you first copy the image object into a local variable. Next, you call the detectMultiScale() method using the rectangle() method can then be used to plot rectangles around all the detected faces. After that, the final image, with the drawn rectangles, is returned to the calling function. Here’s the full `get_detected_face() method:
def get_detected_face (face):
    face_img = face.copy()
    fr = fd.detectMultiScale(face_img)
    for (x,y,width,height) in fr:
        cv2.rectangle(face_img, (x,y), (x + width, y+height), (255,255,77), 10)
    return face_img
Once you have the method defined, you simply need to call the get_detected_face() method with the OpenCV image object you read earlier.
result = get_detected_face(face1)The image returned by the get_detected_face() method can be plotted via the imshow() method as shown in the following script:
plt.imshow(result, cmap = "gray")If the plt.imshow statement doesn’t work for you, simply add plt.show() on the next line:
plt.imshow(result, cmap = "gray")
plt.show()
Either way, the output shows that the face has been detected and a rectangle was successfully drawn around the detected face.
Output:
We’re going to dive into eye detection and smile detection shortly, but I wanted to share the full code we just built for Python face detection using OpenCV:
import cv2
import matplotlib.pyplot as plt
face1 = cv2.imread(r"C:/Datasets/faces/aj6.jpg", 0)
fd = cv2.CascadeClassifier(cv2.data.haarcascades + 'haarcascade_frontalface_default.xml')

def get_detected_face (face):
    face_img = face.copy()
    fr = fd.detectMultiScale(face_img)
    for (x,y,width,height) in fr:
        cv2.rectangle(face_img, (x,y), (x + width, y+height), (255,255,77), 10)
    return face_img

result = get_detected_face(face1)
plt.imshow(result, cmap = "gray")
plt.show()
The above script is the version of the Python code that doesn’t rely on the Jupyter Notebook.
Python Eye Detection
OpenCV contains objects you can use to detect eyes within a face. The most commonly used object is the “haarcascades_eye.xml” object. The following script imports this object.
ed = cv2.CascadeClassifier(cv2.data.haarcascades + 'haarcascade_eye.xml')The rest of the process is identical to the process we took for face detection. You can create a method which accepts an image and uses eye detector to detect the eyes in an image. Rectangles are drawn around the eyes and the resultant image is returned to the calling function. Here’s an example.
def get_detected_eyes (image):
    face_img = image.copy()
    er = ed.detectMultiScale(face_img)
    for (x,y,width,height) in er:
        cv2.rectangle(face_img, (x,y), (x + width, y+height), (255,255,77), 10)
    return face_img
Next, you call the get_detected_eyes() method and plot the resultant image using the imshow() method, like this:
result = get_detected_eyes(face1)
plt.imshow(result, cmap = "gray")
Again, remember to add plt.show() to the end if you’re not using the Jupyter Notebook.
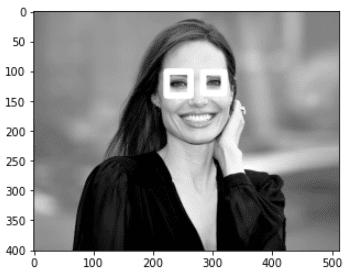
The output confirms that eyes were successfully detected.
Output:
Python Smile Detection
OpenCV helps you detect human smiles from images, as well. The object used for smile detection is “haarcascade_smile.xml”.
The process is similar to eye and face detection. You first need to import the smile detector object.
sd = cv2.CascadeClassifier(cv2.data.haarcascades + 'haarcascade_smile.xml')Next, you need to define a method that accepts an image as a parameter and returns an image with bordered smile as shown in the following script.
def get_detected_smile (face):
    face_img = face.copy()
    sr = sd.detectMultiScale(face_img)
    for (x,y,width,height) in sr:
        cv2.rectangle(face_img, (x,y), (x + width, y+height), (255,255,77), 10)
        return face_img
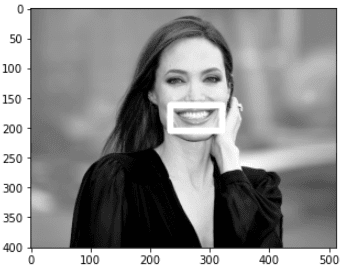
Finally, you can plot the image returned by the get_detected_smile() method to see if smile has been detected successfully or not. Run the following script for that.
result = get_detected_smile(face1)
plt.imshow(result, cmap = "gray")
Output:
It’s worth noting that smile detection can be pretty inaccurate. We indented our return statement in the example above to only draw one rectangle. Otherwise, you’ll have rectangles drawn all over the image with false identification of smiles. The downside of this is that indenting this way will prevent multiple smiles from being detected if their are multiple faces in an image.
This was a great introduction to Python face detection using the OpenCV module. For a more detailed look into face detection and facial recognition, subscribe using the form below.


