Use the FileSystemObject TextStream to create a text file with VBA CreateTextFile. The TextStream is a class of the Microsoft Scripting Runtime object library and the CreateTextFile method, as you might have guessed, is a handy way to quickly create text files. The combination of TextStream and CreateTextFile make creating text files a breeze.
In case you haven’t already done so, read our tutorial on writing to a text file with VBA Print statement for an alternate way to create text files in VBA. Also check out our introduction to the VBA FSO tutorial for background info on the scripting object used for creating text files in this tutorial.
In this tutorial we’re going to show you how to create a text file using the FileSystemObject (FSO) and the methods of the
We’ll start with the basic setup of a TextStream and explain the various methods for writing text content to it. Next, we’ll show you a more advanced example where you pass an input range as a parameter to a procedure which then creates a text file containing all the text from your input. You’ll be able to separate the rows and columns by a delimiter of your choice in the text file. Finally, we’ll briefly discuss some powerful application ideas and when not to use the FSO
- VBA CreateTextFile Basic Setup
- TextStream Write methods
- Create text file from range of values
- CreateTextFile Application Ideas
- Comments
Now, let’s get started with the basic setup!
VBA CreateTextFile Basic Setup
Start by opening the Visual Basic Editor by pressing Alt+F11. Then, go to Tools > References… and set a reference to the Microsoft Scripting Runtime object library.
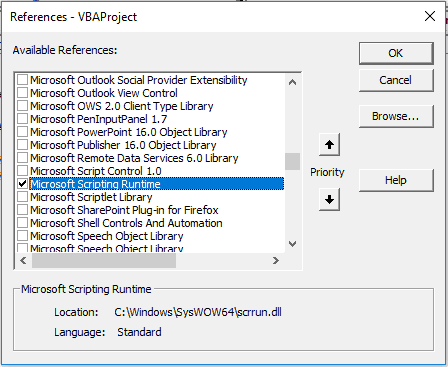
VBA Microsoft Scripting Runtime Reference
Next, paste the code below into a standard code module:
Sub CreateTextFileBasic()
    'Must add reference to Tools > References > Microsoft Scripting Runtime
    ' (1) Open an instance of the FileSystemObject.
    ' (2) Open an instance of the FileSystemObject TextStream.
    ' (3) Write two example lines of text to the TextStream object.
    ' (4) Close the TextStream object.

    Dim fso As Scripting.FileSystemObject
    Dim tsTxtFile As Scripting.TextStream

    ' (1) Open an instance of the FileSystemObject.
    Set fso = New Scripting.FileSystemObject

    ' (2) Open an instance of the FileSystemObject TextStream class.
    Set tsTxtFile = fso.CreateTextFile("C:\Test\test.txt", True)

    ' (3) Write two example lines of text to the TextStream object.
    tsTxtFile.WriteLine "This is the first line"
    tsTxtFile.WriteLine "This is the second line"

    ' (4) Close the textstream object
    tsTxtFile.Close

End Sub
Make powerful macros with our free VBA Developer Kit It’s easy to copy and paste a macro like this, but it’s harder make one on your own. To help you make macros like this, we built a free VBA Developer Kit and wrote the Big Book of Excel VBA Macros full of hundreds of pre-built macros to help you master file I/O, arrays, strings and more - grab your free copy below.
The TextStream object is used for creating the text file and we use the
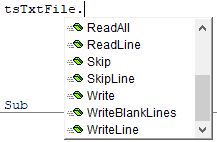
VBA CreateTextFile Auto List Members
The members of this object, listed in the picture above, are not all write methods. This object can also be used for reading text files. In this tutorial, however, we’ll focus solely on the write methods of the CreateTextFile object but look forward to our future tutorial devoted entirely to the read methods of this object.
In the basic setup procedure above, we first set up the
The
The first parameter,
The second parameter,
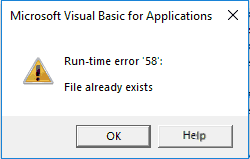
VBA File already exists run-time error 58
The third parameter is a Boolean type variable which specifies whether you want to encode the text using the ANSI (American National Standards Institute) code page or Unicode (an international encoding standard). The ANSI code page is the “native” or standard code page on a computer system whereas Unicode is typically used when you need to include “foreign” or other special characters in your text file. The default value of this optional parameter is
Now, let’s take a closer look at the very useful write methods of the
TextStream Write methods
The write methods of the TextStream object are shown in the table below.
| Method | Description |
|---|---|
| .Write | The method takes as parameter the string to be written to the TextStream. The input string is appended to any existing content in the TextStream on the same line as the existing content. |
| .WriteBlankLines | The method takes one parameter, the number of blank lines to be written to the TextStream. This is the TextStream equivalent of the |
| .WriteLine | The method takes as parameter the string to be written to the TextStream and adds a carriage return to it. In other words, the input string is appended as a separate line to the TextStream. |
Hopefully, these methods seem quite intuitive to you. You access them by chaining onto (adding a dot behind) the
It’s now time to present a more advanced example where we create a text file based on values from an input range! This is actually a really useful example, so stick with me.
Create text file from range of values
First, insert the following example data into cell “A1” of an empty sheet:
| Index | Value |
|---|---|
| 1 | A |
| 2 | B |
| 3 | C |
Next, paste the code below into a standard code module:
Sub CreateTextFileFromRange(rngInput As Range, strFileName As String, strDelim As String)

    'Must add reference to Tools > References > Microsoft Scripting Runtime
    Dim rngCol As Range, rngRow As Range
    Dim fso As Scripting.FileSystemObject
    Dim strRow As String
    Dim tsTxtFile As Scripting.TextStream

    Set fso = New Scripting.FileSystemObject
    Set tsTxtFile = fso.CreateTextFile(strFileName, True)

    ' Write each line of text in the range to the text file
    For Each rngRow In rngInput.Rows
        strRow = vbNullString
        For Each rngCol In rngRow.Columns
            strRow = strRow & strDelim & rngCol.Text
        Next rngCol

        ' write concatenated row content to separate new line
        tsTxtFile.WriteLine Right(strRow, Len(strRow) - 1)
    Next rngRow

    ' Close textstream
    tsTxtFile.Close

    ' Open text file in Notepad
    Call Shell("notepad.exe """ & strFileName & """", vbNormalFocus)

End Sub
You invoke the procedure above like this:
Sub ConvertRangetoFile()
Call CreateTextFileFromRange(ThisWorkBook.Sheets("Test").Range("A1:B4"), "C:\Test\test.txt", Chr(9))
End Sub
The first parameter of the procedure,
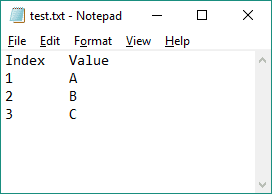
Use VBA to convert range to text file
The second parameter,
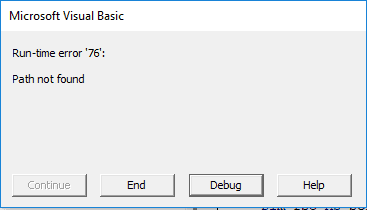
VBA Path does not exist run-time error 76
To avoid this error, you can use the VBA Dir function and pair it with VBA MkDir to make your folder if it doesn’t already exist.
The third parameter,
Next, the
Note, multiline cells will be printed on the same line by the procedure! If you wish to have these printed on separate lines, you need to incorporate a check for the linefeed character,
If InStr(1, rngCol.Value, vbLf) > 0 Then Debug.Print "Multiline: " & rngCol.TextAfter looping through all the rows, we close the TextStream with the
Finally, as a bonus, we’ve included a VBA Shell command which displays your newly created text file in the Notepad text editor. You can replace the reference with that of another text editor if you wish, or you can simply delete this line of code if it doesn’t suit your needs at all.
CreateTextFile Application Ideas
Separate text files are created for a multitude of reasons and some of the most important ones are listed below:
- Log files. Let’s say you want to distribute an application to several of your coworkers. You could then create a log files with individual user information on a shared network drive, rather than having to examine each individual instance of the application each time an error occurred. I’ve also used log files when exporting outlook emails to a folder for archival. The log file lists files that could not be exported for whatever reason.
- Collection of data/data extraction. The
CreateTextFile object is very powerful in combination with other methods of the FSO, which allow you to easily iterate through folders and files and retrieve any information you require. This is particularly true when you need to construct a text file to be imported into another computer system, like a financial management system. - Data backup. In case you want to do personal backups of sensitive data in your files and you want to take up as little disk space as possible, generating separate data text files could be the solution for you.
One word of caution, though. As we noted in our introduction to the VBA FSO tutorial, if you’re writing a program meant to be used by people in different countries, you should NOT use the FSO for writing to binary files! This is because the user’s default ANSI code page may differ from yours. Some countries, such as Japan, uses a double-byte character set, whereas most Western countries, including the US, don’t. Unless the character sets match, the bytes you’re writing to the file will be interpreted incorrectly!
That’s all for this tutorial. When you’re ready to take your VBA to the next level, subscribe using the form below.

